Table of Contents
Advertisement
Quick Links
EDS - V. Ca' Nova Zampieri 6 - 37057 S. G. Lupatoto - VERONA - Tel. +39045547529 - Fax. +390458750065 - E.mil: eds@eds.eu - Web: www.eds.eu
EDS - V. Ca' Nova Zampieri 6 - 37057 S. G. Lupatoto - VERONA - Tel. +39045547529 - Fax. +390458750065 - E.mil: eds@eds.eu - Web: www.eds.eu
EDS - V. Ca' Nova Zampieri 6 - 37057 S. G. Lupatoto - VERONA - Tel. +39045547529 - Fax. +390458750065 - E.mil: eds@eds.eu - Web: www.eds.eu
EDS - V. Ca' Nova Zampieri 6 - 37057 S. G. Lupatoto - VERONA - Tel. +39045547529 - Fax. +390458750065 - E.mil: eds@eds.eu - Web: www.eds.eu
EDS - V. Ca' Nova Zampieri 6 - 37057 S. G. Lupatoto - VERONA - Tel. +39045547529 - Fax. +390458750065 - E.mil: eds@eds.eu - Web: www.eds.eu
OPTICAL DUST
OPTICAL DUST
OPTICAL DUST
OPTICAL DUST
OPTICAL DUST
DETECTORS
DETECTORS
DETECTORS
DETECTORS
DETECTORS
RPV20
RPV20
RPV20
RPV20
RPV20
RPV20-EX
RPV20-EX
RPV20-EX
RPV20-EX
RPV20-EX
TECHNICAL MANUAL
TECHNICAL MANUAL
TECHNICAL MANUAL
TECHNICAL INSTRUCTIONS FOR
TECHNICAL INSTRUCTIONS FOR
TECHNICAL INSTRUCTIONS FOR
TECHNICAL INSTRUCTIONS FOR
TECHNICAL INSTRUCTIONS FOR
INSTALLATION, SETUP AND
INSTALLATION, SETUP AND
INSTALLATION, SETUP AND
INSTALLATION, SETUP AND
INSTALLATION, SETUP AND
EDS - TECHNICAL INSTRUCTIONS
EDS - TECHNICAL INSTRUCTIONS
EDS - TECHNICAL INSTRUCTIONS
EDS - TECHNICAL INSTRUCTIONS
EDS - TECHNICAL INSTRUCTIONS
TECHNICAL MANUAL
TECHNICAL MANUAL
MAINTENANCE
MAINTENANCE
MAINTENANCE
MAINTENANCE
MAINTENANCE
1
Advertisement
Table of Contents

Subscribe to Our Youtube Channel
Related Manuals for EDS RPV20


Summary of Contents for EDS RPV20
- Page 1 MAINTENANCE EDS - V. Ca' Nova Zampieri 6 - 37057 S. G. Lupatoto - VERONA - Tel. +39045547529 - Fax. +390458750065 - E.mil: eds@eds.eu - Web: www.eds.eu EDS - V. Ca' Nova Zampieri 6 - 37057 S. G. Lupatoto - VERONA - Tel. +39045547529 - Fax. +390458750065 - E.mil: eds@eds.eu - Web: www.eds.eu EDS - V.
- Page 2 1 - General Precautions for Usage 1 - General Precautions for Usage 1 - General Precautions for Usage 1 - General Precautions for Usage 2 - RPV20 Elements 2 - RPV20 Elements 2 - RPV20 Elements 2 - RPV20 Elements...
-
Page 3: Installation
2 - RPV20 ELEMENTS - TX -RX unit - optical reflector 2.1 - The RPV20 includes a Control Panel, 1 Transmitter/ - power supply and electronic processing switchboard. Receiver and 1 reflector. An infrared ray is emitted by the TX and directed towards the reflector which reflects it towards the RX. -
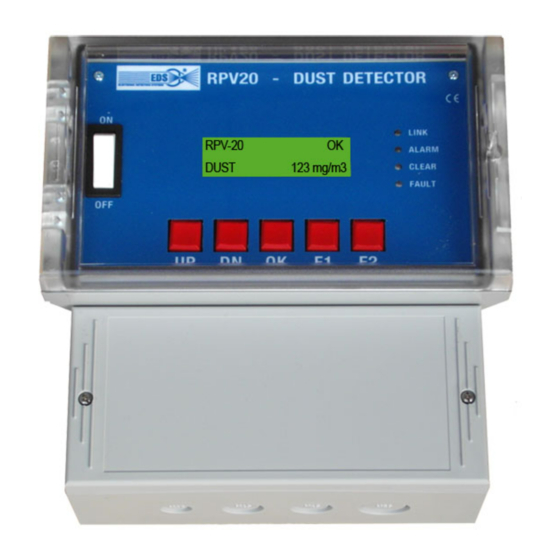
Page 4: Control Panel Menu
F1 key = entry into the configuration menu and other functions F2 key = laser aiming and other functions 4.2 - When powered the RPV20 control unit will show EDS message on display and start a sequential flashing of the LEDs on the front panel. -
Page 5: Configuration Menu
EDS - TECHNICAL INSTRUCTIONS EDS - TECHNICAL INSTRUCTIONS EDS - TECHNICAL INSTRUCTIONS EDS - TECHNICAL INSTRUCTIONS EDS - TECHNICAL INSTRUCTIONS 5 - CONFIGURATION MENU 5 - CONFIGURATION MENU 5 - CONFIGURATION MENU 5 - CONFIGURATION MENU 5 - CONFIGURATION MENU The RPV 20 detector admits a distance between 10m and 25m. - Page 6 Model RPV-20-EX Model RPV-20-EX Model RPV-20-EX Model RPV-20-EX For RPV20-EX, activate the Laser tool button on the TX transmitter and direct the beam so that is directed at the lens of the receiver. After this operation turn off the laser It will be seen that the flashing frequency will increase 6.8 - Turn on the button of the laser instrument also...
- Page 7 EDS - TECHNICAL INSTRUCTIONS EDS - TECHNICAL INSTRUCTIONS EDS - TECHNICAL INSTRUCTIONS EDS - TECHNICAL INSTRUCTIONS EDS - TECHNICAL INSTRUCTIONS 6 - LEDS QAND RELAYS 6 - LEDS QAND RELAYS 6 - LEDS QAND RELAYS 6 - LEDS QAND RELAYS...
-
Page 8: Maintenance
Do not use solvents for cleaning. We recommend a cloth wet with slightly soapy water NOTE : - In RPV20-EX the blue and red leds do the same and then dry carefully. function on both transmitter and receiver. - Page 9 EDS - TECHNICAL INSTRUCTIONS EDS - TECHNICAL INSTRUCTIONS EDS - TECHNICAL INSTRUCTIONS EDS - TECHNICAL INSTRUCTIONS EDS - TECHNICAL INSTRUCTIONS CONTROL PANEL TERMINAL BOARD CONTROL PANEL TERMINAL BOARD CONTROL PANEL TERMINAL BOARD CONTROL PANEL TERMINAL BOARD CONTROL PANEL TERMINAL BOARD...
- Page 10 Pressing Up and DOWN keys all leds and relays will be is 230. You can check the changing of the output current in activated. To quit press OK. Then RPV20 gets back to normal realtime with a multimeter during regulation on terminals AMP+ operation.
- Page 11 EDS - TECHNICAL INSTRUCTIONS EDS - TECHNICAL INSTRUCTIONS EDS - TECHNICAL INSTRUCTIONS EDS - TECHNICAL INSTRUCTIONS EDS - TECHNICAL INSTRUCTIONS CONNECTION DIAGRAM OF CONTROL PANEL AND OPTICAL UNITS CONNECTION DIAGRAM OF CONTROL PANEL AND OPTICAL UNITS CONNECTION DIAGRAM OF CONTROL PANEL AND OPTICAL UNITS...
- Page 12 EDS - TECHNICAL INSTRUCTIONS EDS - TECHNICAL INSTRUCTIONS EDS - TECHNICAL INSTRUCTIONS EDS - TECHNICAL INSTRUCTIONS EDS - TECHNICAL INSTRUCTIONS TECHNICAL DATA - RPV20 TECHNICAL DATA - RPV20 TECHNICAL DATA - RPV20 TECHNICAL DATA - RPV20 TECHNICAL DATA - RPV20 •...
- Page 13 The information contained in this document have been thoroughly evaluated and can be considered reliable. In any event the firm EDS assumes no responsibility for any inaccuracies. Additionally, the firm EDS, reserves the right to make changes to any part of this document and / or product, such as to increase the quality, reliability or design.
Need help?
Do you have a question about the RPV20 and is the answer not in the manual?
Questions and answers