Advertisement
Available languages
Available languages
Quick Links
Advertisement

Related Manuals for Little Seeds 6807218COM


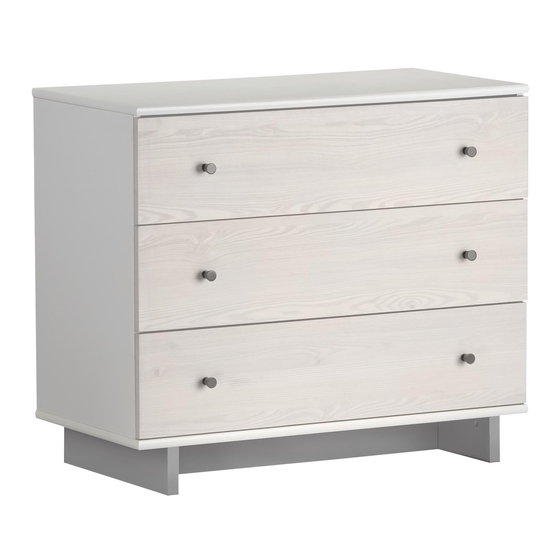
Summary of Contents for Little Seeds 6807218COM
- Page 1 B346807218COM4 Date of Purchase ___ / ___ / ___ Lot Number:...
- Page 2 Vous trouverez les traductions en français à Two adults la fin de ce manuel. recommended for assembly This product is not intended for commercial use. Do NOT return this product. Follow little seeds on For missing or broken parts - Visit littleseedskids.com - Call 1-800-489-3351...
-
Page 3: Helpful Hints
Do NOT return this product! Contact our friendly customer service team first for help. Call us! Assembly Tips 1-800-489-3351 Monday-Friday 9am - 5pm CST Tube Visit littleseedskids.com Helpful Hints - Open your item in the area you plan to keep it for less heavy lifting - Identify, sort and count the parts before attempting assembly - Compression dowels are tapped in with a hammer - Slides are labeled with a R (right) and L (left) for proper placement... - Page 4 6807218COM 3 Drawer Dresser Board Identification Bottom Left Panel Right Panel 36801015011 36801015021 36807015040 36801015030 Drawer Front Lower Back Drawer Bottom 36801000050 36807218061 36801331080 LEFT RIGHT SIDE BACK SIDE Drawer Brace Left Drawer Side Drawer Back Right Drawer Side 35538000121...
- Page 5 6807218COM 3 Drawer Dresser Board Identification This piece is paperboard construction. It is not made from wood but is required for the assembly of your unit. RIGHT SIDE BACK LEFT SIDE littleseedskids.com...
-
Page 6: Parts List
6807218COM 3 Drawer Dresser Parts List Actual Size #A12120 #A11070 #A17400 #A23030 #A21970 7/16" pan head 1/4" euro screw 8-32 x 7/8" bolt Confirmat drive fastener #A21110 #A22610 #A22910 #A22620 #A22920 Nail Cam Bolt Cam Lock Connector Bolt Connector #A21520... - Page 7 6807218COM 3 Drawer Dresser Parts List Not Actual Size #A54520 #A84050 Drawer bracket Safety Bracket Kit x3 (pairs) #A56540 Slide littleseedskids.com...
- Page 8 6807218COM 3 Drawer Dresser Before You Start Read through each step carefully and follow the proper order Separate and count all your parts and hardware Give yourself enough room for the assembly process Have the following tools: Flat Head Screwdriver, Phillips Head...
- Page 9 6807218COM 3 Drawer Dresser Step 1 Quick Assembly (x2) (x1) (x2) #A22610 #A21660 #A22620 Proper orientation of CAM LOCK littleseedskids.com...
- Page 10 6807218COM 3 Drawer Dresser Step 2 Quick Assembly (x2) (x1) (x2) #A21660 #A22610 #A22620 Proper orientation of CAM LOCK littleseedskids.com...
- Page 11 6807218COM 3 Drawer Dresser Step 3 (x6) #A56540 Extend each slide as shown. Press the black plastic lever upward and separate the two parts of the slide. Plastic Lever This part of slide goes on side panels. This part of slide goes on drawer sides.
- Page 12 6807218COM 3 Drawer Dresser Step 4 (x9) (x3) #A11070 #A56540 Outer slide separated in step 3. finished edge borde acabado bord fini littleseedskids.com...
- Page 13 6807218COM 3 Drawer Dresser Step 5 (x9) (x3) #A11070 #A56540 Outer slide separated in step 3. finished edge borde acabado bord fini littleseedskids.com...
- Page 14 6807218COM 3 Drawer Dresser Step 6 (x4) #A22610 #A84050 Do not fully tighten this screw in this step littleseedskids.com...
- Page 15 6807218COM 3 Drawer Dresser Step 7 Quick Assembly (x2) (x4) #A21660 #A22620 Proper orientation of CAM LOCK littleseedskids.com...
- Page 16 6807218COM 3 Drawer Dresser Step 8 littleseedskids.com...
- Page 17 6807218COM 3 Drawer Dresser Step 9 (x4) #A23030 littleseedskids.com...
- Page 18 6807218COM 3 Drawer Dresser Step 10 littleseedskids.com...
- Page 19 6807218COM 3 Drawer Dresser Step 11 (x14) (x6) #A21110 #A12120 Carefully place unit on its front side. IMPORTANT! THE BACK PANEL IS A STRUCTURAL PART OF THIS UNIT AND MUST BE INSTALLED PROPERLY. Align bottom holes of back panel (O) with holes of bottom back (E).
- Page 20 6807218COM 3 Drawer Dresser Step 12 Quick Assembly (x4) (x8) (x4) Proper orientation of CAM LOCK #A22610 #A22920 #A22620 You will need to tap the connector with a hammer to fully insert. Be sure the connector is positioned as shown before pushing into holes.
- Page 21 6807218COM 3 Drawer Dresser Step 13 littleseedskids.com...
- Page 22 6807218COM 3 Drawer Dresser Step 14 (x8) #A22910 littleseedskids.com...
- Page 23 6807218COM 3 Drawer Dresser Step 15 Turn connector screw clockwise to lock in place. littleseedskids.com...
- Page 24 6807218COM 3 Drawer Dresser Step 16 (x6) #A54520 #A22610 #A12120 littleseedskids.com...
- Page 25 6807218COM 3 Drawer Dresser Step 17 Quick Assembly Proper orientation of CAM LOCK (x3) (x3) #A22620 #A21520 7/16" Approx. littleseedskids.com...
- Page 26 6807218COM 3 Drawer Dresser Step 18 (x12) #A12120 You will be assembling three drawers. They all assemble in same manner. Attach a left drawer side and a right drawer side to the drawer front (F) with screws (1) as shown. Be sure the groove in the drawer sides are centered with the groove in the drawer front.
- Page 27 6807218COM 3 Drawer Dresser Step 19 raw surface superficie no terminada surface non-finie LEFT SIDE RIGHT SIDE littleseedskids.com...
- Page 28 6807218COM 3 Drawer Dresser Step 20 You will need to tap the drive fasteners (5) with a hammer to (x18) securely fasten. #A21970 BACK RIGHT SIDE littleseedskids.com...
- Page 29 6807218COM 3 Drawer Dresser Step 21 (x6) (x18) (x6) (x6) #A56540 #A12120 #A17400 #A50255 LEFT SIDE BACK RIGHT SIDE littleseedskids.com...
- Page 30 6807218COM 3 Drawer Dresser Step 22 For Masonry, Concrete, or other wall materials: Consult your local hardware store for appropriate anchors to securely attach the safety bracket. (x1) #A84050 IMPORTANT: THIS UNIT MUST BE SECURE TO THE WALL TO HELP PREVENT TIPOVER.
- Page 31 6807218COM 3 Drawer Dresser Step 23 Be sure the carrier of the slide is position all carrier the way to the front of the slide before you of slide install the drawers. Install the drawers by engaging the inner slides on the drawer sides with the slides attached to the left and right panels and push in.
- Page 32 6807218COM 3 Drawer Dresser MAXIMUM LOADS This unit has been designed to support the maximum loads shown. Exceeding these load limits could cause sagging, instability, product collapse, and/or serious injury. 35 lbs. 15.8 kg. 50 lbs. 22.7 kg. Warning: Risk of injury to persons - do not place a television on this furniture. This furniture is not approved for use with a television.
- Page 33 Certificate of Conformity 1. This certificate applies to the Dorel Home Furnishings, Inc. product identified by this instruction manual. 2. This certificate applies to compliance of this product with the CPSC Ban on Lead-Containing Paint (16 CFR 1303). 3. This product is distributed by: Dorel Home Furnishings, Inc. 410 East First Street South Wright City, MO 63390 636-745-3351...
- Page 34 Visit your local retailer's website, rate your purchased product and leave us some feedback! We would like to extend a big "Thank You" to all of our customers for taking the time to assemble this Little Seeds product, and to give us your valuable feedback. littleseedskids.com...
- Page 35 6807218COM Cajonera de 3 Cajones Consejos Útiles (página 3) - Abra su artículo en el área donde usted planea utilizarlo para evitar levantar y moverlo menos - Identificar, ordenar y contar las piezas antes de intentar ensamblar - Las clavijas de compresión se golpean con un martillo - Las diapositivas están marcadas con una R (derecha) y L (izquierda) para la colocación correcta...
- Page 36 6807218COM Cajonera de 3 Cajones Paso 5 Diapositiva separada en el paso 3. Paso 6 No apriete totalmente el tornillo en este paso. Paso 11 Cuidadosamente voltee la unidad a su lado de enfrente. IMPORTANTE! EL PANEL DE ATRAS ES UNA PARTE ESTRUCTURAL DE ESTA UNIDAD Y DEBE SER INSTALADO CORRECTAMENTE.
- Page 37 6807218COM Cajonera de 3 Cajones Paso 22 Para mampostería, hormigón u otros materiales de la pared: Consulte a su ferretería local para los anclajes apropiados para fijar firmemente el soporte de seguridad. (x1) #A84050 IMPORTANTE: ESTA UNIDAD DEBE SER ASEGURADA CON LA PARED PARA PREVENIR VOLQUEO.
- Page 38 6807218COM Cajonera de 3 Cajones Paso 23 Asegúrese que el corredor de la diapositiva sea posicionado asta enfrente de al diapositiva antes de instalar el cajón. Instale los cajones encontrando las diapositivas inferiores de los lados del cajón con las diapositivas adjuntadas en los lados izquierdos y derechos de los paneles y empuje hacia dentro.
- Page 39 6807218COM Cajonera de 3 Cajones CARGA MAXIMA Esta unidad ha sido diseñada para soportar la carga máxima anotada. El exceder estos límites puede causar inestabilidad, colapsarse y/o causar serias lesiones. 35 lbs. 15.8 kg. 50 lbs. 22.7 kg. ADVERTENCIA: Riesgo de lesiones a las personas - no coloque un televisor sobre muebles.
- Page 40 Visite el sitio web de su distribuidor local, califique su compra Producto y déjenos una cierta reacción! Gracias Nos gustaría enviar un gran "Agradecimiento" a todos nuestros clientes por tomarse el tiempo de ensamblar este producto de Little Seeds, y por darnos sus valiosos comentarios. littleseedskids.com...
-
Page 41: Avant De Commencer
6807218COM Commode à 3 Tiroirs Astuces Utiles (page 3) -Ouvrez votre article dans la zone que vous prévoyez de le garder pour moins de levage lourd -Identifier, trier et compter les pièces avant d'essayer d'assembler -Les goujons de compression sont taraudés avec un Marteau -Les glissières sont marquées d'un R (droit) et d'un L (gauche) pour un bon placement... - Page 42 6807218COM Commode à 3 Tiroirs Étape 4 Glissière extérieure séparée à l’étape 3. Étape 5 Glissière extérieure séparée à l'étape 3. Étape 6 Ne pas visser complètement cette vis à cette é tape. Étape 11 Tournez soigneusement l'unité sur le côté avant.
- Page 43 6807218COM Commode à 3 Tiroirs Étape 22 Pour la maçonnerie, béton ou d'autres matériaux de mur: Consultez votre magasin local de matériel pour les ancrages appropriés pour fixer le support (x1) de sécurité en toute sécurité. #A84050 IMPORTANT: CET APPAREIL DOIT ÊTRE SÛR AU MUR POUR AIDER À PRÉVENIR Tipover.
- Page 44 6807218COM Commode à 3 Tiroirs Étape 23 Assurez-vous que le support de la glissière est placé complètement à l'avant de la glissière avant d'installer les tiroirs. Installez les tiroirs en engageant les glissières intérieures sur les côtés du tiroir avec les glissières fixées aux panneaux gauche et droit et poussez vers l'intérieur.
- Page 45 6807218COM Commode à 3 Tiroirs CHARGES MAXIMALES Ce meuble a été conçu pour supporter les charges maximales indiquées. En excédant ces limites de charge, le meuble pourrait devenir instable, s’effondrer, et/ou causer des blessures graves. 35 lbs. 15.8 kg. 50 lbs.
- Page 46 Visitez le site Web de votre détaillant local, évaluez votre produit acheté et laissez-nous quelques commentaires! Nous tenons à offrir un grand "Merci" à tous nos Merci ! clients pour avoir pris le temps d'assembler ce produit "Little Seeds", et de nous donner vos commentaires précieux. littleseedskids.com...