IKEA BEJUBLAD Manual
Hide thumbs
Also See for BEJUBLAD:
- Manual (376 pages) ,
- Instruction manual (168 pages) ,
- User manual (28 pages)
Table of Contents
Advertisement
Available languages
Available languages
Quick Links
Advertisement
Table of Contents

Related Manuals for IKEA BEJUBLAD


Summary of Contents for IKEA BEJUBLAD
- Page 1 23199 © Inter IKEA Systems B.V. 2020 AA-2231729-2...
- Page 3 Please refer to the last page of this manual for the full list of IKEA appointed Authorized Service Centre and relative national phone number Consultez la dernière page de ce manuel contenant la liste complète des services Après-vente agréés IKEA avec les numéros de téléphone...
-
Page 4: Table Of Contents
Power limitation Rating plate Functions Environmental aspects Cooking Table IKEA GUARANTEE User menu customization Safety information For your own safety and to ensure proper operation of the appliance, please read this manual carefully before installation and operation. Keep these instructions together with the appliance, even if it is sold or transferred to third parties. - Page 5 ENGLISH wires to be pulled out before the earth wire in the event of the cable coming out of its anchor. • The manufacturer will not be liable for any damage resulting from incorrect or inadequate installation. • Check that the mains power supply corresponds to the one indicated on the rating plate fixed to the inside of the product.
- Page 6 ENGLISH supervised and instructed in safe use of the appliance by a person responsible for their safety. • This appliance may be used by children over the age of 8 years and by persons with limited physical, sensory or mental abilities or with insufficient experience and knowledge, provided they are carefully supervised and instructed on safe use of the appliance and on the dangers that it involves.
- Page 7 ENGLISH CAUTION: The cooking process must be supervised. A short cooking process must be constantly supervised. • The appliance is not designed to be started using an external timer or a separate remote controlled system. WARNING: cooking surfaces. • The appliance must be installed in such a way as too allow disconnection from the electrical power supply with a contact aperture (3 mm) that ensures complete disconnection in category III overload conditions.
-
Page 8: Installation
ENGLISH Installation Installation process must follow the laws, must be mounted with heat-resistant ordinances, directives and standards (electrical safety rules and regulations, unsuitable material and adhesives may proper recycling in accordance with the result in warping and detachment. regulations, etc.) in force in the country •... -
Page 9: Electrical Connection
• If damaged, replace the power supply • Connection terminals are revealed when the cables with the respective original spare connection box cover is removed. cables. Please contact your local IKEA store • Make sure the characteristics of the call centre. household electrical system (voltage, maximum power and current) are compatible with those of the appliance. - Page 10 ENGLISH L1 L2 L3 N1 N2 Insert the shunts between the screws as shown = Brown or Black = Brown = Blue = Black = Yellow / Green = Blue = Yellow / Green...
-
Page 11: Product Description
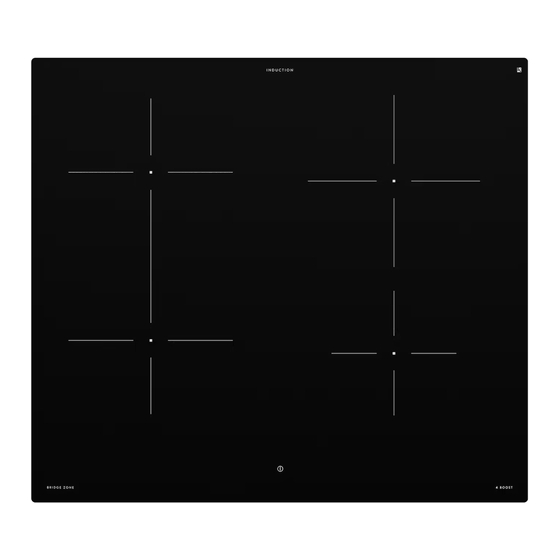
ENGLISH Product description Single cooking area (210 x 190 mm) 2100W, with Booster 3000W. Single cooking area (210 x 190 mm) 2100W, with Booster 3000W. Single cooking area (200 mm) 2300W, with Booster 3000W. Single cooking area (145 mm) 1400W, with Booster 1850W. Control panel Bridge cooking area (210 x 380 mm) 3000W, with Booster 3700W. -
Page 12: Control Panel
ENGLISH Control panel Power level indicator Timer symbol Timer control and cooking time indicator Melting function button Lock function button Pause function button Scroll keypad The cooking areas can be activated by pressing the reference digit . The digit lights up more When a pan is placed on one of the 4 cooking areas, the hob automatically detects its presence and turns on the corresponding digit to put it into use. -
Page 13: Power Limitation
ENGLISH Power limitation based on the actual abilities and capacity of the power supply itself. If this is not necessary, the hob can be turned on directly using , otherwise, follow the operations below to access the menu. Connect the hob to the domestic mains power All the digits light up for a few seconds, than they go out only the Press and hold the and digits of the zones show... -
Page 14: Functions
ENGLISH Functions This function prevents an accidental operation of the appliance. placed press and hold for 3 seconds one of the 4 digits (not visible) near the dot on the left side. Child lock All the digits display The operations described must be completed within 10 seconds. The operations described must be completed within 10 seconds. - Page 15 ENGLISH Timer with alarm for generic use. Press the digit to access the Timer menu and view “ 0 0 0 “. Hours Minutes Timer (generic) Tenths by pressing any of the buttons. Repeat the operations described to modify the countdown value. The digit for the selected area will show Melting or press...
-
Page 16: Cooking Table
ENGLISH This function is used to recall all the hob function settings in the event of involuntary shut-down or a sudden power cut. Recall , the Function for 6 seconds. Press the button to recover the functions set previously. A beep sounds to This function allows 2 cooking areas to be connected, so that they can be controlled as a single, large cooking area. -
Page 17: User Menu Customization
ENGLISH User menu customization Press Press again and hold for 3 seconds. The button Press and hold the and digit of the zone show Holding start pressing the zones digitis in clock direction, starting from the bottom left. The back left hand digit alternately shows and a number from 2 to 7, indicating the type of menu. -
Page 18: Power Management
ENGLISH Power Management This product is equipped with electronically controlled Power Management. See the illustration. This function monitors electric loading and limits the maximum power output to 3700 W for each cooking area group (1+2 and 3+4), optimizing the power distribution and preventing the system from overloading. -
Page 19: Cookware Guidance
ENGLISH Cookware guidance What pots to use Empty or thin-based pots/pans Only use pots and pans with bottom Do not use empty or thin-based pots/ made from ferromagnetic material pans on the hob as it will not be able which are suitable for use with to monitor the temperature or turn off automatically if the temperature is •... -
Page 20: Care And Cleaning
ENGLISH Care and cleaning • Never use abrasive sponges, wire wool, amount of limescale remover solution, hydrochloric acid or other products for example vinegar or lemon juice, that might scratch or mark the surface. once the Hob has cooled down. Then •... -
Page 21: Troubleshooting
ENGLISH Troubleshooting Error Possible causes of the Description Solution code error Continuous key activation detected. Remove water or cookware from glass ER03 10 sec. Water or cookware placed on and Control panel. Control panel. Let the hob cool down. The internal temperature of ER21 ventillation. - Page 22 If there is a fault, try to resolve it by following the troubleshooting guidelines. If the problem cannot be resolved, contact your IKEA store or the After Sales Service. contacts at the end of this user manual. When contacting the After Sales...
-
Page 23: Hob Technical Data
Total power 7400 Parameter Value Power supply voltage/frequency Weight of the appliance 8,8 Kg Energy efficiency of hob BEJUBLAD 504.678.21 Number of cooking areas Number of Bridge cooking areas 1 - Left Cooking technology Induction Dimension of Bridge cooking area... -
Page 24: Rating Plate
“The technical data is provided on the manufactured and sold in rating plate affixed to the bottom of the compliance with EEC Directives. Rating plate Made in Italy © Inter IKEA Systems B.V.1999 504.678.21 Design and Quality IKEA of Sweden 23199 IKEA of Sweden AB SE-343 81 Älmhult... -
Page 25: Environmental Aspects
• The guarantee covers faults of the appli- GAN or TILLREDA - from the original date of ance, which have been caused by faulty purchase of your appliance at IKEA or from construction or material faults from the the installation date with maximum limit of date of purchase from IKEA or from the three months from the purchase date. - Page 26 • Repairs not carried out by our appointed service providers and/or an authorized What will IKEA do to correct the prob- service contractual partner or where non- lem? original parts have been used.
- Page 27 An obligation to carry out services in the framework of the guarantee exists only if Please also always refer to the IKEA arti- the appliance complies and is installed in cle number (8 digit code) placed on the rating plate of your appliance.
- Page 28 Leistungsbegrenzung Typenschild Funktionen Informationen zum Umweltschutz Gartabelle IKEA GARANTIE Personalisieren des Benutzermenüs Consignes de sécurité Pour votre sécurité et pour garantir le fonctionnement correct de l’appareil, veuillez lire attentivement ce manuel avant son installation et sa mise en fonction. Toujours conserver ces instructions avec l’appareil, même en cas de...
- Page 29 FRANÇAIS d’ e xtraire le conducteur sous tension en amont du câble de mise à la terre au cas où le cordon sortirait de son ancrage. • En aucun cas le fabricant ne pourra être tenu pour responsable des dommages éventuellement provoqués par une installation ou une utilisation impropre.
- Page 30 FRANÇAIS surveillés par un adulte. • Surveiller les enfants. S’ a ssurer qu’ils ne jouent pas avec cet appareil. • Cet appareil ne doit pas être utilisé par des personnes (enfants compris) dont les capacités physiques, sensorielles ou mentales sont diminuées ou ayant une expérience et des connaissances insuffisantes, à...
- Page 31 FRANÇAIS • des dommages sont visibles dans l’ é paisseur du matériau. • Ne pas toucher l’appareil avec les mains ou des parties du corps mouillées. • Ne pas utiliser des appareils à vapeur pour nettoyer le produit. • Ne pas poser d’ o bjets métalliques tels que couteaux, fourchettes, cuillères, et couvercles sur la surface de la table de cuisson, car ils pourraient atteindre des températures très élevées.
- Page 32 FRANÇAIS écart entre les contacts (3 mm) à même d’ a ssurer le sectionnement complet dans des conditions de surtension de catégorie III. • Ne jamais exposer l’appareil aux agents atmosphériques (pluie, soleil). • Ranger les emballages hors de portée des enfants et des animaux domestiques.
- Page 33 FRANÇAIS Installation Le technicien chargé de l’installation est les composants (en matière plastique tenu de se conformer à la législation, ou en bois plaqué) avec des colles aux réglementations, aux directives et aux normes (règlements sur la sécurité l’utilisation de matériaux ou de colles des installations électriques, le recyclage inadaptés risque de provoquer la correct des composants, etc.) en vigueur...
- Page 34 à bornes. Contactez le centre d’appels de votre • S’assurer que les caractéristiques de votre magasin IKEA. système électrique domestique (tension, puissance maximum et courant) sont Attention! Ne pas souder les câbles!
- Page 35 FRANÇAIS L1 L2 L3 N1 N2 Insérer des shunts = Marron ou Noir = Marron = Bleu = Noir = Bleu...
- Page 36 FRANÇAIS Description du produit Zone de cuisson simple (210 x 190 mm) 2100 W, avec fonction Boost de 3000 W. Zone de cuisson simple (210 x 190 mm) 2100 W, avec fonction Boost de 3000 W. Zone de cuisson simple (200 mm) 2300 W, avec fonction Boost de 3000 W. Zone de cuisson simple (145 mm) 1400 W, avec fonction Boost de 1850 W.
- Page 37 FRANÇAIS Bandeau de commande Branché/Débranché Indicateur de niveau de puissance. Symbole du minuteur Contrôle du minuteur et indicateur du temps de cuisson Touche fonction Fondre Touche fonction Pause Pour activer les zones de cuisson, appuyer sur le digit de référence. Le digit s’éclaire plus intensément pour valider l’opération.
- Page 38 FRANÇAIS Limitation de la puissance Lors du premier branchement de l’appareil au secteur, l’installateur doit régler la puissance des zones de cuisson en fonction de la capacité réelle de l’installation électrique domestique. Si cela n’est pas nécessaire, la table de cuisson peut être activée directement en intervenant sur , autrement, suivre la marche ci-après pour accéder au menu.
- Page 39 FRANÇAIS Fonctions Cette fonction permet d’ é viter un actionnement accidentel de l’ a ppareil. 3 secondes sur le digit correspondant. En absence de casserole sur la table de cuisson, appuyer et garder l’ a ppui pendant 3 secondes sur un des 4 digits (non visibles) à côté du point sur le côté Dispositif gauche.
- Page 40 FRANÇAIS Minuteur avec alarme pour une utilisation générique. zones de cuisson actives. Heures Minuteur Minutes (générique) Dixièmes Ne rien toucher pendant 10 secondes pour valider le temps paramétré. touche quelconque pour interrompre la fonction. zones de cuisson actives. Fonction Fondre ou sur continuer la cuisson au niveau sélectionné.
- Page 41 FRANÇAIS Cette fonction permet de mettre en pause/redémarrer n’importe quelle fonction active sur le plan de cuisson, en diminuant la puissance disponible dans la zone de cuisson et en mettant à zéro toutes les fonctions. Si on ne désactive pas la fonction Pause dans les 10 minutes, la table de cuisson se débranche automatiquement.
- Page 42 FRANÇAIS Personnalisation du menu utilisateur Appuyer sur Appuyer de nouveau et garder l’appui pendant 3 secondes. La touche commence à clignoter. Appuyer et garder l’appui sur Garder l’appui sur , puis appuyer sur les digits des zones de cuisson en procédant dans le sens des aiguilles d’une montre à...
- Page 43 FRANÇAIS Fonction de gestion de la puissance Cette fonction permet de surveiller la charge électrique et limite la puissance maximale fournie à 3700 W pour chaque groupe de zones de cuisson (1+2 et 3+4), en optimisant la distribution de la puissance et en évitant la surcharge du système. Table de cuisson à...
- Page 44 FRANÇAIS Guide à l’utilisation des casseroles Quelles casseroles utiliser Casseroles ou poêles vides ou avec un Utiliser exclusivement des fond peu épais casseroles avec un fond en matériau Ne pas utiliser de casseroles ou ferromagnétique, elles sont adaptées à de poêles vides ou avec fond peu une utilisation sur les tables de cuisson épais sur la table de cuisson, car cela ne permettrait pas de contrôler...
- Page 45 FRANÇAIS Nettoyage et entretien • Ne jamais utiliser de tampons à encore chaude. Sans cela, les résidus récurer, laine d'acier, acide muriatique pourraient endommager la surface en ou autres produits qui pourraient rayer vitrocéramique. ou marquer la surface. • Enlever tout résidu de matière •...
- Page 46 FRANÇAIS Solution des inconvénients Code Description Cause possible de l’erreur Solution d’erreur Détection d’une activation La table de cuisson Enlever l’eau ou la casserole de la continue des touches. ER03 s’éteint après 10 surface en vitrocéramique ou du Eau ou casserole présente sur secondes.
- Page 47 à la solution des inconvénients. Si le problème persiste, contactez votre magasin IKEA ou le service après-vente. services après-vente agréés par IKEA et les informations de contact correspondantes à la dernière page de cette notice.
- Page 48 7400 Paramètre Valeur Tension/fréquence d’alimentation Poids de l’appareil 8.8 kg Efficacité énergétique de la table de cuisson BEJUBLAD 504.678.21 Nombre de zones de cuisson Nombre de zones de cuisson Bridge 1 - Gauche Technologie de cuisson Induction Dimensions la zone de cuisson Bridge...
- Page 49 EN/IEC 60350-2 EN/IEC 50564 “Les données techniques figurent sur la commercialisé conformément aux directives CEE. Plaque signalétique Made in Italy © Inter IKEA Systems B.V.1999 504.678.21 Design and Quality IKEA of Sweden 23199 IKEA of Sweden AB SE-343 81 Älmhult Model: BEJUBLAD 504.678.21...
- Page 50 (2) ans pour les appareils nommés LAGAN ou TILLREDA - à compter de la date Le prestataire de services désigné par originale d’achat de votre appareil IKEA ou IKEA fournira l’assistance via ses propres de sa date d’installation, avec une limite réparateurs ou son réseau de partenaires...
- Page 51 Cependant, si le transport au domicile par l’eau, y compris, mais sans s’y limiter, du client a été effectué par IKEA, tout les dommages causés par une eau dommage éventuellement dû au trans- d’alimentation excessivement calcaire et port sera couvert par la garantie IKEA.
- Page 52 Le ticket de caisse mentionne aussi le nom Service APRÈS-VENTE dédié aux appa- IKEA et le code de l’article (8 chiffres) de reils IKEA chacun des appareils achetés. N’hésitez pas à contacter le prestataire...
- Page 53 UNITED ARAB EMIRATES & OMAN Toll free: 800 4532 Web: www.IKEA.com QATAR Toll free: 800 4532 Web: www.IKEA.qa e-mail: Ikea_qatar@alfuttaim.com EGYPT Hotline: 16576 Web: www.IKEA.eg e-mail: IkeaCairo.customerservice@alfuttaim.com STATE OF KUWAIT Contact centre: +965 18 40 40 8 Web: www.IKEA.com.kw e-mail: info@IKEA.com.kw...
- Page 57 Made in Italy © Inter IKEA Systems B.V.1999 504.678.21 Design and Quality IKEA of Sweden 23199 IKEA of Sweden AB SE-343 81 Älmhult Model: BEJUBLAD 504.678.21 Serial No: Z1209440 220-240V; 50Hz; or 220V; 60Hz; 2N ~ 380-415 V 50 Hz 2N ~ 380 V 60 Hz TOT.
- Page 71 L1 L2 L3 N1 N2...
- Page 73 580 mm min. 520 mm 560 +2 490 +2 min. max. R 5 mm Min. 28 mm...
- Page 78 Please refer to the last page of this manual for the full list of IKEA appointed Authorized Service Centre and relative national phone number Consultez la dernière page de ce manuel contenant la liste complète des services Après-vente agréés IKEA avec les numéros de téléphone...
- Page 80 BEJUBLAD...
Need help?
Do you have a question about the BEJUBLAD and is the answer not in the manual?
Questions and answers