Dell Latitude 12 Rugged Extreme 7214 Getting Started Manual
Hide thumbs
Also See for Latitude 12 Rugged Extreme 7214:
- Owner's manual (95 pages) ,
- Getting started manual (111 pages) ,
- Getting started manual (24 pages)

Related Manuals for Dell Latitude 12 Rugged Extreme 7214


Summary of Contents for Dell Latitude 12 Rugged Extreme 7214
- Page 1 Dell Latitude 12 Rugged Extreme – 7214 Getting Started Guide Regulatory Model: P18T Regulatory Type: P18T002 June 2020 Rev. A01...
- Page 2 A WARNING indicates a potential for property damage, personal injury, or death. © 2016 Dell Inc. All rights reserved. This product is protected by U.S. and international copyright and intellectual property laws. Dell and the Dell logo are trademarks of Dell Inc. in the United States and/or other jurisdictions. All other marks and names mentioned herein may be trademarks of their respective...
-
Page 3: Table Of Contents
Contents Chapter 1: Finding information and resources..................5 Chapter 2: System overview......................6 Chapter 3: Quick setup........................8 Chapter 4: Removing and installing components................10 Opening the press latch doors............................10 Closing the press latch doors............................. 10 Removing the battery................................10 Installing the battery................................11 Removing the hard drive..............................11 Installing the hard drive................................ - Page 4 Environmental specifications............................. 22 Chapter 8: Contacting Dell......................23 Chapter 9: NOM Information (for México only)................24 Chapter 10: Taiwan RoHS......................25 Contents...
-
Page 5: Chapter 1: Finding Information And Resources
Finding information and resources See the safety and regulatory documents that shipped with your computer and the regulatory compliance website at Dell.com/ regulatory_compliance for more information on: • Safety best practices • Regulatory certification • Ergonomics See Dell.com for additional information on: •... -
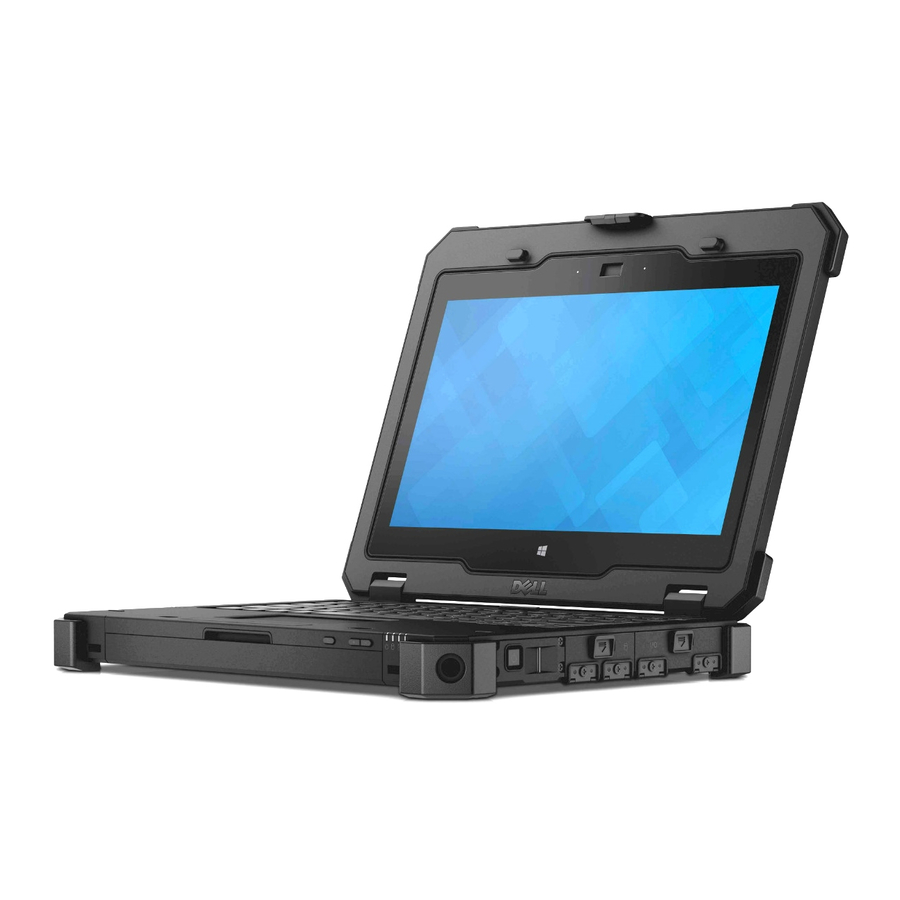
Page 6: Chapter 2: System Overview
System overview Figure 1. System overview 1. display latch 2. microphone 3. camera shutter (optional) 4. camera (optional) 5. camera status light (optional) 6. microphone 7. ambient light sensor 8. screen rotate button 9. volume button 10. power status lights 11. - Page 7 NOTE: Do not block, push objects into, or allow dust to accumulate in the air vents. Do not store your Dell computer in a low-airflow environment, such as a closed briefcase, while it is running. Restricting the airflow can damage the computer or cause a fire.
-
Page 8: Chapter 3: Quick Setup
NOTE: Before you begin any of the procedures in this section, read the safety information that shipped with your computer. For additional best practices information, see Dell.com/regulatory_compliance. NOTE: The AC adapter works with electrical outlets worldwide. However, power connectors and power strips vary among countries. - Page 9 Figure 5. Power button Next steps NOTE: It is recommended that you turn on and shut down your computer at least once before you install any cards or connect the computer to a docking device or other external device, such as a printer. Quick setup...
-
Page 10: Chapter 4: Removing And Installing Components
Using an incompatible battery may increase the risk of fire or explosion. Replace the battery only with a compatible battery purchased from Dell. The battery is designed to work with your Dell computer. Do not use a battery from other computers with your computer. -
Page 11: Installing The Battery
3. Disconnect the modem from the wall connector and computer. 4. Remove any other external cables from the computer. WARNING: To prevent ignition in a hazardous atmosphere, batteries must only be removed, changed or charged in an area known to be non-hazardous. NOTE: The battery cannot be installed or removed with the optional accessory handle installed. - Page 12 NOTE: Keep the hard drive pull tab clear of the doors before closing the hard drive latch door. 2. Close the hard drive latch door. 3. Slide the latch until the lock icon is visible. Removing and installing components...
-
Page 13: Chapter 5: Working On Your Computer
Working on your computer This section provides information about the backlit keyboard, stealth mode, function keys and converting your computer to notebook and tablet modes (if applicable). Topics: • Using the backlit keyboard • Function Fn key lock features • Turning stealth mode on/off •... -
Page 14: Customizing The Backlit Keyboard In System Setup (Bios)
Steps 1. Turn off the computer. 2. Turn on the computer and when the Dell logo appears, press the F2 key repeatedly to bring up the System Setup menu. 3. Under System Configuration menu, select RGB Keyboard Backlight. You can enable/disable the standard colors (White, Red, Green and Blue). -
Page 15: Enabling The Function (Fn) Lock
Steps 1. Power off the computer. 2. Power on the computer and at the Dell logo, tap the F2 key repeatedly to bring up the System Setup menu. 3. Expand and open the System Configuration menu. 4. Select Stealth Mode Control. -
Page 16: Converting Between Notebook And Tablet Modes
Converting between notebook and tablet modes Steps 1. To undock the computer, press the display latch. 2. Open the display lid by lifting it upwards. 3. To change to tablet mode: a. Gently push the display panel in the direction indicated to pop the display from the display frame. b. -
Page 17: Chapter 6: Quick Disconnect (Qd) Connector
Quick Disconnect (QD) connector Latitude fully rugged products come equipped with receptacles for QD (Quick Disconnect) connectors at the corners. These receptacles allow the connection of optional accessories such as shoulder straps. Topics: • Installing the QD connector • Removing the QD connector Installing the QD connector Steps 1. -
Page 18: Chapter 7: Technical Specifications
Technical specifications NOTE: Offerings may vary by region. For more information regarding the configuration of your computer in: • Windows 10, click or tap Start > Settings > System > About. • Windows 8.1 and Windows 8, from the charms sidebar, click or tap Settings > Change PC settings. In the PC Settings window, select PC and devices >... -
Page 19: Memory Specifications
Memory specifications Feature Specification Memory Two SODIMM slots connector Memory capacity 4 GB, 8 GB, and 16 GB Memory type DDR4 SDRAM Speed 2133 MHz Minimum memory 4 GB Maximum memory 32 GB Audio specifications Feature Specification Type four channel high definition audio Controller HDA Codec - ALC3235 Stereo conversion 24 bit (analog-to-digital and digital-to-analog) -
Page 20: Port And Connector Specifications
Port and connector specifications Feature Specification Audio one microphone/stereo headphone/speakers connector Video • one 19-pin HDMI port • one 15-pin VGA port Network adapter one RJ45 connector Serial port one DB9 pin serial port Docking port USB ports • one 4-pin USB 2.0-compliant port •... -
Page 21: Touchpad Specifications
Touchpad specifications Feature Specification Active Area: X-axis 99.50 mm Y-axis 53.00 mm Battery specifications Feature Specification Type 4-cell smart lithium ion Depth 72.6 mm (2.85 inches) Height 16.6 mm (0.65 inches) Width 215 mm (8.46 inches) Weight 318 g (0.70 lb) Voltage 14.8 V DC Life span... -
Page 22: Physical Dimension Specifications
Feature Specification Temperature –40°C to 70°C (–40°F to 158°F) range (nonoperating) Physical dimension specifications Feature Specification Height 39 mm (1.54 inches) Width 219 mm (8.62 inches) Length 311 mm (12.24 inches) Weight (minimum 6.0 lbs (2.72 kg) config) Environmental specifications Feature Specifications Temperature —... -
Page 23: Chapter 8: Contacting Dell
About this task Dell provides several online and telephone-based support and service options. Availability varies by country and product, and some services may not be available in your area. To contact Dell for sales, technical support, or customer service issues: Steps 1. -
Page 24: Chapter 9: Nom Information (For México Only)
NOM Information (for México only) The following information is provided on the device described in this document in compliance with the requirements of the official Mexican standards (NOM). Input voltage 100 V AC — 240 V AC Input frequency 50 Hz — 60 Hz Power 1.7 A/3.34 A consumption... -
Page 25: Chapter 10: Taiwan Rohs
Taiwan RoHS Taiwan RoHS...
Need help?
Do you have a question about the Latitude 12 Rugged Extreme 7214 and is the answer not in the manual?
Questions and answers