Table of Contents
Advertisement
Quick Links
Advertisement
Table of Contents

Related Manuals for Culina UBTCC75


Summary of Contents for Culina UBTCC75
- Page 1 User Manual UBTCC75 Built-in ceramic hob...
- Page 2 Warning 1) The appliance is not to be used by persons (including children) with reduced physical, sensory or mental capabilities, or lack of experience and knowledge, unless they have been given supervision or instruction. children being supervised not to play with the appliance.
- Page 3 Warning use of the appliance in a safe way and understand the hazards involved. children shall not play with the appliance. cleaning and user maintenance shall not be made by children without supervision. 9) WARNING: The appliance and its accessible parts become hot during use.
-
Page 4: Table Of Contents
Contents Environmental note Important safety information 4 – 9 Specifications 10 – 12 Ceramic hob layout Control panel layout Using the ceramic hob 12 - 16 Before first use Touch controls Switching the hob top on and off Operating procedures and function instructions Switching on a zone and setting a power level Using the dual / oval cooking zones Pause button... -
Page 5: Environmental Note
Environmental note o The packaging materials that we uses are environmentally friendly and can be recycled. o Please discard all packaging material with due regard for the environment. -
Page 6: Important Safety Information
Important safety information Your safety is of the utmost importance to us. Please make sure that you read this instruction booklet before attempting to install or use the appliance. If you are unsure of any of the information contained in this booklet, please contact our Customer Care Department. - Page 7 o You should not store or place flammable or highly flammable liquids/materials on top of or near the appliance. Items made from aluminium, plastic or plastic film should also be kept away from the appliance, as they may fuse to the surface. o Repairs may only be carried out by our service engineers or their authorised service agent.
- Page 8 o You should not allow the electrical connection cables to come into contact with the hob surface when it is hot or any hot cookware. o If fat and oil overheats, then it can ignite extremely quickly. For this reason, when cooking with fat and oil the appliance should not be left unattended.
- Page 9 o The manufacturer declares that the hob is built using certified materials and requires the appliance to be installed in accordance with the standards currently in force. This appliance must be used by a trained person for domestic purposes only. To avoid damaging your appliance o The ceramic glass can be damaged by objects falling onto it.
-
Page 10: Specifications
Specifications Product dimensions: Aperture dimensions: Depth: 520 mm Depth: 490 mm Width: 750 mm Width: 720 mm Height: 46 mm Product specifications: 1 x 1.00 / 2.10 kW double zone (Ø 126/220 mm) 1 x 1.40 / 2.20 kW oval zone (Ø 180/275 mm) 1 x 1.80 kW zone (Ø... -
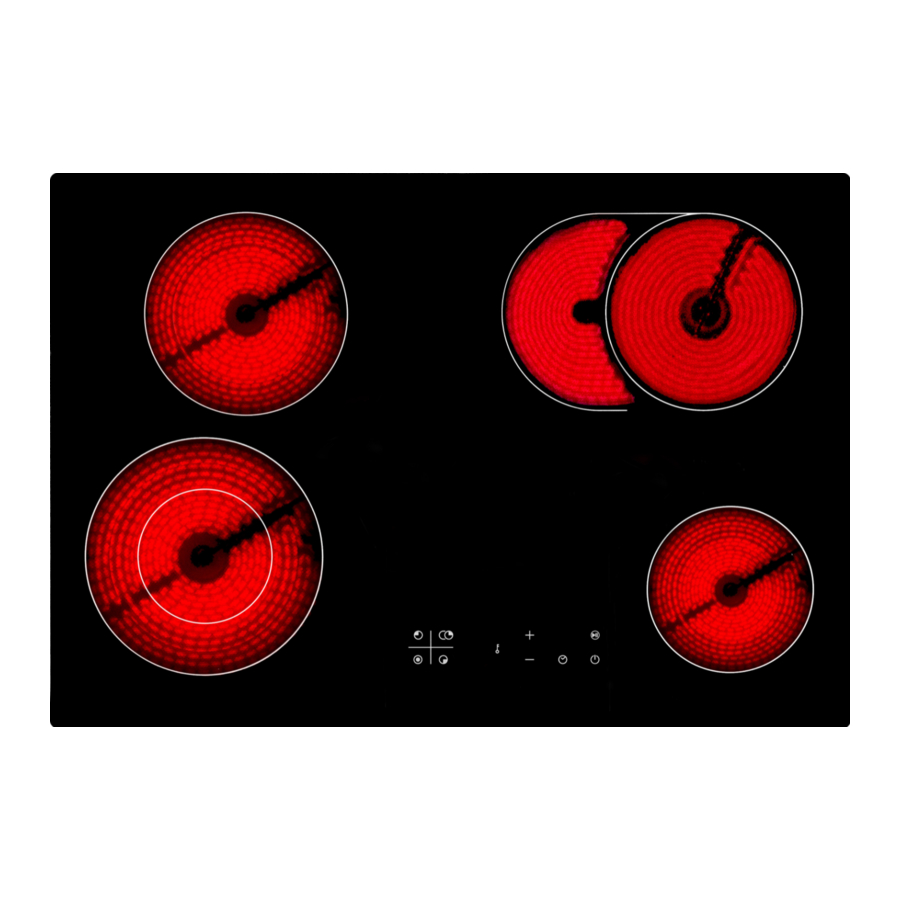
Page 11: Ceramic Hob Layout
Electrical details Rated Voltage: 380-415V 3N~ 50/60Hz Supply Connection: 32 A Max Rated Inputs: 7.3 kW Mains Supply Lead: 5 core x 1.5 mm² Ceramic hob surface layout 1 x 1.80 kW zone (Ø 190 mm) 1 x 1.40 / 2.20 kW oval zone (Ø 180/275 mm) 1.20 kW zone (Ø... -
Page 12: Control Panel Layout
Control panel layout Safety lock button Minus button Cooking zone selection buttons Plus button Timer display Timer button Zone timer activated LED Zone temperature display Pause button Power button Using the ceramic hob Before first use IMPORTANT: You should clean the ceramic hob surface. Please see the “Cleaning and maintenance”... -
Page 13: Touch Controls
Touch controls o All operations are performed by means of the touch controls that can be found on the control panel. o Each touch control has a visual display that corresponds to it. Switching the hob top on and off o Press the power button (10) to switch on the appliance. -
Page 14: Switching On A Zone And Setting A Power Level
Switching on a zone and setting a power level o press the Cooking zone selection button(3) to start the cooking function, the display will show power level 5(default setting),then click the Minus button(2)“-”or Plus button(4)”+” to increase or decrease the power leve. -
Page 15: Using The Dual /Oval Cooking Zones
Using the dual /oval cooking zones Your hob comes with three dual cooking zones. Zone 2a/4a is a circular dual zone. o The dual cooking zone 2a/4a has two cooking areas that you can use - a central section and an outer section. You can use the central section (A) independently or both sections (B) at once. -
Page 16: Timer Function
o Pressing the pause/resume button(9) for 3 seconds , it will stop all zones from heating and will also pause any active timers, the zone displays will show “P”. o The control panel will automatically be locked and only the power button(10)and the pause/resume(9) button will operate. -
Page 17: Setting The Timer To Turn Cooking Zone Off
display will show the remaining time and the timer indicator will flash for 5 seconds. 7. Buzzer will beep for 30 seconds and the timer indicator shows “- - “ when the setting time finished. 8. “- - “when the setting time finished. Cancelled the Minute Minder 1.Make sure no zone is selected 2.Touch the timer button(6), it shows the remaining minute timer... -
Page 18: Residual Temperature
Setting the timer to turn more than one cooking zone off 1. If more than one heating zone is using this function, the timer indicator will show the lowest time. 2. Once the countdown timer expires, the corresponding zone will switch off. -
Page 19: Hob Guidelines
Hob guidelines o The first few times the hob top is used, it may give off an acrid, burning smell. This smell will disappear completely with repeated use. o The hob is fitted with cooking areas of different diameter and power. o The positions where the heat will radiate from are clearly marked on the hob top. -
Page 20: Cleaning And Maintenance
o DO NOT USE THE HOB IF THE SURFACE BECOMES BROKEN OR CRACKED. YOU SHOULD CONTACT THE CUSTOMER CARE DEPARTMENT IMMEDIATELY. Cleaning and maintenance Cleaning operations must only be carried when the hob is cool. The appliance should be disconnected from your mains supply before commencing any cleaning process. -
Page 21: Installation
Installation The installation must be carried out by a suitably qualified person, in accordance with the current version of the following. o UK Regulations and Safety Standards or their European Norm Replacements. o Building Regulations (issued by the Department of the Environment). -
Page 22: Installing The Appliance
Installing the appliance o Cut a hole in the worktop that corresponds with drawing shown above. o IMPORTANT: must MIN. 3.5cm observe ventilation requirements shown in the drawing opposite. o The air intake vent can be at the rear wall or in the base area. - Page 23 o IMPORTANT: There are ventilation holes around the outside of the hob. YOU MUST ensure that these holes are not blocked by the work top, when you put the hob into position (see drawing opposite). o IMPORTANT: Do not use a silicon sealant to seal the appliance against the aperture.
-
Page 24: Electrical Connection
Electrical connection This appliance must be installed by a qualified person in accordance with the latest edition of the I.E.E. Regulations and in compliance with our instructions. Before connecting the appliance, make sure that the supply voltage marked on the rating plate corresponds with your mains supply voltage. WARNING: THIS APPLIANCE MUST BE EARTHED. -
Page 25: Replacing The Mains Supply Cable
o The cable connections must be in accordance with the diagram located on the bottom of the hob (see above). The links must also be positioned as indicated. o You should use a good quality screwdriver to carefully, fully tighten ALL of the terminal screws. -
Page 26: My Appliance Isn't Working Correctly
o Replace the cable with one of the same length and in accordance with the specification given on page 21. o The “green-yellow” earth wire must be connected to the terminal marked . It must be about 10 mm longer than the live and neutral wires. - Page 27 the working of the appliance. However you should make sure that the cleaning instructions are being followed regularly. IMPORTANT: If your appliance appears not to be operating correctly, then you should disconnect it from your mains supply then contact Customer Care Department on telephone number DO NOT ATTEMPT TO REPAIR THE APPLIANCE YOURSELF.
Need help?
Do you have a question about the UBTCC75 and is the answer not in the manual?
Questions and answers