Advertisement
Available languages
Available languages
Table of Contents
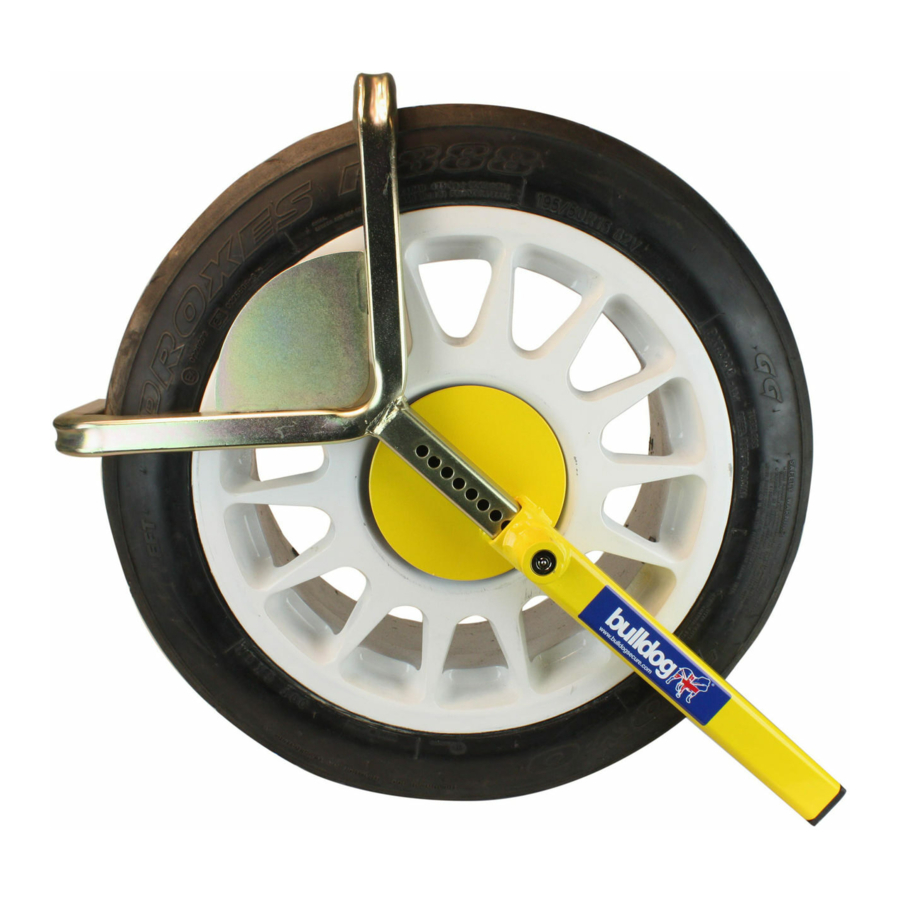
Bulldog Auto Clamp Fitting Instructions
INITIAL SETTING UP
First select the three angular steel claws. Select the holes which give the best fit on the
tyre width. Secure with button head screws using a gripper washer, as illustrated (see
fig 1). When initially trying the clamp around the tyre take care to select which tapped
hole gives the tightest fit. The easiest method is:- Insert two of the claws into the gold
arm facing inwards to the width of the tyre, then secure each in place with one button head screw using the allen
key provided. The third claw locates in the yellow stem facing inwards at the required setting as before. Once
the claws are set correctly, fit the three yellow plastic tips. There is no need to dismantle again.
1. The auto Clamp is fitted by taking the gold arm twisting it into the angle
shown in the picture.
B
2. Then push the arm into the wheel arch and slide around the wheel into
place.
3. The next step is to take the yellow stem and slide it into the gold arm until all three
points of the clamp are in contact with the tyre.
4. Then press the lock in until it clicks. When the clamp is unlocked the key is not
required to lock it again leaving both hands to secure the clamp in approx 5 - 10
seconds.
IMPORTANT. To remove clamp, insert key, rotate 1/2 turn, pull on key, and/or
press down on gold arm until lock pops out.
We have taken every care in the design and manufacture
of this security device and we believe that it is an
effective deterrent. However we cannot guarantee that it
will resist the efforts of the most determined thief, and as
such we do not accept any liability for loss or damage
caused by theft, vandalism or other illegal
activity against property to which this
Print Ref: REG. PB36-5
BULLDOG AUTO CLAMP
SECURED IN APPROX 5-10 SECONDS
FITTING
A
REMOVAL
this device is fitted.
Lock Lubrication.
IMPORTANT - To ensure free movement of the lock, spray outside of lock
body with WD40 (or equivalent) minimum every four months.
Key Security. Enter your key number here:
IMPORTANT - Your Bulldog product is supplied with two keys. Make a
note of your personal key number in the space provided above and keep it
in a safe place. Should you lose your keys, replacements can only be
obtained from the manufacturer through your dealer.
Fig 1
Advertisement
Table of Contents

Related Manuals for Bulldog Security Auto Clamp


Summary of Contents for Bulldog Security Auto Clamp
- Page 1 SECURED IN APPROX 5-10 SECONDS FITTING 1. The auto Clamp is fitted by taking the gold arm twisting it into the angle shown in the picture. 2. Then push the arm into the wheel arch and slide around the wheel into place.
- Page 2 Bulldog Autoclamp Gebrauchsanleitung. 1. Wählen Sie die drei Stahlhaken zu Ihrem Fahrzeug passend aus. Vorsicht! Diese haben verschiedene Armlängen, mit einer Bohrung am Ende. Wenn Sie die Bulldog-Radkralle um den Reifen Ihres Fahrzeuges legen achten Sie darauf mit welchem Loch die Radkralle am besten um den Reifen klemmt. 2.
Need help?
Do you have a question about the Auto Clamp and is the answer not in the manual?
Questions and answers