Table of Contents
Advertisement
Advertisement
Table of Contents

Related Manuals for Leica EG1150 H


Summary of Contents for Leica EG1150 H
- Page 1 NOTE: All units before 7623/12.2009 the F2 Fuse is 3.2 AMP Leica EG1150 H Paraffin Embedding Station Instruction Manual Leica EG1150 H V2.2 English, Rev. B - 12/2009 Always keep this manual near the instrument. Read carefully prior to operating the instrument.
- Page 3 Leica reserves the right to change technical stand it following thorough investigation in this specifications as well as manufacturing pro- field.
-
Page 4: Table Of Contents
Table of contents Important notes ................................5 Symbols used in the text and their meanings ..................................5 Specified use and application ..........................5 User group ................................... 5 Instrument type ................................5 Safety ..................................6 Safety regulations ..............................6 Safety instructions ..............................6 Built-in safety devices ............................... -
Page 5: Important Notes
1.3 User group • The Leica EG1150H may only be operated by This warning symbol indicates the qualified personnel. surfaces on the instrument that are • The user must read the operating instruc- hot during operation. -
Page 6: Safety
The protective devices on both instrument and accessories may neither be removed nor modi- fied. Only service personnel qualified by Leica may repair the instrument and access the instrument’s internal components. 2.2 Warnings The safety devices installed in this instrument by the manufacturer only constitute the basis for accident prevention. - Page 7 (e.g. Bunsen burner) is carried out in the direct vicinity of the instrument (solvent vapors). Therefore a minimum safety distance of 2 meters must be adhered to! Leica EG1150 H – Paraffin Embedding Station...
-
Page 8: Built-In Safety Devices
Safety Hazards – servicing and cleaning Switch off the instrument each time before servicing and pull out the mains plug. When using cleaners, please comply with the safety instructions of the manufacturer and the laboratory safety regulations. Before changing defective fuses, the instrument has to be disconnected from the mains. Only fuses that are easily accessible may be replaced by the user. -
Page 9: Instrument Components And Specifications
100 cassettes Mold warmer: approx. 50 molds Programmable parameters Temperature: Paraffin reservoir/dispenser (heating-up time = 4h) Mold warmer, cassette warmer, work area Time: Working days, current weekday Working times (start, end), time Leica EG1150 H – Paraffin Embedding Station... -
Page 10: Overview - Instrument Parts
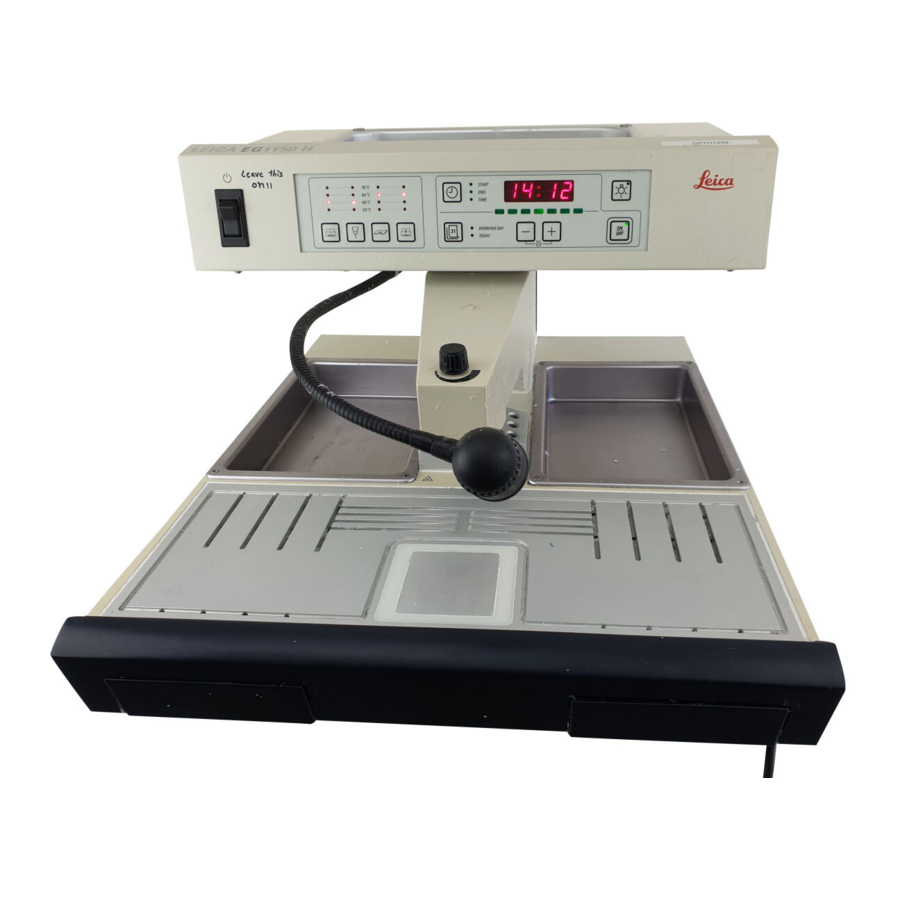
Instrument components and specifications 3.2 Overview – instrument parts Standby Paraffin reservoir switch with lid Control panel Work area illumination Dispenser Cassette warmer Cassette warmer Forceps holder Work area Mold warmer Mold warmer Paraffin collection tray right Refrigeration spot Paraffin collection tray left Fig. -
Page 11: Instrument Specifications
• Temperature range of cassette and mold warmer, work area and paraf- fin reservoir adjustable from 55°C to 70°C. • Permanent temperature display for all the work areas. • The beginning and end of the work time and work days can be pro- grammed. Leica EG1150 H – Paraffin Embedding Station... -
Page 12: Commissioning
Commissioning 4.1 Unpacking and installation The unpacking instructions are attached to the outside of the transport crate. Fig. 3 shows the design of the original packaging. The numbers indicate the sequence of disassembling and reassembling. • To lift up the instrument (6), hold it at the front and rear of the base plate (Fig. -
Page 13: Package Contents
1 EC Declaration of Conformity Leica EG1150H 14 0388 80011 Please compare the delivered components against the packing list, delivery note, and your or- der. Should there be any discrepancy, please contact the Leica distributor handling your order. Leica EG1150H – Paraffin Embedding Station... -
Page 14: Necessary Assembly Work
Commissioning 4.4 Necessary assembly work Install the following accessories and make the appropriate adjustments to make the instrument ready for use: • Install accessories. • Adjust instrument feet if necessary. • Install magnifier (optional). • Connect foot switch (optional). • Establish the electrical connections. Install accessories Install mold warmer (2) and cassette warmer (3). - Page 15 Commissioning Installing the accessories Fig. 5 Leica EG1150 H – Paraffin Embedding Station...
-
Page 16: Optional Accessories
Commissioning 4.5 Optional accessories Magnifying glass The magnifying glass provides a magnified view of the work area. When properly adjusted, an enlarged view of the dispenser and refrigeration spot is available. Fig. 6 Installing the magnifying glass • On the dispenser (5) a tap hole (1) is provided, which is closed with a nylon screw (2). -
Page 17: Electrical Connection
• Insert the plug (4) of the foot switch into the connecting port (3). connecting port (5) on the rear of the instru- ment. • Plug the power cord into the wall outlet. • Tighten the screws (6) of the plug. Leica EG1150H – Paraffin Embedding Station... -
Page 18: Operation
A built-in filtering screen prevents any particles contained in the paraffin from getting in the par- affin block. Recycled paraffin may not be used in the Leica EG1150H due to the dan- ger of contamination. Dispenser (2) The dispenser is heated separately. The tem- perature adjustment of the dispenser and paraf- fin reservoir is coupled. - Page 19 Forceps holder (5) The removable forceps holder under the dis- Fig. 10 penser can accommodate up to 6 forceps. The forceps holder is separately heated to approximately 70 °C. Risk of burning! Leica EG1150H – Paraffin Embedding Station...
- Page 20 5. Operation Paraffin collection tray (8) Two indirectly-heated paraffin collection trays for excess paraffin are located under the work surface. The paraffin collection tray must be emptied daily. To prevent con- tamination, do not reuse paraffin collected in this tray. If the instrument is operated with- out the paraffin collection trays there is risk of burning.
- Page 21 (18) in the position where the two “I“ “I“ marks (19) are located one above the other. To access the halogen bulb, the cap (18) can be removed. (For replacement of the halogen lamp see Chapter 7.2) Fig. 12 Leica EG1150H – Paraffin Embedding Station...
- Page 22 Operation Foot switch (22) optional The foot switch (22) actuates the magnet valve of the dispenser. It must be connected as described in Chapter 4.6. The plug of the foot switch MUST be screwed onto the socket. Otherwise hot paraf- fin may escape even when the foot switched is not be- ing pressed.
-
Page 23: Switching The Instrument On
• Fill the paraffin reservoir with paraffin. Prior to leaving the factory, the Leica EG1150H is tested thor- oughly under laboratory conditions. For this reason, you will find a small quantity of clean, hardened ”Leica Histowax” in the in- strument. -
Page 24: Control Panel Functions
Operation 5.3 Control panel functions The control panel beside the standby switch (8) consists of a foil keyboard with push buttons, LEDs and a single-line display. It is divided into two control areas: temperature setting and display and instrument control and programming. Temperature control Instrument control and and display... -
Page 25: Operating Modes
The timer is disabled if the switch-off time is before the switch-on time. E.g. switch-on time: 08:00 a.m. and switch-off time: 06:00 a.m. In 24-hour mode, activate enhanced mode (see Chap. 5.6) to ac- celerate the melting process after replenishing solid paraffin. Leica EG1150 H – Paraffin Embedding Station... -
Page 26: Time-Program Control
Operation 5.5 Time-program control The value shown in the display must be set to the current local time to en- sure the correct operation of the time-program control. Setting the time • Press the CLOCK button as many times as required until the green “TIME“... - Page 27 If the programmed values are to be effective on the following days (the instrument is operational at the programmed time and switches off automatically when the switch-off time is reached), the standby mode must be active --> press ON/OFF. Leica EG1150 H – Paraffin Embedding Station...
-
Page 28: Instrument Heater
Operation 5.6 Instrument heater Setting temperature values The temperatures for the four heated areas can be adjusted separately in a range from 55 °C to 70 °C in 5 degree (K) increments. When setting the temperature, please observe paraffin manufacturer’s specifications for the maximum permissible tempera- ture. - Page 29 The enhanced mode can be switched off at any time by pressing and holding and again until all four LED’s of the paraffin reservoir light up briefly indicating that the enhanced mode has been switched off. Fig. 22 Leica EG1150H – Paraffin Embedding Station...
-
Page 30: Cleaning And Maintenance
Cleaning and maintenance 6.1 Cleaning the instrument Do not use xylene for cleaning. Xylene vapors are heavier than air and can ignite at a considerable distance from the source of heat. Fire hazard! To avoid scratching the surface of the instrument only the plastic spatula that is supplied with it should be used for cleaning –... -
Page 31: Maintenance Instructions
• Regularly remove dust from the ventilation slots on the back of the instrument with a brush or vacuum cleaner. • Have the instrument inspected at least once a year by an authorized Leica customer service technician. • Enter into a service contract at the end of the warranty period. For more information, contact the relevant technical service center. -
Page 32: Troubleshooting
Leica EG1150H. If a problem cannot be remedied by following the instructions in this chap- ter, please contact your Leica technical service center. For further instructions, please refer to Chapter 8. The table below includes the most common problems that may occur when working with the instrument, including possible causes and correc- tive action. - Page 33 Non-homogeneous paraffin - Air pockets in dispenser at - Keep dispenser open at flow (e.g. air pockets). the start. maximum flow for a period of time. Leica EG1150 H – Paraffin Embedding Station...
- Page 34 Troubleshooting Problem Possible cause Corrective action 5. Illumination does not work. - Cap of the work area - Check adjustment of halogen lamp incorrectly lamp cap. positioned. (see Figures 12 / - Replace bulb - Bulb defective. (see Chapter 7.2) - Replace fuse - Fuse defective.
-
Page 35: Replacing The Halogen Lamp
4. Hold the new lamp with care (do not touch the glass bulb!) and insert in the housing. 5. Replace cap (observing correct align- ment!) and turn to the “I“ to “I“ posi- tion. Fig. 23 Leica EG1150 H – Paraffin Embedding Station... -
Page 36: Changing A Fuse
Troubleshooting 7.3 Changing a fuse Before changing a fuse switch the instrument off and pull out the mains plug. Use ONLY the provided replacement fuses. Important! The instrument has a number of circuits that are protected by fuses with different values. Observe the following instructions exactly to ensure that the correct spare fuse is used for the matching fuse holder. - Page 37 Insert the fuse holder with the spare fuse, press in us- ing screwdriver (1) and se- cure by turning it clockwise 1/4 turn. Replace fuse cover (6,7). Fig. 26 Leica EG1150H – Paraffin Embedding Station...
-
Page 38: Warranty And Service
Leica Biosystems Nussloch GmbH guarantees that the contractual prod- uct delivered has been subjected to a comprehensive quality control pro- cedure based on the Leica in-house testing standards, and that the prod- uct is faultless and complies with all technical specifications and/or agreed characteristics warranted.
Need help?
Do you have a question about the EG1150 H and is the answer not in the manual?
Questions and answers