Table of Contents
Advertisement
Quick Links
Contents
1.Users Considerations------------------------------------------------------------------------------------------------------------------------------------------------------------------ 2
2.Description of Bike Structure--------------------------------------------------------------------------------------------------------------------------------------------------------- 3
3.Bike Unpacking and Assembling---------------------------------------------------------------------------------------------------------------------------------------------------- 4
4.Bike Debugging Instruction----------------------------------------------------------------------------------------------------------------------------------------------------------- 9
4.1 Disc Brake Device Debugging--------------------------------------------------------------------------------- ------------------------------------------------------------- 9
4.2 Shifting System Debugging-------------------------------------------------------------------------------------------------------------------------------------------------11
4.3 Battery Charging-----------------------------------------------------------------------------------------------------------------------------------------------------------------12
4.4 Whole bike Circuit Test----------------------------------------------------------------------------------------------------------------------------------------------------------- 13
5. Common Circuit Problems Checking-------------------------------------------------------------------------------------------------------------------------------------------- 15
6. Daily Maintenance Instruction----------------------------------------------------------------------------------------------------------------------------------------------------- 18
E L E C T R I C B I C Y C L E M A N U A L - B I G B O Y
Page 1
Advertisement
Table of Contents

Subscribe to Our Youtube Channel
Related Manuals for RBSM BIGBOY


Summary of Contents for RBSM BIGBOY
-
Page 1: Table Of Contents
Contents 1.Users Considerations------------------------------------------------------------------------------------------------------------------------------------------------------------------ 2 2.Description of Bike Structure--------------------------------------------------------------------------------------------------------------------------------------------------------- 3 3.Bike Unpacking and Assembling---------------------------------------------------------------------------------------------------------------------------------------------------- 4 4.Bike Debugging Instruction----------------------------------------------------------------------------------------------------------------------------------------------------------- 9 4.1 Disc Brake Device Debugging--------------------------------------------------------------------------------- ------------------------------------------------------------- 9 4.2 Shifting System Debugging-------------------------------------------------------------------------------------------------------------------------------------------------11 4.3 Battery Charging-----------------------------------------------------------------------------------------------------------------------------------------------------------------12 4.4 Whole bike Circuit Test----------------------------------------------------------------------------------------------------------------------------------------------------------- 13 5. Common Circuit Problems Checking-------------------------------------------------------------------------------------------------------------------------------------------- 15 6. -
Page 2: Users Considerations
Please pay attention to it. 5. Please do not disassemble and decompose components by yourself, you can buy standard components from RBSM Corp for replacement. -
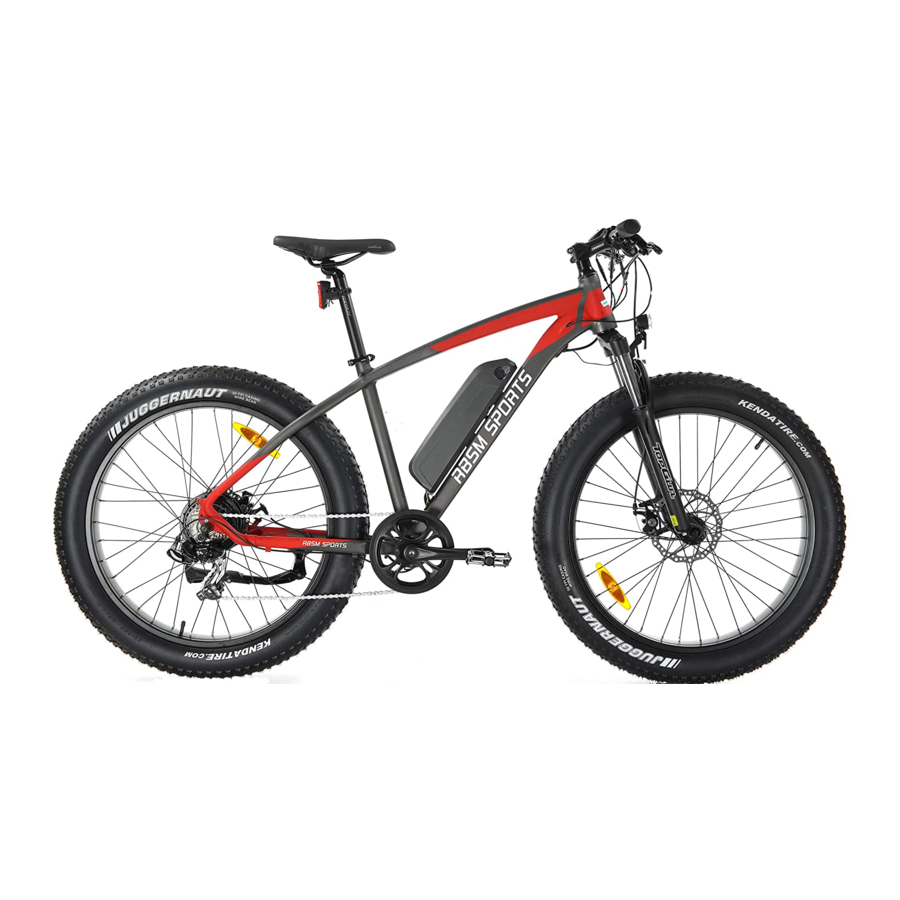
Page 3: Description Of Bike Structure
Description of Bike Structure 1. Seat post clamp 2. Stem 3. Handle bar 4. Frame of the Bicycle 5. Front Disc brake Device 6. Battery and Controller 7. Pedal 8. Rear Derailleur 9. Flywheel 10. Rear Disc brake Device 11. Crank set 12. -
Page 4: Bike Unpacking And Assembling
Bike Unpacking and Assembling 1.Unpacking the packaging box and making an inventory of accessories. 2.Taking out the bike from the packaging box, clipping the ribbons which used on front wheel and handlebar, dismantling the pearl wool cover on bike. E L E C T R I C B I C Y C L E M A N U A L - B I G B O Y Page 4... - Page 5 Bike Unpacking and Assembling 3.Find the front wheel quick release rod, fix the front wheel in the front fork and keep the front wheel on the center of the fork, then tighten the quick- release rod; 4.Fix the front disc brakes with the inner six screws on the front fork disc brake mount. E L E C T R I C B I C Y C L E M A N U A L - B I G B O Y Page 5...
- Page 6 Bike Unpacking and Assembling 5.Putting down the kick stand to make the bike stand on the ground. 5.1 dismount the screws 5.2 Assemble the Handle bar to the stem and tighten the screws; Please ensure the handle bar should be symmetrical and the Stem should be in the center of frame; E L E C T R I C B I C Y C L E M A N U A L - B I G B O Y Page 6...
- Page 7 Bike Unpacking and Assembling 6.Lock the head light to the front fork by the screw, washer and nut; (A) 7.Put the seat post inside the seat tube, adjust it to proper height and lock the seat post clamp; (B) Please pay attention: the seat post cannot be lower than the security line; E L E C T R I C B I C Y C L E M A N U A L - B I G B O Y Page 7...
- Page 8 Bike Unpacking and Assembling 8.Fix the pedals to crank arm and lock by wrench; E L E C T R I C B I C Y C L E M A N U A L - B I G B O Y Page 8...
-
Page 9: Bike Debugging Instruction
Bike Debugging Instruction 1.Disc brake Device Debugging: 1.1Adjusting the right and left space of disc brake’s shoe by adjusting the position of the bracket of disc brake device to achieve the back lash uniformity at the both sides of disc brake pad and disc brake device : You can also slightly adjust the space between disc brake piece and disc brake device by slightly adjust the screws on the right side of disc brake device. - Page 10 Bike Debugging Instruction 1.2. Finally, through adjusting the installed nut of the fixed brake core of disc brake device and adjusting the core’s degree of tightness to achieve the proper degree of tightness of the brake which means effective brake can be realized when the brake handle is pushed to the 1/3 position.
-
Page 11: Shifting System Debugging
Bike Debugging Instruction 2.Shifting Device Debugging: 2.1Through adjusting the regulating screws on the back derailleur to make the center of guide wheel is placed at the same line as the center of the flywheel’s minimum tooth when the derailleur is at the outermost place, and make the center of guide wheel is placed at the same line as the center of the flywheel’s maximum tooth when the derailleur is at the innermost place. -
Page 12: Battery Charging
Bike Debugging Instruction 3.Battery charging: 3.1Use to charger to charge the bike battery. Under charged, two charger indicator lights are red; (A) Battery is full or not under charged, the indicator lights are green+red; (B) E L E C T R I C B I C Y C L E M A N U A L - B I G B O Y Page 12... -
Page 13: Whole Bike Circuit Test
Bike Debugging Instruction 4.Whole bike Circuit Test: 4.1Display button instruction 1.Display switch 2.Head light switch button 3.Model button to choose assistant level 4.Battery indicator 5.Head light indicator light 6.Assistant Level 4.2Please check whether all of the bikes electric connectors are in normal condition before the circuit test. 4.3Please open the display to check the battery indicator, head light indicator, assistant level light work normally or not;... - Page 14 Bike Debugging Instruction 4.7The sensor indicator is flashing normally 4.8when the assistant level is on Low, middle or high level, please turn the crank arm, the motor starts to work, and the other hand gently pinch the brake lever, the motor will stop working without electricity; E L E C T R I C B I C Y C L E M A N U A L - B I G B O Y Page 14...
-
Page 15: Common Circuit Problems Checking
Common Circuit Problems Checking 1. Whole bike is out of power/ display cannot be turned on 1.Please use a Multimeter to check whether there is a voltage at the discharge end of the battery. (36V battery voltage is more than 31.5V generally,48V battery voltage is more than 42.5V generally) 2.Please check whether the battery plug-in is installed in place, whether the positive and negative electrode is installed in reverse;... - Page 16 Common Circuit Problems Checking 5. Whole bike without assistance: Situation one (if the bike with throttle) The Display can be lighted up, the motor works if we push throttle(if the bike has) or use 6KM/H pushing speed function, while there is no assistance power when we cranking;...
- Page 17 Common Circuit Problems Checking 7. head light or tail light cannot work Condition 1: the lights with dry battery Check whether the dry batteries of taillight or head light have ran out, if yes, please change new ones ; Condition 2: the lights are connected wire A).
-
Page 18: Daily Maintenance Instruction
Daily Maintenance Instruction 1. Lubrication is an important part of the maintenance of electric bike. The front axle, central shaft, flywheel and the pivot point of the front fork shock absorber should be inspected and cleared of any dirt or debris every six months. If necessary, add butter or oil. Lubricant Parts Lubricant Interval Recommended Lubricating Oil...
Need help?
Do you have a question about the BIGBOY and is the answer not in the manual?
Questions and answers
Bonjour je possède un vélo de montagne reconditionné de type RBSM sport que je me suis procuré en 2023 chez Best Buy : malheureusement j ai égaré mes clefs de batterie qui sur le vélo ,et c est impossible d enlever la batterie . J aimerais me procure de nouvelles clés...est ce une possibilité ; Merci et une réponse serait apprécié J habite au Québec
@Jocelyn Gauthier Je voulais dire que la batterie est sur le vélo et c est impossible de l enlevé , compte tenu que je n ai pas de clé...