
Related Manuals for Hoover ONE Pet


Summary of Contents for Hoover ONE Pet
- Page 1 User Guide Please read carefully before use English 2 -1 4 Deutsch 15-27 Français 28-40 Italiano 4 1- 5 3 Nederlands 54-66 Česky 6 7-79 What could be easier than...
-
Page 2: Table Of Contents
• Continue to use your cleaner if it appears to be faulty. If the supply cord is damaged stop using the cleaner The supply cord must be replaced by an authorized Hoover IMMEDIATELY. service engineer to avoid a safety hazard To avoid safety hazards the cleaner must only be repaired by an authorised Hoover Service Engineer. www.hoover.co.uk... -
Page 3: Getting To Know Your Cleaner P
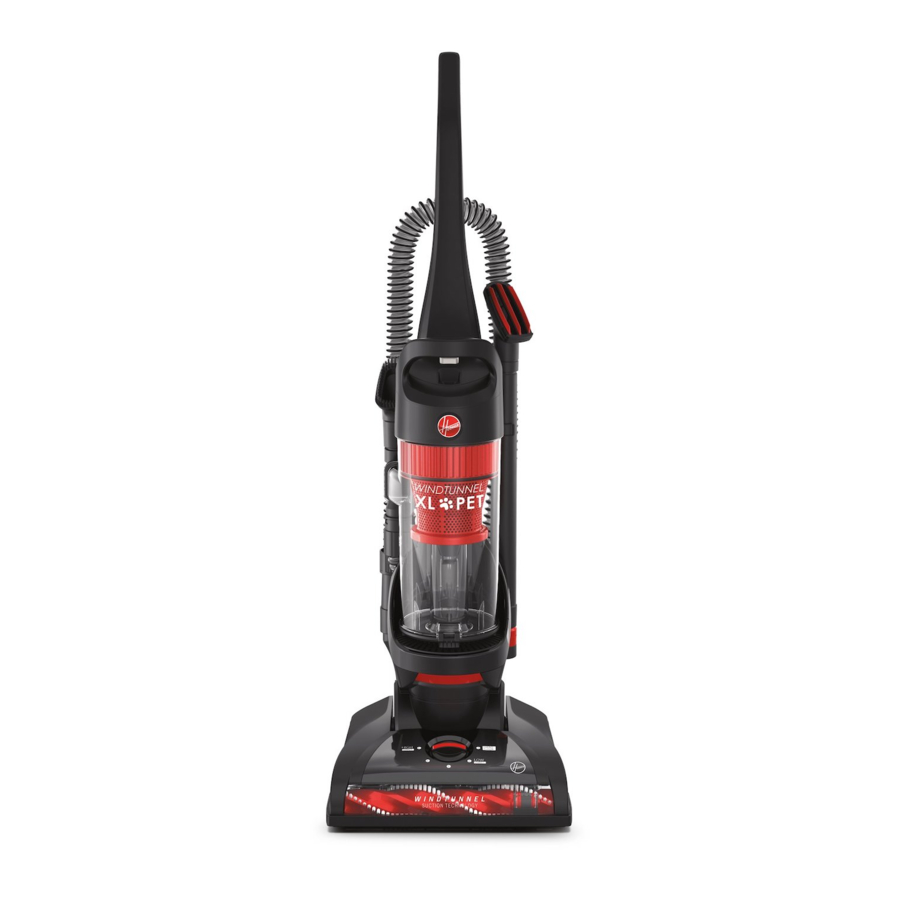
Getting to know your cleaner ZOOM ON/OFF CLEANING TOOL SWITCH STAIR CLEANING RELEASE BUTTON CARRYING HANDLE PRE MOTOR FILTER COVER RELEASE BUTTON PET HAIR REMOVER DUST E XTRA LONG DUSTING CONTAINER INFINITY HOSE BRUSH DUST LEVEL VIEWING WINDOW HOSE CLIPS CORD EXHAUST REWIND... - Page 4 Congratulations. You now own the power of “Congratulations on your purchase of The One – the vacuum cleaner that delivers the power of one touch from Hoover. One Touch is all it takes to meet your cleaning needs. One Touch switches the cleaner from carpet to hard floor cleaning.
-
Page 5: Assembling Your Cleaner P
Place the dust container onto the ribbed moulding and push into main body until it clicks into place. Hang the Infinity hose over the shoulder of the hose support. Feed the hose following the direction indicated by the arrows. Ensure the hose is clipped in place to prevent it becoming loose. www.hoover.co.uk... -
Page 6: Using Your Cleaner P
To stop the brush from rotating, select “Hard Floor” by pressing the carpet and hard floor selector (5a). An orange light will illuminate. Use this setting on hard floors or surfaces prone to marking (5b). The brush will automatically stop when The One is in parking position. www.hoover.co.uk... - Page 7 11 Dusting brush The dusting brush is stored on the cleaner body and fits on the crevice tool. It is ideal for gentle dusting on all surfaces. REMEMBER - Make sure handle is fully clicked into place after use. www.hoover.co.uk...
-
Page 8: Maintaining Performance P
Maintaining performance EMPTYING THE DUST CONTAINER For peak performance we recommend the dust container is emptied on a regular basis. Filling must not exceed the maximum level indicated on the dust level viewing window. REMEMBER – Always switch off and unplug the machine from the electricity supply before maintaining your cleaner. - Page 9 16 Hepa Anti odour filter The One Pet is fitted with a HEPA Anti Odour exhaust filter to retain finest dust particles and unpleasant odours. After 12 months you may wish to replace the exhaust filter with a new one.
- Page 10 Reinsert the plug into the socket and turn the cleaner on. Please be aware the cleaner will automatically return to its last setting when switched on. NOTE: It will take about 10 minutes for the safety device to automatically reset. www.hoover.co.uk...
-
Page 11: Before Calling Hoover P1
(refer to section 5) Are the brushes rotating? (refer to section 19) REMEMBER - If there is any doubt, call the Hoover Advice Helpline (open 7 days a week) on 08705 400600. They may be able to assist you over the telephone. - Page 12 Notes www.hoover.co.uk...
-
Page 13: Important Information
12 months. Safety and the Environment As the owner of a new Hoover product, we would like to tell you more about the high standards we have set in safety and the environment. -
Page 14: Your Guarantee
Your guarantee Your Hoover Guarantee During year 1 HOOVER engineers will replace or repair all defective parts free of charge, except for parts subject to fair wear and tear such as belts, brushes and bags. To qualify for benefits under guarantee, you must be able... - Page 15 • Den Staubsauger bitte nicht mehr benutzen, wenn ein Defekt des Gerätes vorliegt oder vermutet wird. Ist das Netzkabel beschädigt, darf der Staubsauger NICHT LÄNGER benutzt werden. Ein beschädigtes Netzkabel muss von einem zugelassenen Hoover-Kundendiensttechniker ausgetauscht werden, damit die Sicherheit des Geräts gewährleistet ist Um den sicheren und wirksamen Betrieb dieses Geräts zu gewährleisten, dürfen Reparaturarbeiten nur von...
-
Page 16: Bezeichnung Der Teile P
Bezeichnung der Teile EIN/-AUSSCHALTER TELESKOPDÜSE AUSLÖSEKNOPF TREPPENREINIGUNG TRAGEGRIFF MOTORSCHUTZFILTER- AUSLÖSEKNOPF DECKEL STAUBBEHÄLTER TIERHAARDÜSE EXTRA- LANGER STAUBBE- INFINITY-SAUG- HÄLTER SCHLAUCH MÖBELPINSEL SICHTFENSTER STAUBFÜLLSTAND KABEL- SCHLAUCHSCHELLEN AUFWICK- SCHALTER LUNG- ABLUFTFILTER TEPPICH/- STASTE HARTBODEN- REINIGUNG... -
Page 17: Prüfliste P
Herzlichen Glückwunsch! Sie besitzen jetzt die Power von Herzlichen Glückwunsch zum Kauf Ihres The One - eines Staubsaugers von Hoover, der höchste Leistung liefert und all Ihren Reinigungsansprüchen mit einem einzigen One Touch/einem einzigen Knopfdruck gerecht wird. Ein One Touch/Knopfdruck schaltet den Staubsauger von Teppich- zu Hartbodenreinigung um. -
Page 18: Zusammenbau Des Staubsaugers P
Setzen Sie den Staubbehälter auf das gerippte Formpressteil und drücken Sie ihn in den Staubsaugerkörper, bis der Behälter einklickt. Hängen Sie den Infinity-Saugschlauch über die Schulter des Schlauchhalters. Führen Sie den Schlauch in Pfeilrichtung. Klicken Sie den Schlauch ein, damit er sich nicht lösen kann. www.candy-hoover.de... -
Page 19: Gebrauch Des Staubsaugers P
Die Bürstwalze stoppt automatisch, sobald das Gerät in die Parkposition gebracht wird. In der Einstellung „Hartbodenreinigung“, angezeigt durch ein oranges Licht (5a), bleibt die Bürstwalze auch in der Arbeitsposition abgeschaltet, um empfindliche Böden vor Beschädigung zu schützen (5b). www.candy-hoover.de... - Page 20 11 Möbelpinsel Der Möbelpinsel wird am Staubsaugerkörper aufbewahrt und passt auf die Fugendüse. Er eignet sich ideal zum schonenden Entstauben von Flächen aller Art. ACHTUNG - Setzen Sie den Griff nach Gebrauch wieder fest ein (d.h., er muss eingeklickt sein). www.candy-hoover.de...
-
Page 21: Aufrechterhaltung Der Leistungsfähigkeit
Rückseite des Behälters mit der Handfläche herunter (13a). Hierdurch wird der feine Staub zuerst entleert. Drehen Sie den Handgriff mit den Fingern, bis der Staubbehälter vollständig geöffnet ist, und entleeren Sie den übrigen Schmutz (13b). Verschließen Sie den Staubbehälter in umgekehrter Reihenfolge zu den vorigen Schritten. www.candy-hoover.de... - Page 22 Nachlassen der Saugleistung festgestellt wird, zu reinigen. 16 HEPA-Antigeruchsfilter The One Pet ist mit einem HEPA-Antigeruchsabluftfilter ausgestattet, damit auch feinste Staubteilchen und unangenehme Gerüche zurückgehalten werden. Der Abluftfilter sollte nach 12 Monaten durch einen neuen ersetzt werden. Dieses Teil kann von der GIAS Service Division unter Tel.
- Page 23 Wenn sich die Bürste wieder frei drehen lässt, kann der Staubsauger wieder benutzt werden. Stecken Sie den Gerätestecker wieder in die Netzdose und schalten Sie den Staubsauger ein. Der Staubsauger beginnt wieder automatisch in der Betriebsart, die zuletzt eingestellt war. HINWEIS: Das automatische Rückstellen der Sicherheitsvorrichtung dauert etwa 10 Minuten. www.candy-hoover.de...
-
Page 24: Bevor Sie Sich An Hoover Wenden P
Bevor Sie sich an Hoover wenden Prüfliste zur Fehlersuche Falls Ihr Staubsauger überhaupt nicht mehr arbeitet, nehmen Sie die Fehlersuche anhand der folgenden Kontrollliste vor: Ist die Stromversorgung in Ordnung? Mit einem anderen elektrischen Gerät überprüfen. Ein automatischer Überhitzungsschutz schaltet den Staubsauger automatisch ab, um die Überhitzung des Geräts zu vermeiden, wenn es mit einem zu vollen Staubbehälter... - Page 25 Notizen www.candy-hoover.de...
-
Page 26: Wichtige Informationen P
Fachhändler erhältlich. Geben Sie bei der Bestellung von Ersatzteilen bitte stets die Modellnummer Ihres Produkts an. Hoover-Kundendienst Zur Wartung oder Reparatur Ihres Produkts wenden Sie sich bitte an Ihre zuständige Hoover- Kundendienststelle. Sicherheit und Umweltschutz Wir möchten Ihnen, als dem Besitzer eines neuen Hoover-Produkts, gern mehr über die hohen Standards, die wir in Bezug auf Sicherheit und Umweltschutz setzen, mitteilen. -
Page 27: Garantieerklärung P
D-40878 Ratingen www.candy-hoover.de Kundendienst Deutschland (GIAS Customer Service) 01805 / 62 55 62 (0,12 ¤ / Min.) Österreich Candy Hoover Austria GmbH Dominikanerbastei 4 A-1011 Wien www.candy-hoover.at Kundendienst Österreich (GIAS Customer Service) 0820 / 220 224 (0,15 ¤ / Min.) -
Page 28: Remarques Importantes Concernant La Sécurité P
• Continuer à utiliser votre aspirateur s’il semble défectueux. Si le cordon d’alimentation est endommagé, arrêtez IMMEDIATEMENT d’utiliser l’aspirateur. Le cordon d’alimentation doit être remplacé par un technicien Hoover agréé pour éviter les risques d’accident Pour éviter les risques d’accident, l’aspirateur doit seulement être réparé par un technicien Hoover agréé. www.hoover.fr... -
Page 29: Première Utilisation P
Première utilisation ACCESSOIRE DE BOUTON NETTOYAGE INTERRUPTEUR D’EJECTION TELESCOPIQUE MARCHE/ARRET POUR LE NETTOYAGE DES ESCALIERS POIGNEE DE TRANSPORT BOUTON COUVERCLE DU FILTRE D’EJECTION DE PROTECTION DU BAC ELIMINATEUR DE POILS D’ANIMAUX TUYAU BAC A EXTENSIBLE BROSSE POUSSIERE EXTRA LONG A POUSSIERE FENETRE DE CONTROLE DU NIVEAU DE... -
Page 30: Liste Des Pièces P
Félicitations. Vous disposez maintenant de la puissance du Nous vous remercions pour votre achat de l’appareil “The One” – l’aspirateur qui met la puissance Hoover au bouts de vos doigts. Une seule touche suffit pour répondre à tous vos besoins de nettoyage. One Touch adapte l’aspirateur aux tapis et aux sols durs. -
Page 31: Montage De L'aspirateur P
Placez le bac à poussière sur le moulage à rainure et poussez le dans le corps principal jusqu’à ce qu’il s’enclenche. Placez le flexible extensible sur son support en suivant le sens des flèches. Assurez-vous que le flexible est fixé correctement pour éviter qu’il ne se détache. www.hoover.fr... -
Page 32: Utilisation De L'aspirateur P
Pour arrêter la rotation de la brosse, sélectionnez la position “Hard Floor” en appuyant sur le sélecteur à la base du produit (5a). Un voyant orange s' a llumera. La position “Hard Floor” est particulièrement indiquée sur les surfaces délicates (5b). La brosse s’arrête automatiquement quand The One est en position parking. www.hoover.fr... - Page 33 La brosse à poussière se trouve sur le corps de l’aspirateur et se fixe sur le suceur. Elle est parfaitement adaptée au dépoussiérage en douceur de toutes les surfaces. RAPPEL - Vérifiez que la poignée est bien enclenchée après utilisation. www.hoover.fr...
-
Page 34: Maintien Des Performances D'aspiration P
à l’arrière du récipient (13a). Faites basculer la poignée grise vers vous afin d’ouvrir complètement le récipient à poussière et vider les débris restants (13b). Répétez l’opération dans le sens contraire pour refermer le récipient. www.hoover.fr... - Page 35 16 Filtre anti-odeurs Hepa L’aspirateur The One Pet est doté d’un filtre anti-odeurs HEPA qui permet de retenir les particules de poussière les plus fines et les odeurs désagréables. Après 12 mois, il est préférable de remplacer ce filtre par un nouveau. Cette pièce peut être commandée par l’intermédiaire du service client GIAS au 0892 35 00 89 (pièce no.
- Page 36 Maintien des performances d’aspiration ELIMINATION DES BLOCAGES RAPPEL – Eteignez et débranchez toujours l’appareil de l’alimentation avant de procéder à des opérations d’entretien. 17 Elimination des blocages dans le tuyau flexible Tournez les bagues de fixation du flexible pour le détacher de la base de l’aspirateur et de la poignée.
-
Page 37: Avant D'appeler Hoover P
Avant d’appeler Hoover Liste des vérifications à effectuer Si votre aspirateur cesse complètement de fonctionner, veuillez procéder aux vérifications de la liste suivante : L’aspirateur est-il alimenté en électricité ? Essayez de brancher un autre appareil à la même prise. - Page 38 Notes www.hoover.fr...
-
Page 39: Informations Importantes P
Informations importantes Pièces Hoover d’origine Remplacez toujours les pièces par des pièces Hoover d' o rigine. Elles sont disponibles auprès de votre revendeur Hoover. Quand vous commandez des pièces, veuillez toujours spécifier le numéro de votre modèle. Service Hoover Pour tout service, à tout moment, veuillez appeler le Centre de service Hoover le plus proche. -
Page 40: Votre Garantie P
Votre garantie Votre garantie Hoover Les conditions de garantie de cet appareil sont définies par notre représentant dans le pays où il est vendu. Les détails concernant ces conditions de garanties peuvent être obtenus en s'adressant au revendeur auquel il a été acheté. - Page 41 IMMEDIATAMENTE l’aspirapolvere. È necessario che un addetto alla manutenzione autorizzato da Hoover provveda alla sostituzione per non mettere a rischio la sicurezza dell’utilizzatore Per non mettere a rischio la sicurezza dell’utilizzatore, rivolgersi esclusivamente al servizio di assistenz a autorizzato Hoover.
- Page 42 Descrizione dell’aspirapolvere I MPUGNATURA TELESCOPICA CONTENITORE INTERRUTTORE RACCOGLI- ACCENSIONE/ PULSANTE POLVERE SPEGNIMENTO (ON/OFF) DI SGANCIO PER LA PULIZIA DELLE SCALE IMPUGNATURA MINI TURBO PER TRASPORTO SPAZZOLA COPERCHIO PULSANTE DI PULSANTE DELL’ALLOGGIAMENTO SGANCIO PER IL DEL FILTRO PRE-MOTORE DEL RECIPIENTE RIAVVOLGI- MENTO DEL CAVO TUBO...
- Page 43 Congratulazioni per aver scelto la forza del Congratulazioni per aver acquistato The One – l’aspirapolvere che porta nella vostra casa la forza del One Touch di Hoover. One Touch è la perfetta soluzione per qualsiasi vostra esigenza di pulizia. Grazie a...
- Page 44 Posizionare il contenitore raccoglipolvere nella sagoma scanalata e inserirlo nel corpo centrale fino a farlo scattare in posizione. Inserire il tubo Infinity sul supporto apposito. Far scorrere il tubo nella direzione indicata dalle frecce. Assicurarsi che il tubo sia inserito nelle clip per evitare che si allenti. www.hoover.it...
- Page 45 Per arrestare la spazzola, selezionare la modilita “Hard Floor” (Pavimenti) premendo il selettore Tappeti/Pavimenti (5a). Si illuminerà una luce arancione. Selezionare la modilita “Hard Floor” (Pavimenti) sulle pavimentazioni dure o sulle superfici delicate (5b). La spazzola si arresterà automaticamente quando The One è in posizione di parcheggio. www.hoover.it...
- Page 46 11 Spazzola a pennello La spazzola a pennello è riposta sul corpo dell’aspirapolvere e va inserita sulla bocchetta per fessure. È perfetta per spolverare con cura tutte le superfici. AVVERTENZA – Dopo l’uso assicurarsi che l’impugnatura sia scattata in posizione. www.hoover.it...
- Page 47 (13a). Ruotare l’impugnatura con le dita per aprire completamente il contenitore raccoglipolvere e svuotare i restanti rifiuti (13b). Ripetere le operazioni in senso inverso per chiudere il contenitore. www.hoover.it...
- Page 48 16 Filtro antiodore Hepa L’aspirapolvere The One Pet è munito di un filtro di uscita antiodore HEPA in grado di rimuovere le polveri più fini e gli odori sgradevoli. Può essere necessario sostituire il filtro di uscita dopo 12 mesi.
- Page 49 Se le spazzole ruotano liberamente, è possibile utilizzare nuovamente l’aspirapolvere. Reinserire la spina nella presa e accendere l’aspirapolvere. Prestare attenzione in quanto, una volta acceso, l’aspirapolvere torna automaticamente all’ultima impostazione utilizzata. NOTA: Per il reset automatico del dispositivo di sicurezza saranno necessari circa 10 minuti. www.hoover.it...
- Page 50 Prima di contattare l’assistenza Hoover Checklist utente Se l’aspirapolvere ha smesso completamente di funzionare, consultare la seguente checklist: L’aspirapolvere è stato collegato ad una presa di corrente funzionante? Controllare con un altro dispositivo elettrico. Un interruttore termico provoca lo spegnimento dell’aspirapolvere per evitare il surriscaldamento se si usa l’apparecchio quando il contenitore è...
- Page 51 Note w w w w w w . . h h o o o o v v e e r r . . i i t t...
- Page 52 Informazioni importanti Ricambi originali Hoover Utilizzare sempre parti di ricambio originali Hoover. Queste si possono acquistare dal distributore locale Hoover. Quando si ordinano delle parti, ricordarsi sempre di fornire il numero del modello di apparecchio utilizzato. Assistenza Hoover Per richiedere assistenza in qualsiasi momento, chiamare il centro assistenza Hoover più vicino.
- Page 53 è stato acquistato. Per ogni contestazione nei termini della garanzia è necessaria l'esibizione della fattura o di documento equipollente. Soggetta a modifiche senza preavviso. Zerowatt. Hoover S.p.A. Sede commerciale:via Privata E.Fumagalli, 20047 Brugherio (Mi) Tel +39 039 208655 servizioclienti@hoover.it...
-
Page 54: Belangrijke Veiligheidstips P
De stofzuiger monteren P 57 De stofzuiger gebruiken P 58 De stofzuiger in goede staat houden P 60 Voordat u Hoover belt P 63 Belangrijke informatie P 65 Uw garantie P 66 B B E E L L A A N N G G R R I I J J K K E E v v e e i i l l i i g g h h e e i i d d s s t t i i p p s s Deze stofzuiger is uitsluitend bestemd voor huishoudelijk gebruik zoals beschreven in deze gebruiksaanwijzing. -
Page 55: Alles Over Uw Stofzuiger P
Alles over uw stofzuiger ZOOM HULPSTUK AAN/UIT -SCHAKELAAR ONTGRENDELKNOP OM TRAP TE ZUIGEN HANDGREEP ONTGRENDELKNOP DEKSEL OM RESERVOIR TE MOTORFILTER LEGEN ZUIGSTUK VOOR DIERENHAREN STOF- EXTRA LANGE STOF- RESERVOIR SLANG BORSTEL KIJKVENSTER STOFNIVEAU SLANGCLIPS OPWINDKN UITLAAT- FILTER SCHAKELAAR SNOER TAPIJT/HARDE VLOER... -
Page 56: Checklist Onderdelen P
Gefeliciteerd. U profiteert voortaan van de kracht van “Gefeliciteerd met uw aankoop van The One – een stofzuiger met de ‘one touch’-kracht van Hoover. One Touch is voldoende voor al uw reinigingswerk. One Touch schakelt u over van het zuigen van tapijt naar harde vloeren. -
Page 57: De Stofzuiger Monteren P
Plaats het stofreservoir op het geribbelde gedeelte en druk het tegen de stofzuiger totdat het op zijn plaats klikt. Hang de extra lange slang over de schouder van de slangsteun. Plaats de slang zoals de pijlen aangeven. Druk de slang tussen de twee clips vast. www.hoover.nl... -
Page 58: De Stofzuiger Gebruiken P
Als u “harde vloer” selecteerd zal de borstel stoppen met draaien (5a). Er verschijnd een oranje lampe. Gebruik deze stand op harde vloeren (5b). De borstel zal automatisch stoppen met draaien als “The One” rechtop wordt gezet. www.hoover.nl... - Page 59 De stofborstel is opgeborgen in de stofzuiger en past op de kierenzuigmond. Dit hulpstuk is ideaal voor het afstoffen van allerlei oppervlakken. LET OP - Zorg ervoor dat u na gebruik de handgreep weer goed op zijn plaats vastklikt. www.hoover.nl...
-
Page 60: De Stofzuiger In Goede Staat Houden P
(13a). Verdraai de handgreep met uw vingers om het stofreservoir volledig te openen en de rest van het vuil weg te gooien (13b). Herhaal de handelingen in omgekeerde volgorde om het stofreservoir weer te monteren. www.hoover.nl... - Page 61 16 Hepa antigeurfilter The One Pet is uitgerust met een HEPA antigeur-uitblaasfilter om de fijnste stofdeeltjes en onaangename geurtjes vast te houden. Na 12 maanden kunt u het uitblaasfilter door een nieuw vervangen.
- Page 62 Steek de stekker weer in het stopcontact en zet de stofzuiger aan. LET OP: de stofzuiger keert bij het aanzetten weer automatisch terug naar de laatst gebruikte instellingen. OPMERKING: Het duurt ongeveer 10 minuten voordat de stofzuiger weer werkt. www.hoover.nl...
-
Page 63: Voordat U Hoover Belt P
Voordat u Hoover belt Checklist gebruiker Als uw stofzuiger het helemaal niet meer doet, loop dan de volgende checklist na: Krijgt de stofzuiger stroom? Controleer het stopcontact met een ander elektrisch apparaat. Een thermische beveiliging schakelt de stofzuiger automatisch uit om oververhitting te voorkomen wanneer de stofzuiger wordt gebruikt als het stofreservoir vol is, als de filters moeten worden gereinigd, of als er een verstopping is. - Page 64 Opmerkingen www.hoover.nl...
-
Page 65: Belangrijke Informatie P
Veiligheid Hoover vindt dat een onafhankelijke erkenning de beste manier is om aan te tonen dat zowel het ontwerp als de fabricage veilig zijn. De British Electrotechnical Approvals Board (BEAB) is een... - Page 66 Uw garantie Uw Hoover garantie De garantievoorwaarden voor dit toestel worden bepaald door onze vertegenwoordiger in het land waar het toestel wordt verkocht. Bijzonderheden omtrent deze voorwaarden zijn verkrijgbaar bij de dealer bij wie het toestel is gekocht. Wanneer u aanspraak wilt maken op deze garantie, dan moet u het verkoop- of ontvangstbewijs voorleggen.
-
Page 67: Důležitá Bezpečnostní Upozornění
• Používat vysavač při podezření, že má poruchu. Pokud je poškozen napájecí kabel, OKAMŽITĚ přestaňte vysavač používat. Pro vyloučení bezpečnostních rizik musí být napájecí kabel vyměněn autorizovaným servisním technikem společnosti Hoover Pro vyloučení bezpečnostních rizik může opravy provádět pouze autorizovaný servis společnosti Hoover. www.hoover.cz... -
Page 68: Poznáváme Vysavač
Poznáváme vysavač ŠTĚRBINOVÁ HUBICE VYPÍNAČ UVOLŇOVACÍ TLAČÍTKO PRO ČIŠTĚNÍ SCHODŮ DRŽADLO PRO PŘENÁŠENÍ TLAČÍTKO PRO KRYT FILTRU UVOLNĚNÍ ODPADNÍ PŘED MOTOREM NÁDOBY HUBICE NA ČALOUNŮNÍ EXTRA DLOUHÁ ZÁSOBNÍK PRUŽNÁ KARTÁČ NA PRACH HADICE NA PRACH OKÉNKO PRO KONTROLU MNOŽSTVÍ PRACHU SVORKY FILTR PRO NA HADICI... -
Page 69: Seznam Součástek
Děkujeme vám. Nyní jste majiteli výrobku značky “Děkujeme vám, za zakoupení výrobku The One – vysavače značky one touch od společnosti Hoover. One Touch uspokojí všechny vaše požadavky na vysávání. One Touch přepíná vysavač z režimu čištění koberců na čištění tvrdých podlah. -
Page 70: Sestavení Vysavače
části vysavače, aby zaklaplo na místo. Umístěte zásobník na prach do žebrového vybrání a zatlačte jej do těla vysavače, aby zaklapl na místo. Zahákněte hadici přes raménko držáku hadice. Posuňte hadici ve směru označeném šipkami. Zajistěte upevnění hadice na místo, aby se neuvolnila. www.hoover.cz... -
Page 71: Jak Používat Vysavač
Rotaci kartáče lze zastavit stisknutím voliče pro koberce/tvrdé podlahy (5a), výběrem volby "Tvrdá podlaha". Rozsvítí se oranžová kontrolka. Použijte toto nastavení při čištění tvrdých podlah náchylných k šmouhám (5b). Kartáč se automaticky přestane otáčet, když je The One v parkovací pozici. www.hoover.cz... - Page 72 Je ideální pro čištění polstrování, schodů a mnoho dalších použití. 11 Prachový kartáč Prachový kartáč je uložen na tělese vysavače a nasazuje se na štěrbinovou hubici. Je ideální pro jemné odstranění prachu z každého povrchu. PAMATUJTE SI! Zkontrolujte, zda je držadlo po použití zcela zaklapnuto na místě. www.hoover.cz...
- Page 73 části zásobníku (13a). Prsty otáčejte držadlem, aby se zásobník plně otevřel a uvolněte zbytky po vysávání (13b). Operacemi v obráceném pořadí se zásobník na prach uzavře. www.hoover.cz...
-
Page 74: Údržba
5 vyprázdněních zásobníku na prach, nebo klesne-li výkon přístroje. 16 FILTR na zplodiny odsávání Vysavač The One Pet je vybaven vysoce účinným filtrem HEPA na zplodiny odsávání, který zadržuje nejjemnější prachové částice a nepříjemné pachy. Doporučujeme vám po 12 měsících vyměnit filtr za zplodiny za nový. Tento díl lze objednat ve firmě Stopas Praha s.r.o. - Page 75 Jakmile se kartáč volně otáčí, můžete vysavač opět používat. Zastrčte přívodní šňůru do zásuvky a vysavač zapněte. Při zapnutí mějte na paměti, že vysavač se automaticky vrátí do posledního nastavení. POZNÁMKA: Bude trvat asi 10 minut, než se bezpečnostní zařízení automaticky obnoví. www.hoover.cz...
-
Page 76: Než Zavoláte Hoover
Než zavoláte Hoover Kontrolní seznam pro uživatele Pokud váš vysavač přestal úplně fungovat, projděte si následující seznam: Funguje správně napájení vysavače? Zkontrolujte pomocí jiného elektrospotřebiče. Tepelná pojistka automaticky vypne vysavač, aby se zabránilo přehřátí, pokud je zásobník na prach přeplněný, je potřeba vyměnit filtry, nebo je vysavač ucpaný. - Page 77 Poznámky www.hoover.cz...
-
Page 78: Důležité Informace
S opravami se obracejte vždy na místní servisní středisko společnosti Hoover. Bezpečnost a životní prostředí Jako majiteli nového výrobku společnosti Hoover bychom vám rádi prozradili něco více o vysokých standardech, které jsme nastavili v oblasti bezpečnosti a ochrany životního prostředí. -
Page 79: Vaše Záruka
Záruka Záruka na vysavač firmy Hoover Záruční podmínky pro tento přístroj jsou definovány naším zástupcem v zemi, v níž se přístroj prodává. Podrobnosti týkající se těchto podmínek lze získat u prodejce, u něhož byl přístroj zakoupen. Při reklamaci podle podmínek této záruky je nutné...
Need help?
Do you have a question about the ONE Pet and is the answer not in the manual?
Questions and answers