Table of Contents
Advertisement
Quick Links
Advertisement
Table of Contents

Related Manuals for 100FIT 140T


Summary of Contents for 100FIT 140T
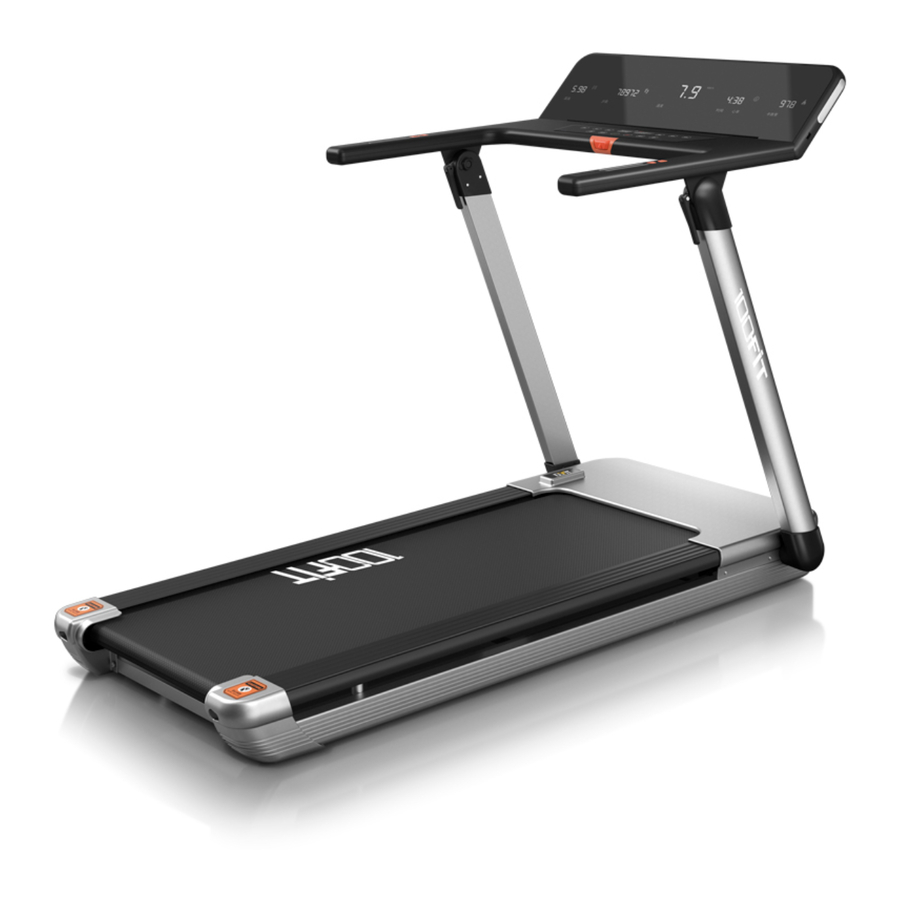
- Page 1 WWW.HUNDREDFIT.COM MOTORIZED TREADMILL INSTRUCTION MANUAL-140T...
- Page 2 C O N T E N T S 1- Product Outline ........2- Safety Instructions ........3- Installation Instructions ........4- Operation Instructions ........5- Daily Maintenance ........6- Warm-up ........Demonstration 7- Warranty ........
-
Page 4: Product List
2 .Product list Product list Treadmill Safety key Silicone oil Manual bag M anual Screw package... -
Page 5: Specification
Specification Specification Color silvery Net weight 60 KG Running belt 48*125cm Folding size 161*83*18cm Peak horsepower 4.5hp Speed 1-16KM/H Shock absorption 120kg Max user weight... - Page 7 Tips: This product is designed and manufactured with many safety issues in mind. Please follow the instructions below for just in case scenarios.We do not bear the consequences of any abnormal operation.To ensure your safety and avoid accidents, please read the instruction manual carefully 1- When you start training with this product, please consider your physical condition, train properly and regularly to ensure that you have enough physical strength to train.
-
Page 8: Special Notice
12.After the product is not in use, remove the safety key to prevent mishappening. 13.When in an emergency, quickly pull down the safety switch and step on the left and right side of the treadmill. 14.Before the treadmill is placed, the side of the left and right handrails needs one meter and a safety distance of two meters at the back. - Page 9 Treadmill folding instructions As shown in the figure below, to fold the treadmill, you must lift the handle up and then press down on the column and armrest.
- Page 10 Operating instructions in manual normal mode When you are using a treadmill, you must use a power outlet with a grounding wire for your safety. 1. Window display: 1. "DIS." window: Display "P01-P02-...-P12-HP1-HP2-FAT" in the program selection state; Displays the distance of movement, the forward count is from 0.00-99.0, and it is cleared to continue running after overflow;...
-
Page 11: Button Function
after a complete stop; distance, Calorie mode forward timing from 0:00-99:59, timing to 99:59 after clearing to continue to run; countdown will decrement from the set time to zero, when the countdown to 0:00, the treadmill will slow down smoothly Stop running, and enter the standby state 5 seconds after it stops completely. -
Page 12: Operation During Exercise
4. "STOP" is the stop button: this button can be used to stop the running of the treadmill and reset to zero during exercise. 5. "SPEED+" and "SPEED-" are speed plus and minus keys: in standby state, used to adjust the set value. It is used to adjust the speed after startup. The adjustment range value is 0.1 km/time. - Page 13 1. In the standby mode, directly press the "START" button, the treadmill starts to run at a speed of 1.0 km/h; other windows start counting forward from 0, press the "SPEED+" and "SPEED -" buttons to change the speed. 2. In the standby state, press the "MODE" key to enter the time countdown mode, the "TIME"...
- Page 14 “SPEED -” keys to change the speed, but when the program enters the next section After a period of time, it will be restored to the speed of that period. After running a program, the system will give out 3 beeps of "B iB i- B i", the treadmill will slow down and stop running and display "End", and enter 5 seconds after it stops completely.
- Page 15 Women' SPEED 8. Heart rate control program: 1. Run at the lowest speed after startup 2. The first 1 minute is a warm-up exercise, you can manually adjust the speed and lift 3. After warming up, calculate the heart rate difference (target heart rate-user's heart rate) as follows: A.
- Page 16 Heart rate Heart rate Heart rate default The default The smallest default smallest smalles smallest smalle smalles...
- Page 17 9, physical test: In the standby state, continuously press the "Program" button to enter the human body mass index (FAT) detection function, press the "Mode" button to enter the F-1, F-2, F-3, F-4, F-5 interface (F -1--Gender, F-2—Age, F-3—Height, F-4—Weight, F-5-Physique Test), press the "speed+" and "speed-" keys to adjust the parameters of 01-04 Set up (parameters as shown in the table below), and then press the "mode"...
- Page 18 50.0 Calories (kcal) 10.0-999.0 0.0-999.0 Step count 0-99999 11. Safety lock function: In any state, pull down the safety lock to stop the running of the treadmill. The treadmill will stop in an emergency, the speed window will display “―――”, and the buzzer will sound “BB”...
- Page 19 3. If there is any problem with this machine, please contact dealer, non-professionals, please disassemble or repair it to avoid damage to the equipment. 16. Simple troubleshooting methods for electric running: Malfunction or phenomenon Possible reason Processing method A.No power plugged in, or no power Connect the power cord to AC, or check the AC outlet B.The power switch is not turned on...
- Page 20 C.Bad drive Replace the drive A.Overloaded System protection, restart after manual blocking E05-overcurrent B.The transmission part is stuck or Adjust the transmission part, or add blocked lubricating oil protection C.Short circuit inside the motor Replace the motor D.Drive burned out Replace the drive A.The motor wire is not connected Reconnect the motor cable...
-
Page 21: Running Belt Adjustment
Proper maintenance is the only way to keep your treadmill at its best. Wrong maintenance can hurt or shorten the life of the treadmill. Tips: 1 . . Running belt adjustment... - Page 22 Adjusting the running belt has two functions: elastic adjustment and running center position adjustment. The running belt has been adjusted at the factory. However, after use, the running belt will be stretched. Deviation from the center plate causes damage to the running belt friction trim strip and the rear cover.
- Page 23 2- Adjust the running belt to the middle position When you are using the Smart Run Treadmill, if the two feet are not the same force when walking, the pressure on the running belt is unbalanced and the running belt is off-center. This deviation is normal. When no one is on the running belt, it will return to the center.
- Page 24 A successful sports program must include warm-up, aerobic and relaxing exercises. Exercise at least two or three times a week. Exercise one day and then take a day off. After a few months, you can increase the amount of exercise to four or five days a week. Warming up is an important part of your fitness program.
- Page 25 Stretch after exercise . Shoulder stretch: This is a simple and effective stretching exercise, especially stretching the muscles around the shoulder joint. Practice: Standing with your feet at the same width as your hips and slightly bend your knees. Turn your left hand over your body and bend your elbow slightly. Fixed to the left elbow with your right hand, then lean your left arm against your body until you feel the muscles of your shoulders are tight.
- Page 26 Dive forward and bend your elbow to the instep: The left foot with a big bow step forward, while keeping the right knee off the ground. Put your right hand on the ground, then move your left elbow to your left instep. Move your left hand to the outside of your left foot and place your hands on the floor, make your hips up.
- Page 27 4.90/90 degree stretch: This action can stretch the torso and back muscles, the body facing the left side, legs close together, knees at a 90 degree angle. A towel is placed between the knees and the arms are stretched out. Then, keep your knees and hips still, rotate your torso and right arm backwards, and try to land your right shoulder.
- Page 28 We make sure that the product is made of high quality materials. In normal use, there is a problem and we will be responsible for the warranty. The warranty period is 1 year (starting from the purchase date). If you have any quality problems, please contact our customer service within 12 months.
Need help?
Do you have a question about the 140T and is the answer not in the manual?
Questions and answers