Overland Tandberg RDX QuikStation 4 Product Manual
Hide thumbs
Also See for RDX QuikStation 4:
- Product manual (120 pages) ,
- Replacement instructions (3 pages) ,
- Quick start manual (2 pages)

Related Manuals for Overland Tandberg RDX QuikStation 4


Summary of Contents for Overland Tandberg RDX QuikStation 4
- Page 1 ® Product Manual For RDX QuikStation 4 and QuikStation 8 Systems ® Running Firmware Version 2.8 RDX® SATA III Part Number: 1021806 Rev. A, November 2016 December 2020 10400880-002...
- Page 2 RDX QuikStation 4 and 8 Product Manual ©2019-20 Overland-Tandberg. All rights reserved. Overland®, Overland Storage®, DynamicRAID®, NEO®, NEO Series®, PowerLoader®, RAINcloud®, RapidRebuild®, REO 4000®, REO Series®, VR2®, and XchangeNOW® are registered trademarks of Overland Storage, Inc. Tandberg®, Tandberg Data®, AccuGuard®, AccuVault®, BizNAS®, QuadPak®, QuikStation®, QuikStor®, RDX®, RDXPRESS®, RDXPRO®, StorageLoader®, SupportSuite®, Tandberg SecureService®, and Tandberg StorageLibrary®...
-
Page 3: Preface
RDX QuikStation into their network environment. Familiarity with system and network configuration is highly recommended. The information in this guide applies to both the RDX QuikStation 4 and the RDX QuikStation 8. When there is a significant operational difference, then either the RDX QuikStation 4 or RDX QuikStation 8 is specified for each difference. -
Page 4: Conventions
RDX QuikStation 4 and 8 Product Manual Preface • Appendix C, “Safety Guidelines,” describes important safety precautions to observe when using the RDX QuikStation. Product Documentation & Software Updates Product documentation and additional information on RDX removable disk solutions are available online at our Overland-Tandberg Knowledge Base website: https://overlandtandberg.atlassian.net/wiki/spaces/KNOW/overview... -
Page 5: Technical Support
RDX QuikStation 4 and 8 Product Manual Preface Information contained in this guide has been reviewed for accuracy, but not for product warranty because of the various environments, operating systems, or settings involved. Information and specifications may change without notice. -
Page 6: Table Of Contents
High Performance and Capacity ........................11 Compatible with Major Backup Software ......................12 Integrated Web-based Management .......................12 Multi-Gigabit Ethernet ............................12 Compact Design ..............................12 RDX QuikStation 4 Components ..........................12 Front Components ..............................12 Rear Components ..............................13 RDX QuikStation 8 Components ..........................14 Front Components ..............................14 Rear Components ..............................15... - Page 7 RDX QuikStation 4 and 8 Product Manual Contents Setting iSCSI Security .............................31 Connecting iSCSI Targets with CHAP for Windows ...................33 Connecting iSCSI Targets with CHAP for Linux ....................34 Connecting iSCSI Targets with CHAP for Mac OS X ..................35 Chapter 4: System Configuration System Settings Overview ............................38...
- Page 8 RDX QuikStation 4 and 8 Product Manual Contents View Active iSCSI Connections Autoloaders .....................82 Move a Cartridge ..............................82 Set the Autoloader Option ..........................83 Chapter 6: Manage Tape Library Configurations View Logical Properties for Tape Libraries .......................84 Move a Cartridge ...............................86 Set the Unique Inquiry Option ...........................87...
- Page 9 RDX QuikStation 4 and 8 Product Manual Contents China RoHS ................................110 Japan ...................................110 Korea ..................................111 United States: FCC Declaration of Conformity ....................111 Appendix C: Safety Guidelines General Safety Precautions .............................113 Electrical Safety Precautions ...........................113 ESD Precautions ................................114 Battery Precautions ..............................114...
-
Page 10: Chapter 1: Product Overview
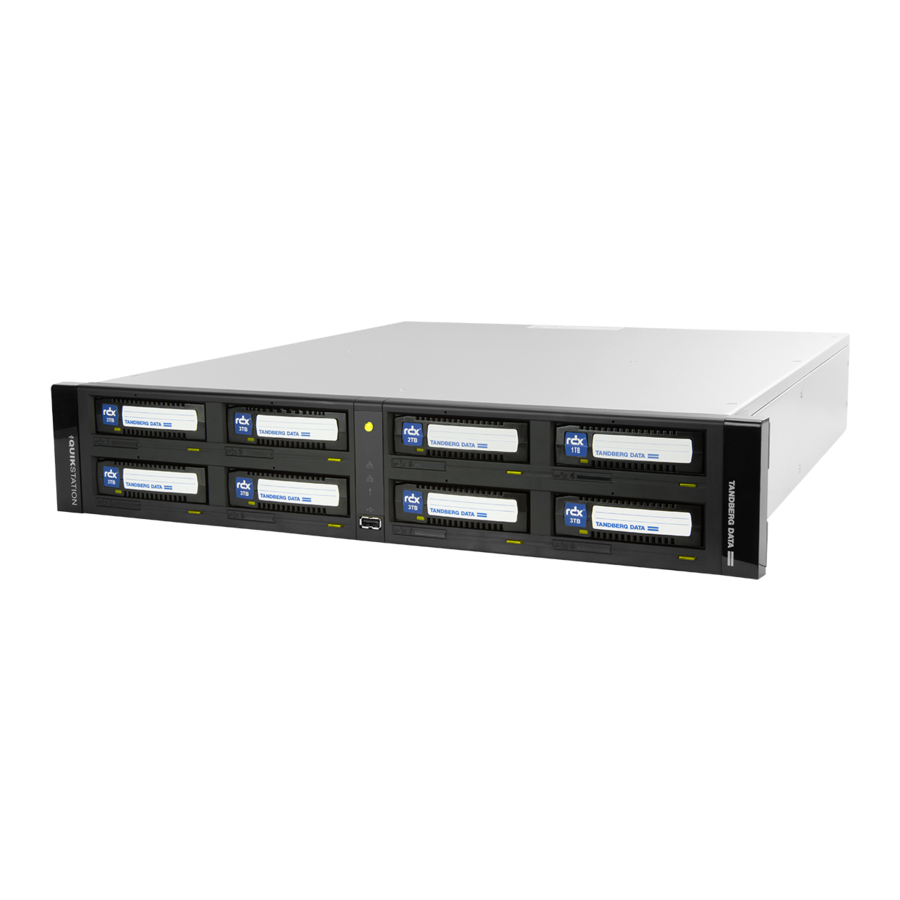
Product Overview The RDX QuikStation 4 and RDX QuikStation 8 are multi-drive, network-attached, removable-cartridge arrays built on RDX technology. They combine data protection benefits of removable media and the reliable performance of disks. They also provide enterprise-grade performance (99.999% reliability and high speed) yet are very easy to use. -
Page 11: Rdx Quikstation Features
• When configured as four removable cartridges, the RDX QuikStation 4 can simultaneously read and write media from all four RDX docks. • With all four docks using 5 TB RDX cartridge, the RDX QuikStation 4 has an online capacity of 20 TB and unlimited offline storage capacity. -
Page 12: Compatible With Major Backup Software
43). Compact Design The RDX QuikStation 4 uses only one unit (1U) of rack space and is also available as a desktop unit, while the RDX QuikStation 8 only uses two units (2U) of rack space, minimizing the impact on data center space requirements. -
Page 13: Rear Components
RDX QuikStation 4 and 8 Product Manual 1 - Product Overview Description RDX cartridge eject button with Status LED (four each). USB 2.0 port used for configuration and diagnostics QuikStation power button with LED (green when power is ON) RDX Cartridge Eject Button Status LED The following table describes status LED color codes. -
Page 14: Rdx Quikstation 8 Components
RDX QuikStation 4 and 8 Product Manual 1 - Product Overview Description AC power plug USB 2.0 Ports (”USB0” top & “USB1” bottom) Ethernet port - IPMI remote management 1GbE Port (eth2) 1GbE Port (eth0) 1GbE Port (eth3) 1GbE Port (eth1) -
Page 15: Rear Components
RDX QuikStation 4 and 8 Product Manual 1 - Product Overview Status Amber A fault condition exists with the dock. Blinking Amber Cartridge ejection is prevented. Front Panel Status LEDs The following table describes the QuikStation status LED icons located in the center panel. - Page 16 RDX QuikStation 4 and 8 Product Manual 1 - Product Overview 8943-RDX Model 14 15 Description AC Power plug (2nd power supply optional) Power Supply Reset Mouse/keyboard connector (green/purple) USB 2.0 ports (2) USB 3.0 ports (2) Ethernet port - IPMI remote management...
- Page 17 RDX QuikStation 4 and 8 Product Manual 1 - Product Overview 10400880-002 ©2019-20 Overland-Tandberg ...
-
Page 18: Chapter 2: Initial Setup And Configuration
This section covers the initial setup and configuration of an RDX QuikStation. NOTE: For information regarding the installation and wiring of your RDX QuikStation hardware, either as a desktop or rack-mount appliance, refer to either the RDX QuikStation 4 Quick Start Guide or the RDX QuikStation 8 Quick Start Guide. -
Page 19: Assign A Static Ip Address
RDX QuikStation 4 and 8 Product Manual 2 - Initial Setup and Configuration Assign a Static IP Address If DHCP support is not enabled, set a static IP address for the appliance: CAUTION: Follow these steps exactly to prevent the possibility of corruption other configuration files on your QuikStation. -
Page 20: Connect To Rdx Quikstation
RDX QuikStation 4 and 8 Product Manual 2 - Initial Setup and Configuration NOTE: If the unit does not reboot automatically, recheck the network.conf filename to ensure it is all lowercase letters. You may need to use a Linux or MacOS host system to check a filename as Windows OS can sometimes change the filename to uppercase but cannot display it as such. -
Page 21: System Settings
RDX QuikStation 4 and 8 Product Manual 2 - Initial Setup and Configuration System Settings Refer to the table below for the recommended RDX QuikStation system settings. For more information, see Chapter 4, “System Settings Overview,” on page Setting Purpose... -
Page 22: Chapter 3: Iscsi Configuration
Chapter 5, “Select the Logical Device Type,” on page 62), you will have either one to four iSCSI targets (RDX QuikStation 4) or one to eight iSCSI targets (RDX QuikStation 8) with which to connect. NOTE: For more information about viewing iSCSI targets, see Chapter 6, “iSCSI Device General... -
Page 23: Connecting To Iscsi Targets Without Authentication
RDX QuikStation 4 and 8 Product Manual 3 - iSCSI Configuration • If the System > Allow multiple host connections option has been set (see Chapter 4, “Options for RDX QuikStation,” on page 53) then up to 10 initiator users (using CHAP) or host computers (using host authentication) can be set for each iSCSI storage target including RDX docks, tape drives, logical volumes, and protected volumes. - Page 24 RDX QuikStation 4 and 8 Product Manual 3 - iSCSI Configuration 2. Open Microsoft iSCSI Initiator and click the Discovery tab. Your version of iSCSI initiator may use Add depending on your Windows OS. 3. Click Discover Portal . 4. In the Discover Target Portal dialog window that opens, type the IP address for the RDX QuikStation, and click OK .
- Page 25 RDX QuikStation 4 and 8 Product Manual 3 - iSCSI Configuration 5. Click the Targets tab. Depending on how you configured the logical device type for the actual RDX QuikStation you have, you will see either four or eight iSCSI targets.
-
Page 26: Connecting Iscsi Targets For Linux
RDX QuikStation 4 and 8 Product Manual 3 - iSCSI Configuration The RDX QuikStation’s iSCSI target should now display as Connected in the Discovered targets list. CAUTION: Before you shut down or restart the RDX QuikStation for any reason, it is recommended that you disconnect all iSCSI targets. -
Page 27: Connecting Iscsi Targets For Mac Os X
RDX QuikStation 4 and 8 Product Manual 3 - iSCSI Configuration 2. Discover iSCSI targets. To discover the RDX QuikStation iSCSI targets, enter the following command, replacing the variable < RDX_IP_address > with the actual IP address for your RDX QuikStation: # iscsiadm -m discovery -t sendtargets -p <RDX_IP_address>... - Page 28 RDX QuikStation 4 and 8 Product Manual 3 - iSCSI Configuration The following dialog window opens. 2. In the Address field, type the IP address for the RDX QuikStation. If you are using a port number other than the default, type the number in the Port field.
- Page 29 RDX QuikStation 4 and 8 Product Manual 3 - iSCSI Configuration 4. Highlight all the discovered targets and click Add . The targets are displayed in the left pane with a red icon, signifying that they are not yet connected.
-
Page 30: Set Iscsi Security
RDX QuikStation 4 and 8 Product Manual 3 - iSCSI Configuration d. Select the Network Node listed and click Login . The iSCSI targets are displayed with a green icon when they are connected to the RDX QuikStation. Before you shut down or restart the RDX QuikStation for any reason, it is CAUTION: recommended that you disconnect all iSCSI targets. -
Page 31: Setting Iscsi Security
RDX QuikStation 4 and 8 Product Manual 3 - iSCSI Configuration Setting iSCSI Security To set iSCSI security: 1. Sign in to the RDX QuikStation (see Chapter 2, “Connect to RDX QuikStation,” on page 20). 2. Click the Logical Device top tab, select the iSCSI target from the tree view on the left, and click the Security tab. - Page 32 RDX QuikStation 4 and 8 Product Manual 3 - iSCSI Configuration The Add iSCSI User dialog box opens. 3. In the User Name field, enter the host initiator name. By default, this is the host IQN name, which you can find from your iSCSI host initiator software application.
-
Page 33: Connecting Iscsi Targets With Chap For Windows
RDX QuikStation 4 and 8 Product Manual 3 - iSCSI Configuration Connecting iSCSI Targets with CHAP for Windows The following instructions describe how to connect your network host computers in Windows Server 2012R2. Your iSCSI initiator interface may differ slightly depending on your Windows operating system. -
Page 34: Connecting Iscsi Targets With Chap For Linux
RDX QuikStation 4 and 8 Product Manual 3 - iSCSI Configuration b. Enter the CHAP Name . The name must match the name that was set for this particular target. c. Enter the Target secret . This secret must match the CHAP secret key that was set for this particular iSCSI target. -
Page 35: Connecting Iscsi Targets With Chap For Mac Os X
RDX QuikStation 4 and 8 Product Manual 3 - iSCSI Configuration c. Set the host initiator user name and CHAP password. Uncomment the following lines and replace the variables with the actual host initiator name and password needed to connect to the iSCSI target: #node.session.auth.username = <host_initiator_name>... - Page 36 RDX QuikStation 4 and 8 Product Manual 3 - iSCSI Configuration 2. For each iSCSI target, complete the following steps to connect the target: a. Select an iSCSI qualified name (IQN) from the left pane. The target’s port information opens.
- Page 37 RDX QuikStation 4 and 8 Product Manual 3 - iSCSI Configuration g. Select the Network Node that is shown, and click Login . When connected to the RDX QuikStation, the iSCSI targets are displayed with a green icon. CAUTION: Before you shut down or restart the RDX QuikStation for any reason, it is recommended that you disconnect all iSCSI targets.
-
Page 38: Chapter 4: System Configuration
System Configuration This chapter describes the RDX QuikStation system settings that a user with administrator privileges can view and modify. Topics in Setup and Configuration: • System Settings Overview • Date and Time Configuration • Network Configuration • Notification Configuration •... -
Page 39: Date And Time Configuration
RDX QuikStation 4 and 8 Product Manual 4 - System Configuration System Setting Menu Description Options The Options dialog window is divided into three tabs: System, Removable Disk, and Diagnostics. See “Options for RDX QuikStation” on page 53 for more information. -
Page 40: Network Configuration
RDX QuikStation 4 and 8 Product Manual 4 - System Configuration Network Configuration NOTE: You must have administrator privileges to configure network information. The RDX QuikStation has multiple network interfaces. These may be used as separate connections or may be “bonded” together to act as a single connection to protect against failure or to improve throughput. - Page 41 RDX QuikStation 4 and 8 Product Manual 4 - System Configuration The Modify Bonding dialog opens. (RDX QuikStation 4, two 1GbE ports) (RDX QuikStation 8, four 1GbE ports) NOTE: For RDX QuikStation 8 10GbE models, the 10GbE interface cannot be bonded with the 1GbE interfaces, if available.
- Page 42 RDX QuikStation 4 and 8 Product Manual 4 - System Configuration 4. If desired, select a new bonding configuration. Normally, the interfaces are bonded in pairs. Bonded interfaces act like a single interface to the host (see “Port Configuration Options” on page 43 for more information).
-
Page 43: Port Configuration Options
11. Click OK to close. Port Configuration Options The RDX QuikStation 4, depending on the model, has either two or four 1GbE ports to provide failover protection and high availability network connectivity. The RDX QuikStation 8, depending on the model, has either four 1GbE ports, four 1GbE and one 10GbE ports, or two 10GbE ports. - Page 44 RDX QuikStation 4 and 8 Product Manual 4 - System Configuration The benefits of port bonding include: • Increase throughput compared to a single connection. • Redundancy in the event one of the connections fails. NOTE: For the RDX QuikStation 8 model with four 1GbE and one 10GbE ports, the 10GbE port cannot be bonded with any 1GbE ports.
-
Page 45: Notification Configuration
RDX QuikStation 4 and 8 Product Manual 4 - System Configuration • At least one interface must be enabled in a split setup. NOTE: A split Ethernet port configuration should be used if ports are connected to the different networks. If ports are connected to the same network setup, use a bonded port configuration. -
Page 46: Setting Smtp Authentication
RDX QuikStation 4 and 8 Product Manual 4 - System Configuration Setting SMTP Authentication 1. From the Notification Settings dialog window, click the Authentication tab. 2. Type the SMTP user name and password for your email server. 3. From the drop-down menu, select the authentication method – either Plain or CRAM-MD5 . -
Page 47: Group Permissions Overview
RDX QuikStation 4 and 8 Product Manual 4 - System Configuration • Removing Users from a Group • Editing User Information • Recovering the Built-In Administrator Password Group Permissions Overview The RDX QuikStation Group Permissions table describes the functionality each group can access. -
Page 48: Removing Users From A Group
RDX QuikStation 4 and 8 Product Manual 4 - System Configuration 4. From the drop-down menu, select the group to which you want to assign the user. For a description of the permissions available to each group, see “Group Permissions Overview”... -
Page 49: Recovering The Built-In Administrator Password
RDX QuikStation 4 and 8 Product Manual 4 - System Configuration The field becomes editable. 3. Make your desired changes, and press Enter . NOTE: User names can only contain letters, numbers, and the underscore (_) character. Names are limited to 80 characters in length. - Page 50 RDX QuikStation 4 and 8 Product Manual 4 - System Configuration Resetting the Password via Email 1. From the RDX QuikStation sign-in dialog, click the question mark ( ? ) in the upper-right corner. The Password Reset dialog is shown.
- Page 51 RDX QuikStation 4 and 8 Product Manual 4 - System Configuration IMPORTANT: If you close the browser session, the request key that was sent via email becomes invalid. 6. Copy the request key from the email message and paste it into the Reset Key field.
- Page 52 RDX QuikStation 4 and 8 Product Manual 4 - System Configuration 3. Rename the text file to password.reset. (In Windows, click Yes to confirm the file name change.) 4. Remove the USB flash drive from your computer and insert it into an RDX QuikStation USB slot.
-
Page 53: Convert Device Type
RDX QuikStation 4 and 8 Product Manual 4 - System Configuration Convert Device Type To select or change the logical device type, from the main menu, select System Settings > Convert Device Type to open the Options tabs. For more information, refer to Chapter 5, “Select the Logical Device Type,”... -
Page 54: System Options
RDX QuikStation 4 and 8 Product Manual 4 - System Configuration Option Description Diagnostics Log Level Allows you to change the log level from Normal to Detail or Extend. We recommend you only change the log level if you are instructed to do so by Technical Support. - Page 55 RDX QuikStation 4 and 8 Product Manual 4 - System Configuration Enabling the unsafe eject option allows you to override the default and manually eject an RDX media. This option is not recommended because you could potentially lose data on the RDX media if you use unsafe eject.
-
Page 56: Setting The Auto-Insert Option
RDX QuikStation 4 and 8 Product Manual 4 - System Configuration Setting the Auto-Insert Option The Auto-Insert option (IE) controls how the RDX QuikStation handles tape library import/export slot functionality. Auto-Insert Option ON This is the default setting. When one or more RDX cartridges are inserted, the RDX QuikStation automatically moves them into an available logical slot. - Page 57 RDX QuikStation 4 and 8 Product Manual 4 - System Configuration This is a physical view of a tape library with the Tape Auto-Insert option turned ON. Note that the cartridges’ physical locations correspond with their logical tape slot locations.
-
Page 58: Configure Remote Access (Ssh)
RDX QuikStation 4 and 8 Product Manual 4 - System Configuration Auto-Insert Option OFF When a single RDX cartridge is inserted into any dock, it is mounted into the virtual IE port awaiting an import command from your backup software. When multiple cartridges are inserted, the first cartridge that is detected by the library is mounted to the virtual IE port. - Page 59 RDX QuikStation 4 and 8 Product Manual 4 - System Configuration Download an SSH Key Use this option to automatically generate a private SSH key. 1. From the main menu, select System Settings > Options . 2. Switch to the Diagnostics tab.
- Page 60 RDX QuikStation 4 and 8 Product Manual 4 - System Configuration 5. Navigate to the location where the new public/private key pair was stored, select the file with .pub extension, and click OK . 6. Click OK again to close the System Settings options dialog box.
-
Page 61: Chapter 5: Logical Device Management
Logical Device Management This chapter describes the Logical Device interface and management. Topics in Setup and Configuration: • Logical Device Type Overview • Select the Logical Device Type • RDX Targets • Logical Volumes • Protected Volumes • Disk Autoloader Logical Device Type Overview The following table compares the logical device types that the RDX QuikStation can emulate. -
Page 62: Select The Logical Device Type
RDX QuikStation 4 and 8 Product Manual 5 - Logical Device Management Logical Device Reported Inquiry Type QuikStation 4 QuikStation 8 iSCSI Targets String Protected Up to four RDX cartridges One volume with up to eight RDX Each volume is... -
Page 63: Rdx Targets
RDX QuikStation 4 and 8 Product Manual 5 - Logical Device Management (QuikStation 8) 2. Click the Logical Device Type item to show options. 3. Select your option and click Change . 4. At the confirmation message, click OK . -
Page 64: Rdx Individual Dock Drives
RDX QuikStation 4 and 8 Product Manual 5 - Logical Device Management RDX Individual Dock Drives By default the target acts like a normal RDX removable cartridge. Optionally, you can set each RDX target to appear as a fixed cartridge to the host using the Advance Options button for the drive. - Page 65 RDX QuikStation 4 and 8 Product Manual 5 - Logical Device Management The Fixed Disk RDX Logical Volume may have faster write times than the Removable Disk RDX Logical Volume for some host operating systems. (QuikStation 4) In the QuikStation 8, you can configure two Fixed Disk RDX Logical Volumes. Each volume consists of up to four RDX cartridges either on the top or the bottom row.
-
Page 66: Logical Volumes
RDX QuikStation 4 and 8 Product Manual 5 - Logical Device Management Since the RDX Logical Volume is presented as an actual RDX device, it will work with any host software that can utilize an RDX dock. NOTE: If you select the RDX Removable Logical Volume configuration, you should first install the RDX Manager, which is available from www.tandbergdata.com. -
Page 67: Creating A Logical Volume
RDX QuikStation 4 and 8 Product Manual 5 - Logical Device Management Creating a Logical Volume If no logical volume is currently present, you can create a logical volume. 1. From the Logical Device tab, select an available disk. 2. Click Create to open the Create a Logical Volume dialog. -
Page 68: Expanding A Logical Volume
RDX QuikStation 4 and 8 Product Manual 5 - Logical Device Management 2. From the Logical Device page, select one of the available disks that has a Logical Volume UUID, and click Import . 3. At the Import Logical Volume dialog, click Import to accept the import operation. -
Page 69: Erasing A Logical Volume
RDX QuikStation 4 and 8 Product Manual 5 - Logical Device Management 2. Select the disks to be added by checking the Add boxes. 3. Click Add Disks to complete the process. Once the logical volume has been expanded, the iSCSI host is responsible for expanding the file system on the volume to take advantage of the extra space. -
Page 70: Exporting The Logical Volume
RDX QuikStation 4 and 8 Product Manual 5 - Logical Device Management NOTE: If you need a secure data erase, please use tools designated for that purpose. Actual data is not erased on the RDX Media, only the partition table on the disk and LVM metadata. -
Page 71: Protected Volumes
RDX QuikStation 4 and 8 Product Manual 5 - Logical Device Management Protected Volumes RDX docks can be configured as protected volumes that combine the capacity of the RDX media available and will continue to function even if one of the RDX cartridges fails. - Page 72 RDX QuikStation 4 and 8 Product Manual 5 - Logical Device Management In the QuikStation 8, you can configure two Fixed Disk RDX Protected Volumes with one-disk fault tolerances. Each volume consists of up to four RDX cartridges either on the top or the bottom row.
-
Page 73: Creating A Protected Volume
RDX QuikStation 4 and 8 Product Manual 5 - Logical Device Management Creating a Protected Volume If no protected volume is currently present, you can create a protected volume: 1. From the Logical Device tab, select an available disk 2. Click Create to open the Create a Protected Volume Array dialog. -
Page 74: Expanding A Protected Volume
RDX QuikStation 4 and 8 Product Manual 5 - Logical Device Management 2. From the Logical Device page, select one of the available disks that has a Protected Volume UUID, and click Import . 3. At the Import Protected Volume Array dialog, click Import to accept the import operation. -
Page 75: Expanding A Fixed Logical Volume File System For A Window Host
RDX QuikStation 4 and 8 Product Manual 5 - Logical Device Management 2. Select the disks to be added by checking the Add boxes. 3. Click Add Disks to complete the process. Once the protected volume has been expanded, the iSCSI host is responsible for expanding the file system on the volume to take advantage of the extra space. - Page 76 RDX QuikStation 4 and 8 Product Manual 5 - Logical Device Management 2. Open the Disk Management tool. 3. Right-click the logical volume and select Extend Volume . 4. In the Extend Volume Wizard , use the defaults to fully extend the file system by clicking Next .
-
Page 77: Expanding A Removable Logical Volume File For A Windows Host
RDX QuikStation 4 and 8 Product Manual 5 - Logical Device Management The extension is completed. Expanding a Removable Logical Volume File for a Windows Host When one or more disks are added to an existing RDX Logical Volume, the file system on that logical volume is not enlarged. -
Page 78: Erasing A Protected Volume
RDX QuikStation 4 and 8 Product Manual 5 - Logical Device Management 9. Use Convert Device Type to convert the RDX QuikStation to Removable Disk RDX Logical Volume. 10. Import the RDX Logical Volume in the Logical Device pane of the User Interface. -
Page 79: Recovering A Degraded Protected Volume
RDX QuikStation 4 and 8 Product Manual 5 - Logical Device Management 1. From the Protected Device interface, select the protected volume to export and select Eject . The Eject Protected Volume Array dialog is shown. 2. To create a copy of the Eject Protected Volume Array dialog information to keep with the protected volume disk set after it is ejected, click Print . - Page 80 RDX QuikStation 4 and 8 Product Manual 5 - Logical Device Management 3. From the Protected Device interface, select the new disk, and click Add . NOTE: Write-protected and damaged media are not allowed in this operation. 4. At the Add disk to repair a degraded Protected Volume array dialog, select the disk being added.
-
Page 81: Disk Autoloader
RDX QuikStation 4 and 8 Product Manual 5 - Logical Device Management Disk Autoloader When the QuikStation is configured as a Disk Autoloader , the host will primarily see an iSCSI removable disk target. When the host software ejects an RDX medium from the disk target, the autoloader will virtually “move”... -
Page 82: View Logical Properties For Autoloaders
RDX QuikStation 4 and 8 Product Manual 5 - Logical Device Management View Logical Properties for Autoloaders The following properties are displayed for virtual autoloaders: Property Name Description For the autoloader and its tape drives Element address The element address associated with the virtual location of the autoloader and drives. -
Page 83: Set The Autoloader Option
RDX QuikStation 4 and 8 Product Manual 5 - Logical Device Management In most cases, you should rely on your backup program and autoloader to logically move media within the autoloader. This functionality is built into the RDX QuikStation mainly for testing and diagnostic purposes. -
Page 84: Chapter 6: Manage Tape Library Configurations
Manage Tape Library Configurations If you have your RDX QuikStation 8 configured as either a virtual tape library or a tape or disk autoloader, you can do these additional tasks from the Logical Device interface: • View Logical Properties for Tape Libraries •... - Page 85 RDX QuikStation 4 and 8 Product Manual 6 - Manage Tape Library Configurations The RDX QuikStation 8 may also be configured as a “hybrid” device. In this case, four docks are used for tape library slots and four are used as RDX docks.
-
Page 86: Move A Cartridge
RDX QuikStation 4 and 8 Product Manual 6 - Manage Tape Library Configurations Move a Cartridge With RDX QuikStation 8 virtual library configurations, you can logically move a cartridge to an open slot, to the IE port, or to the tape drives. -
Page 87: Set The Unique Inquiry Option
RDX QuikStation 4 and 8 Product Manual 6 - Manage Tape Library Configurations Set the Unique Inquiry Option The Unique Inquiry option is available from the Advanced Options dialog. You can set the RDX QuikStation to report the tape library/autoloader unique inquiry string, or an RDX QuikStation inquiry string. - Page 88 RDX QuikStation 4 and 8 Product Manual 6 - Manage Tape Library Configurations By default, the iSCSI Devices Properties window displays information such as the volume name, serial number (UUID), and iSCSI name for the logical device’s iSCSI targets. RDX QuikStation RDX Logical Volume logical device properties:...
-
Page 89: Customize The Iscsi Devices View
RDX QuikStation 4 and 8 Product Manual 6 - Manage Tape Library Configurations Property Name Description Target ID/LUN Shows “ 1/0 .” Displays the operating status for the device of either good , Status offline , or an error state. - Page 90 RDX QuikStation 4 and 8 Product Manual 6 - Manage Tape Library Configurations If there is a host connected to the target, the host’s initiator node name is displayed in the Connection window. NOTE: You can also set iSCSI security for each iSCSI target. See Chapter 3, “Set iSCSI Security,”...
-
Page 91: Chapter 7: Physical Device Management
Physical Device Management The physical device view is useful for determining the physical location of your RDX media, since logical library views can differ. You can also use the physical device view to force-eject RDX media, erase RDX media, and clone data from one RDX media to another. Topics in Setup and Configuration: •... -
Page 92: Rdx Dock Properties
RDX QuikStation 4 and 8 Product Manual 7 - Physical Device Management Property Name Description System Temp Current temperature in both °C and °F Host Name Name of the host server Serial Number Serial number of the QuikStation Version Firmware version installed... -
Page 93: Ejecting Rdx Media
RDX QuikStation 4 and 8 Product Manual 7 - Physical Device Management Property Name Description Write Protected Displays information on whether the RDX media is write- protected or not. Ejecting RDX Media You can eject an RDX media from the RDX QuikStation GUI. However, with removable... -
Page 94: Reformatting Rdx Media
RDX QuikStation 4 and 8 Product Manual 7 - Physical Device Management Reformatting RDX Media You can reformat RDX media as a single NTFS partition from the RDX QuikStation GUI. NOTE: You cannot reformat a cartridge in an RDX system if the iSCSI target related to that RDX is connected to a host. - Page 95 RDX QuikStation 4 and 8 Product Manual 7 - Physical Device Management 2. From the Physical Device interface, click Clone . The Clone dialog window opens. 3. Select the Source RDX media from the drop-down menu. 4. Select the Destination RDX media from the drop-down menu.
-
Page 96: Chapter 8: System Maintenance
System Maintenance This chapter describes the RDX QuikStation system maintenance tasks that a user with administrator privileges can perform. Topics in Setup and Configuration: • System Maintenance Overview • Generate System Logs • Diagnostics Tab Log Options • RDX QuikStation Restart and Shutdown •... -
Page 97: Generate System Logs
RDX QuikStation 4 and 8 Product Manual 8 - System Maintenance Menu Name Description Export Configuration Allows you to export RDX QuikStation system configuration settings, such as network information, email notification, time zone, user names and passwords, logical device type settings, and iSCSI security settings. -
Page 98: Rdx Quikstation Restart And Shutdown
RDX QuikStation 4 and 8 Product Manual 8 - System Maintenance 2. Select the Diagnostics tab. 3. Use the drop-down menu to change the log level to either Detail or Extend . NOTE: If you change the log level, the system will default back to Normal once the current browser session is closed. -
Page 99: Import Rdx Quikstation System Configuration Files
RDX QuikStation 4 and 8 Product Manual 8 - System Maintenance If you press and hold power button for more than three (3) seconds, you will CAUTION: immediately cut off the unit’s power for a hard power-off without any software shut down. -
Page 100: Export Rdx Quikstation System Configuration Files
RDX QuikStation 4 and 8 Product Manual 8 - System Maintenance Export RDX QuikStation System Configuration Files As a best practice, Overland-Tandberg recommends that you export your system configuration files as a backup in case you ever need to replace your current unit. The system exports all configuration settings, including network information, email notification settings, time zone setting, user names and passwords, logical device type settings, and iSCSI security settings. - Page 101 1. From the main menu, select System Maintenance > Update Firmware . The Update Firmware dialog window opens. 2. Select Update the RDX QuikStation 4/8 firmware manually and click Continue . The Update Firmware dialog window changes to show a selection field.
-
Page 102: Use A Usb Flash Drive For System Tasks
RDX QuikStation 4 and 8 Product Manual 8 - System Maintenance Use a USB Flash Drive for System Tasks The RDX QuikStation ships with a USB flash drive you can use to perform many system tasks. If the RDX QuikStation flash drive is unavailable, you can use any USB flash drive that is formatted with a FAT32 file system. -
Page 103: Use The Ipmi Port
RDX QuikStation 4 and 8 Product Manual 8 - System Maintenance Use the IPMI Port The Intelligent Platform Management Interface (IPMI) is only available on the RDX QuikStation 4 model with four 1GbE ports (QuikStation 4 Version 2 With Four 1GbE Ports on... -
Page 104: Appendix A: Troubleshooting
Troubleshooting This appendix provides information on error codes and some basic troubleshooting. For more detailed troubleshooting help, visit the Support section of the Tandberg Data website (www.tandbergdata.com), or contact Overland-Tandberg Technical Support at: https://www.overlandstorage.com/company/contact-us/index.aspx Basic Troubleshooting Information The following table describes some basic RDX QuikStation troubleshooting information. If you have a problem that is not addressed in the table below, contact Overland-Tandberg Technical Support. -
Page 105: Reported Error Conditions
RDX QuikStation 4 and 8 Product Manual A - Troubleshooting Reported Error Conditions The RDX QuikStation reports error conditions of the dock/cartridge with an amber LED and by using email notifications. The emails detail the issue and whether it is the dock or media. -
Page 106: Appendix B: Specifications
Specifications This appendix provides the information about the RDX QuikStation specifications. Topics in Setup and Configuration: • Physical Specifications • Power Specifications • Environmental Specifications • Safety and Regulatory Agency Compliance Physical Specifications The following tables give the physical specifications for the three different RDX models. QuikStation 4 Desktop Appliance Part Number 8922-RDX... -
Page 107: Quikstation 4 Rackmount Appliance
RDX QuikStation 4 and 8 Product Manual B - Specifications QuikStation 4 Rackmount Appliance Part Number 8920-RDX Dimensions (D x W x H) 47.8cm x 44.0cm x 4.3cm / 18.8in. x 17.3in. x 1.7in. Weight 6.02 kilograms / 13.3 pounds... -
Page 108: Power Specifications
QuikStation 8 is a Class A device and both comply with the safety and regulatory agency standards listed below when installed in accordance with this manual. For regulatory purposes, the RDX QuikStation 4 regulatory model number is filed as RMN-A- 01-14 and the QuikStation 8 regulatory model number is filed as RMN-A-01-16. -
Page 109: European Community
RDX QuikStation 4 and 8 Product Manual B - Specifications European Community This Information Technology Equipment has been tested and found to comply with the following European directives: RDX QuikStation 4: EN 55032:2015, Class B EN 61000-3-2:2014 EN 61000-3-3:2013 EN 55035:2017... -
Page 110: China Rohs
RDX QuikStation 4 and 8 Product Manual B - Specifications China RoHS This product is marked in accordance with China's Ministry of Information Industry (MII) “Management Methods for Controlling Pollution Cause by Electronic Information Products” Order #39. The Environmental Protection Use Period (EPUP) is determined to be 10 years. -
Page 111: Korea
United States: FCC Declaration of Conformity RDX QuikStation 4: We declare under our sole responsibility that: Product Name: RDX QuikStation 4, regulatory model RMN-A-01-14. To which this declaration relates, is in conformity with the following standards or other normative documents: •... - Page 112 RDX QuikStation 4 and 8 Product Manual B - Specifications RDX QuikStation 8: We declare under our sole responsibility that: Product Name: RDX QuikStation 8, regulatory model RMN-A-01-16 To which this declaration relates, is in conformity with the following standards or other normative documents: •...
-
Page 113: Appendix C: Safety Guidelines
Safety Guidelines This appendix provides safety guidelines for the RDX QuikStation. Topics in Setup and Configuration: • General Safety Precautions • Electrical Safety Precautions • ESD Precautions General Safety Precautions • Keep the area around the RDX QuikStation clean and free of clutter. •... -
Page 114: Esd Precautions
RDX QuikStation 4 and 8 Product Manual C - Safety Guidelines • The power cord must include a grounded plug and must be plugged into a grounded electrical outlet. • Use only one hand when working with powered-on electrical equipment. This is to avoid making a complete circuit, which will cause electrical shock. - Page 115 Index Symbols importing configuring network settings > (menu flow indicator) conventions, typographical customer support access via SSH active-backup/failover network mode date and time setting adaptive load balancing network mode diagnostic administrator group system logs adding to Disk Automation Configuration editing dynamic link aggregation network mode permissions removing users from...
- Page 116 RDX QuikStation 4 and 8 Product Manual Index QuikStation 4 connecting iSCSI targets QuikStation 8 connecting targets with CHAP log files, generating log level, changing logical device type general safety precautions configuring generate public/private SSH key pair emulations groups logical volumes...
- Page 117 RDX QuikStation 4 and 8 Product Manual Index permissions for groups SMTP email port physical specifications specifications port bonding modes physical power ratings power product documentation power ratings protected volumes SSH (Secure Shell) remote access option SSH key pair, generating...
- Page 118 RDX QuikStation 4 and 8 Product Manual Index resetting the administrator password uses for user group adding to editing permissions removing users from Windows connecting iSCSI targets connecting targets with CHAP Xtend SAN iSCSI initiator for Mac OS X connecting with CHAP...
Need help?
Do you have a question about the RDX QuikStation 4 and is the answer not in the manual?
Questions and answers