Wize PRG11A Instruction Manual
Universal projector mount kit
Hide thumbs
Also See for PRG11A:
- Instruction manual (11 pages) ,
- Instruction manual (11 pages) ,
- Instruction manual (11 pages)
Table of Contents
Advertisement
Quick Links
www.wize-av.com
Instruction Manual
Инструкция
WA RN I NG!
!
WARNING! SEVERE PERSONAL INJURY AND PROPERTY DAMAGE CAN RESULT FROM
IMPROPER INSTALLATION OR ASSEMBLY. READ THE FOLLOWING WARNINGS BEFORE
Do not use this product for any purpose not explicitly specified by Wize. Improper installation may
cause property damage or personal injury. If you do not understand these directions, or have doubts
about the safety of the installation, contact Wize Customer Service or call a qualified contractor. Wize
is not liable for damage or injury caused by incorrect mounting, assembly, or use.
The hardware provided with this product, is exclusively intended for installation on surfaces made of
solid wood or concrete, with a maximum of 16 mm of drywall. For surfaces made of other materials,
for example hollow bricks, please consult your installer and/or specialist supplier.
DO NOT EXCEED THE MAXIMUM WEIGHT CAPACITY FOR THIS PRODUCT
PRG11A PRG18A
PR24A PR11A-S PR18A-S
PR24A-S
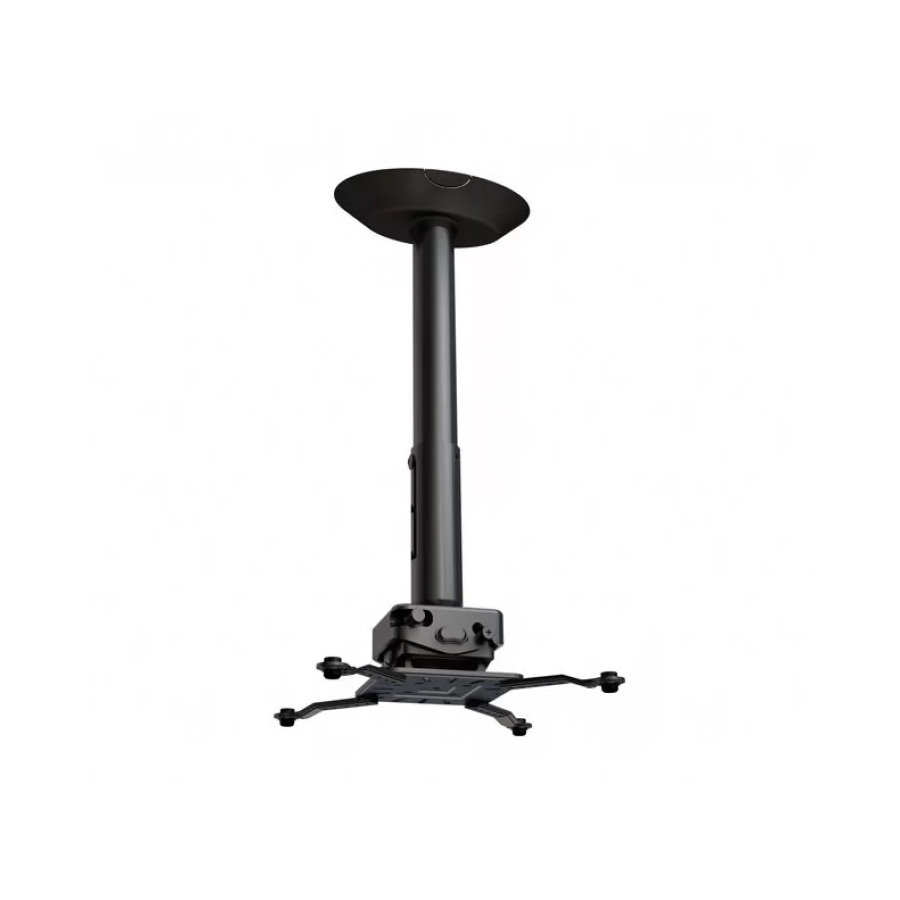
Universal Projector Mount Kit
Weight Capacity: 70 lb
info@wize.ru
Manuel D'instructions
!
BEGINNING.
ВНИМА НИЕ!
ВНИМАНИЕ! ТРАВМА И ПОВРЕЖДЕНИЕ ОБОРУДОВАНИЯ МОЖЕТ ПРОИЗОЙТИ ОТ
НЕПРАВИЛЬНОЙ УСТАНОВКИ ИЛИ СБОРКИ. ОЗНАКОМЬТЕСЬ СО СЛЕДУЮЩИМИ
ПРЕДУПРЕЖДЕНИЯМИ ПЕРЕД НАЧАЛОМ.
Компоненты, входящие в этот продукт, предназначен для установки на стенах из цельного
дерева, бетона или бетонных блоков. Для стен из других материалов, таких как кирпич,
НЕ ПРЕВЫШАЙТЕ МАКСИМАЛЬНЫЙ ВЕС, УКАЗАННЫЙ В ИНСТРУКЦИИ
AVERTISSEMENT
AVERTISSEMENT! SI CE PRODUIT N'EST PAS CORRECTEMENT INSTALLÉ OU ASSEMBLÉ,
IL RISQUE DE CAUSER DES BLESSURES RAVES, VOIRE MORTELLES, AINSI QUE DES DOM-
MAGES MATÉRIELS IMPORTANTS. AVANT DE COMMENCER, LISEZ LES AVERTISSEMENTS
N'utilisez pas ce produit à une fin non spécifiée expressément par Wize. Une installation incorrecte
peut entraîner des préjudices corporels ou des dommages matériels. Si vous ne comprenez pas ces
instructions ou si vous avez des doutes quant à la sécurité de l'installation, veuillez contacter le service
clientèle de Wize ou un installateur qualifié. Wize n' e st pas responsable des dommages ou des préju-
dices causés par un montage, un assemblage ou une utilisation incorrects.
Le matériel fourni avec ce produit, est exclusivement destiné à être installé sur des murs en bois mas-
sif, en béton, blocs de béton ou des colonnes en bois massif avec un maximum de 16 mm de plaques
de plâtre. Pour les murs faits d'autres matériaux, comme la brique creuse, s'il vous plaît consulter votre
installateur et / ou fournisseur spécialisé.
NE DÉPASSEZ JAMAIS LA CAPACITÉ DE CHARGE MAXIMALE DE CE PRODUIT.
1
SUIVANTS.
Advertisement
Table of Contents

Related Manuals for Wize PRG11A


Summary of Contents for Wize PRG11A
- Page 1 If you do not understand these directions, or have doubts clientèle de Wize ou un installateur qualifié. Wize n’ e st pas responsable des dommages ou des préju- about the safety of the installation, contact Wize Customer Service or call a qualified contractor. Wize dices causés par un montage, un assemblage ou une utilisation incorrects.
-
Page 2: Weight Ca Pacity
WEIGHT CA PACITY PAC KAG E C O NT EN T S Maximum Weight Capacity 70 lb / 31. 7 kg Входит в комплект Contenu de l’emballage PR 3 X L Poids maximal de l’écran CAUTI O N! TOO LS R EQUIRED Outils nécessaires Необходимые... -
Page 3: Installation Instructions
PAC K AG E C ONT ENT S PAC K AG E C ONT ENT S I NSTAL L AT IO N IN STR UC T IO NS Инструкция Instructions d’installation Входит в комплект Contenido del paquete Contenu de l’emballage Contenu de l’emballage Security Ensure that holes are on center of wood joist. - Page 4 1 b-1 ST RU CTUR A L C ONCRET E I NSTALL AT ION U NISTRU T INSTALL ATION 1c- 1 Use a 8mm - 5/16” masonry bit to make a 32mm / 1.25” deep hole on marks. Attach to unistrut using kit HU2 Используйте...
- Page 5 AS SE M BL E A DJ U STM E NT C OLUM N Slide column (A) into column (AA). Adjust to desired length. Lock into place with securing screws. Thread 2 - 4 column into ceiling adapter. Вставьте штангу(А) в штангу (AA). Отрегулируйте до нужной длины. Зафиксируйте на место с крепежными...
- Page 6 3 - 1 PRE PAR E PR OJ E CT OR F OR MOUN T IN G 3 -3 PREPARE PRO JECTO R FO R M O UN TING Attach the universal plate (Y) to the universal legs (Z) Determine the correct leg length needed. Attach all four legs to the projector utilizing the provided screws.
- Page 7 INSTAL L PRO JECTO R B O D Y (EXTEN SIO N PI PE) 3- 5 PRE PA RE PROJ E CTO R F OR MOUN T IN G Some projectors have only one attachment point. In this case, attach directly to the Tighten the locking set screw.
- Page 8 INSTAL L PR O J EC T OR INSTAL L PRO JECTO R Slide the universal plate into the PR3 body from right to left (while facing screen). Tighten pre-installed thumb screw and attach at least one of two retaining screws (J) Hold the wires up to prevent interference.
- Page 9 6 -1 M AKE A DJUS T MEN T S-YAW M AKE AD JUSTM ENTS- PITCH Adjust the yaw by turning the knob labeled “yaw” Adjust the pitch by turning the knob labeled “pitch” ” “yaw” “pitch” Réglez le lacet en tournant le bouton étiqueté “lacet” Réglez la hauteur en tournant le bouton étiqueté...
- Page 10 6 -3 M AKE A DJ US T M ENT S- R OLL L O CK AND M ICRO -AD JUST Adjust the roll by turning the knob labeled “roll” Tighten the pitch and roll lock screws, then, if required, use pitch and roll knobs to micro adjust the image.
-
Page 11: Warranty
Wize will not be liable for any damages arising out of the use of, or inability to use, Wize products. Wize bears no responsibility for incidental or consequential damages. This includes, but is not limited to, any labor charges for the repair of Wize products performed by anyone other than Wize.
Need help?
Do you have a question about the PRG11A and is the answer not in the manual?
Questions and answers