Advertisement
Quick Links
QUICK START PaperSaver Slimline Bidet Instructions
This general instruction sheet covers the basic installation procedure for this kit. Depending on your specific bathroom
configuration, further installation steps and/or tools may be required. For additional information please visit our
https://www.water-saver.org
website at
Thank You for choosing Water Saver Products ! ! !
O
VERVIEW
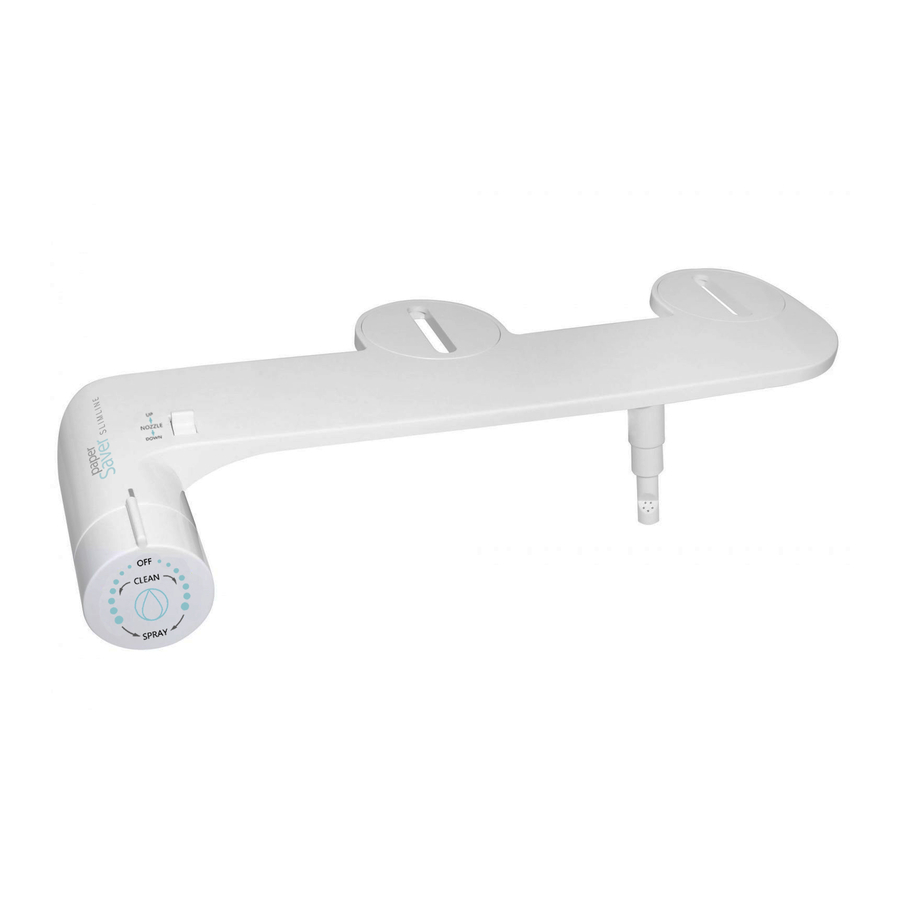
PaperSaver Slimline Bidet fits most standard Two Piece toilets (with separate tank and bowl) and is VERY EASY TO OPERATE.
Sleek and thin design minimally protrudes from the toilet and blends well with most bathroom decors. Connects easily to the
existing toilet water line with the included t-valve and stainless braided hose. Uses NO ELECTRICITY or BATTERIES, so is TOTALLY
SAFE in any bathroom environment. Single horizontal water control knob is large with bold print and works the same when
turned in either direction . . . first to clean the nozzle and then further around to spray. The nozzle spray angle adjusts with a
convenient lever tab near the control knob and is also designed with a unique twist out mount for easy cleaning or replacement.
Anyone with basic DIY home plumbing experience can install this simple bidet kit . . . MINIMUM COMMON TOOLS REQUIRED.
P
REPARATION
Before attempting installation, please read these Quick Start Instructions in full, familiarize yourself with your specific bathroom
configuration and gather any required tools and hardware. This kit and these instructions apply to a typical toilet and water supply
configuration, but since every bathroom is different, some installations may require additional steps or assistance from a professional
plumber. Ensure that the bidet will fit the bowl width and shape of the toilet by positioning it over the toilet seat bolts and adjusting
its rotating mounts accordingly. For most installations, the only tool required is a standard adjustable wrench, but since toilet
plumbing hardware can vary widely, additional tools, fittings or adapters may be required beyond what is supplied with this kit.
C
OMPONENTS
(Items not to relative scale for clarity)
BIDET
BRAIDED HOSE
T-VALVE
TOILET
WATER LINE
support@water-saver.org
or email your questions to
.
A
CCESSORIES
(Items not to relative scale for clarity)
SPRAY NOZZLES
(2 SETS - REMOVABLE)
T-VALVE NUT
15/16" (23mm)
STANDARD
TWO PIECE TOILET
(SEPARATE TANK AND BOWL)
INSTALLATION EXAMPLE
BATHROOM CONFIGURATIONS VARY WIDELY
I
NSTALLATION (
"Home of the FlushSaver DIY Kits"
©
◊◊◊ PSBD-1SC1 Rev A
WSP 2020 ◊◊◊
WASHER
TOP NUT
1 1/16" (27mm)
BRASS T-VALVE
(7/8" M/F + G1/2" M)
BIDET NUT
5/8" (16mm)
BRAIDED HOSE
STAINLESS STEEL
30" LENGTH {76cm)
)
over
Advertisement

Related Manuals for water saver PaperSaver Slimline

Summary of Contents for water saver PaperSaver Slimline
- Page 1 VERVIEW PaperSaver Slimline Bidet fits most standard Two Piece toilets (with separate tank and bowl) and is VERY EASY TO OPERATE. Sleek and thin design minimally protrudes from the toilet and blends well with most bathroom decors. Connects easily to the existing toilet water line with the included t-valve and stainless braided hose.
- Page 2 NSTALLATION COLLAR Remove the toilet seat bolts and slide the bidet BOLTS O-RING underneath the seat mounts while positioning NOZZLE the bidet mounts to align with the same bolt holes. SEAT Check nozzle for proper assembly of o-ring and lock collar as shown.
Need help?
Do you have a question about the PaperSaver Slimline and is the answer not in the manual?
Questions and answers