Table of Contents
Advertisement
Quick Links
Advertisement
Table of Contents

Related Manuals for Kimray PO


Summary of Contents for Kimray PO
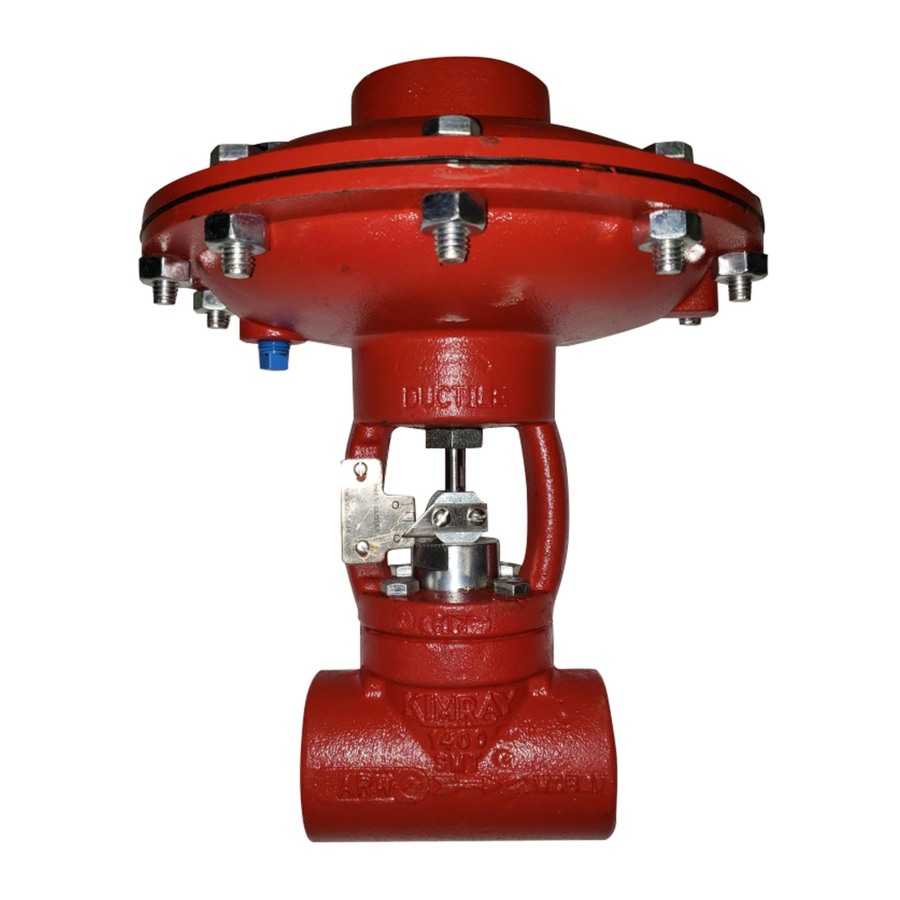
- Page 1 HIGH PRESSURE CONTROL VALVE STEM GUIDED...
- Page 2 Kimray products or services described herein or their use or application. All sales are governed by our terms and conditions, which are available on request. Kimray reserves the right to modify or improve the designs or specifications of such products at any time without prior notice. ©2015 Kimray Inc.
-
Page 3: Table Of Contents
HIGH PRESSURE CONTROL VALVE Model: PO, PC Installation, Operation & Maintenance Guide Contents Before you start A1 Scope A2 Introduction A3 Description A4 Maintenance A5 Changes and Updates A6 Special Tools and Equipment A7 Orientation INSTALLATION Installation Start-up and Test... -
Page 4: A Before You Start
Kimray Inc, sales office or a sales / applications representative. Kimray reserves the right to modify or improve the designs or specifications of such products at any time without notice. www.kimray.com... -
Page 5: A6 Special Tools And Equipment
HIGH PRESSURE CONTROL VALVE Model: PO, PC Installation, Operation & Maintenance Guide SPECIAL TOOLS AND EQUIPMENT Kimray Seat & Cage Removal Tool Kimray Seat Removal Tool Part No. Line Size Part No. Line Size 3032 1 in. 1 in. 3033 2 in. -
Page 6: A7 Orientation
HIGH PRESSURE CONTROL VALVE Model: PO, PC Installation, Operation & Maintenance Guide ORIENTATION Stem Guided Shown ✴ ✴ Recommended spare parts and stocked as repair kits See catalog section E1 for additional information Item Part No. / Description Item Part No. / Description... -
Page 7: Installation
CAUTION: Repair kits are available. contacting the Kimray Inc, sales office When ordered, the high pressure valve configuration and or a sales/applications representative for the correct repair kit construction materials were selected to meet specific pressure, number. -
Page 8: Disassembly
HIGH PRESSURE CONTROL VALVE Model: PO, PC Installation, Operation & Maintenance Guide DISASSEMBLY Adjusting Screw, Pivot, Breather Plug, Bonnet Use a wrench to remove the Adjusting Screw on top of the Bonnet. See Fig. 3-1 Remove Pivot from Adjusting Screw. See Fig. 3-2... -
Page 9: Travel Indicator
HIGH PRESSURE CONTROL VALVE Model: PO, PC Installation, Operation & Maintenance Guide DISASSEMBLY Travel Indicator Pivot, Spring Plate, Spring Remove the Bolts from the Travel Indicator Block. NOTE: Remove the Block from the Stem. Again sometimes the Pivot will separate from the See Fig. -
Page 10: Pivot Sleeve, Diaphragm Plate, Diaphragm Nut
HIGH PRESSURE CONTROL VALVE Model: PO, PC Installation, Operation & Maintenance Guide DISASSEMBLY Pivot Sleeve, Diaphragm Plate, Diaphragm Nut Use a small adjustable wrench to hold the Upper Stem in place by the flats and spin the Diaphragm Plate in a counter clock wise direction loosening it from the Upper Stem. -
Page 11: Yoke Assembly
HIGH PRESSURE CONTROL VALVE Model: PO, PC Installation, Operation & Maintenance Guide DISASSEMBLY Yoke Assembly Use a wrench to remove the Bolts from the Yoke base. Wrap the Threads and Slide Yoke up from the Upper Housing. See Fig. 7-1... -
Page 12: Packing Box
HIGH PRESSURE CONTROL VALVE Model: PO, PC Installation, Operation & Maintenance Guide DISASSEMBLY Packing Box Use an adjustable wrench on flats to loosen. DO NOT Wrench up on the flats machined into the Packing Box USE pipe wrench Body and remove by turning counter-clockwise. -
Page 13: Removing Packing Box
HIGH PRESSURE CONTROL VALVE Model: PO, PC Installation, Operation & Maintenance Guide DISASSEMBLY Removing Packing Box Flip the Packing Box up side down and clamp the two flat sides of the Packing Box in vise and loosen Seat with an adjustable wrench. -
Page 14: Packing Box Assembly
Re-use Spring (Item 8). Packing Box. Use a brush or a grease gun to fill the Packing Box with all purpose grease. Tip: Use Kimray replacement parts only. Fig. 10-1 ✴ Recommended spare parts and stocked as repair kits Item Part No. -
Page 15: Inspection
HIGH PRESSURE CONTROL VALVE Model: PO, PC Installation, Operation & Maintenance Guide INSPECTION 11 Inspection & Cleaning Replace If the Packing Box shows excessive corrosion and wear. Fig. 11-1 Remove O-Ring from Packing Box. Remove Follower from the Packing Box. -
Page 16: Assembly
HIGH PRESSURE CONTROL VALVE Model: PO, PC Installation, Operation & Maintenance Guide ASSEMBLY 12 Cage, Packing NOTE: Hand tighten the Cage at this point in assembly. The Apply all purpose grease on the outside of the Packing Cage will be fully tightened at Seat installation. - Page 17 HIGH PRESSURE CONTROL VALVE Model: PO, PC Installation, Operation & Maintenance Guide ASSEMBLY "V" Packing Box Assembly Option 1. Insert stem through lower end of cage, then through spring, and then through follower. 2. Slide male packing expander (D) over stem with flat end toward follower.
-
Page 18: Diaphragm Assembly
HIGH PRESSURE CONTROL VALVE Model: PO, PC Installation, Operation & Maintenance Guide ASSEMBLY 13 Diaphragm Assembly Use a pair of brass jaws to hold the Diaphragm Plate in a vice. Diaphragm Assembly Place Diaphragm on Diaphragm Plate. See Fig. 13-1 Thread Diaphragm Nut on Diaphragm Plate. -
Page 19: Internal Yoke Assembly
HIGH PRESSURE CONTROL VALVE Model: PO, PC Installation, Operation & Maintenance Guide ASSEMBLY 14 Internal Yoke Assembly Use a brush to grease the Upper Pivot point. See Fig. 14-1 Spring Slide the Spring Plate on the Pivot Sleeve. Plate See Fig. 14-2 Insert the Spring on the Sleeve. -
Page 20: Pressure Closed
HIGH PRESSURE CONTROL VALVE Model: PO, PC Installation, Operation & Maintenance Guide ASSEMBLY 15 Pressure Closed Diaphragm Assembly NOTE: For pressure closed, flip Diaphragm Assembly upside down and place onto Yoke. See Fig. 15-1 Insert Bolts in Bonnet and tighten. -
Page 21: Travel Indicator
Yoke using a ball peen hammer. NOTE: Make sure the Travel Indicator Tag shows the correct operation of the valve either PO or PC. Insert Breather Plug. When assembling the Coupling Block, make sure the bevels are in the same side of the Block. -
Page 22: Testing
HIGH PRESSURE CONTROL VALVE Model: PO, PC Installation, Operation & Maintenance Guide TESTING 17 High Pressure Control Valve Testing Use a male nipple and install in the pressure port on the Yoke. See Fig. 17-1. Test the valve following assembly test procedure. - Page 23 Kimray is an ISO 9001- certified manufacturer. Kimray quality assurance process maintains strict controls of materials and the certification of parts used in Kimray HPCV. Please visit our website for up to date product data www.Kimray.com...
- Page 24 Kimray.com © 2015 Kimray, Inc. 1/15 MKSLLS-RM0002 Issued 4/21...
Need help?
Do you have a question about the PO and is the answer not in the manual?
Questions and answers