Table of Contents
Advertisement
Quick Links
7/21/2010
®
VISIT THE LIFETIME WEB SITE:
WWW.LIFETIME.COM
**U.S. and Canada customers ONLY**
IF ASSISTANCE IS NEEDED,
DO NOT CONTACT THE STORE!
CALL OUR CUSTOMER SERVICE DEPARTMENT
1 (800) 225-3865
at
HOURS: 7:00 a.m. to 5:00 p.m. Monday through Friday (Mountain Standard Time)
**For customers outside the U.S. or Canada, please contact the store for assistance.**
TABLE STORAGE CART
ASSEMBLY INSTRUCTIONS AND OWNER'S MANUAL
MODEL #6520
WARNING
Failure to comply with any of the warnings in these instructions may result in serious personal injuries such as
cuts, broken bones, nerve damage, paralysis, brain injury, or death. Failure to comply may also result in property
damage. Please heed all warnings and cautions. To ensure your safety, do not attempt to assemble this cart
without reading and following all instructions carefully. Identify and inventory the parts using the Parts List.
Save this instruction in the event that the manufacturer has to be contacted for replacement parts.
INSTRUCTION #1067123
1
Advertisement
Table of Contents

Related Manuals for Lifetime 6520


Summary of Contents for Lifetime 6520
- Page 1 7/21/2010 ® VISIT THE LIFETIME WEB SITE: WWW.LIFETIME.COM **U.S. and Canada customers ONLY** IF ASSISTANCE IS NEEDED, DO NOT CONTACT THE STORE! CALL OUR CUSTOMER SERVICE DEPARTMENT 1 (800) 225-3865 HOURS: 7:00 a.m. to 5:00 p.m. Monday through Friday (Mountain Standard Time) **For customers outside the U.S.
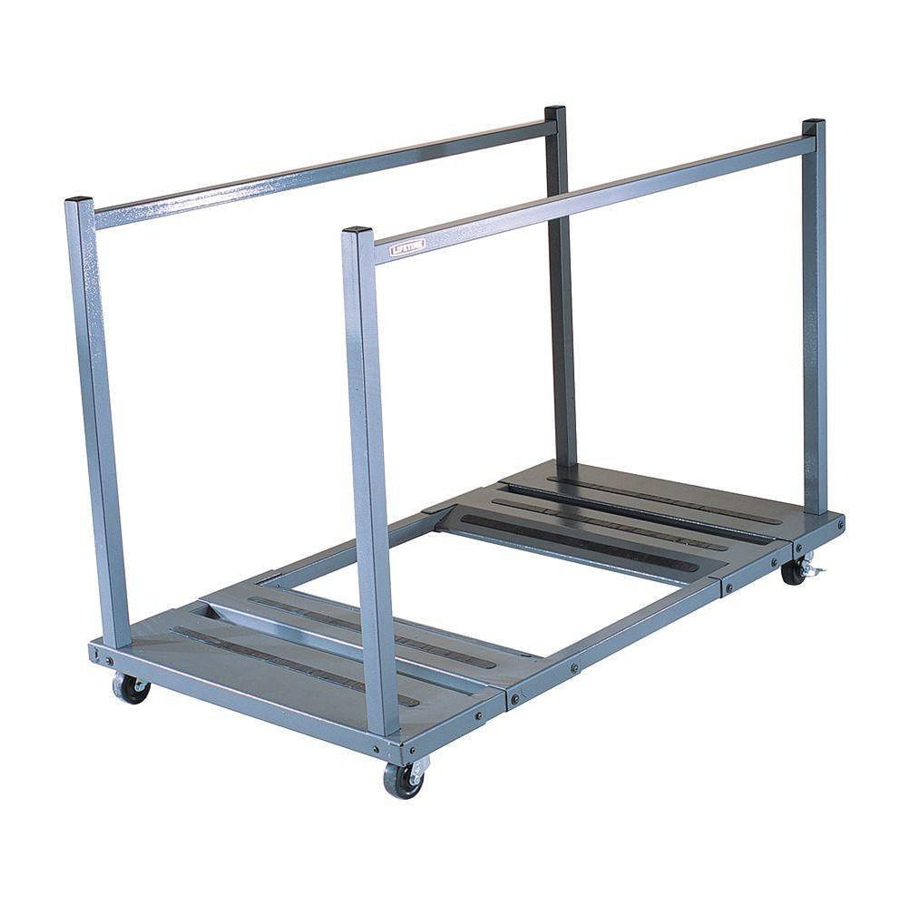
- Page 2 CIK * PARTS LIST Part # Description AA00704 End Deck Plate AA00804 Center Deck Plate AA00904 Long Bar AA00404 Cross Bar 1026028 Upright Bar AA00604 Brace 500028 Caster CF01000 Plastic Cap 1011415 Left Lateral L-Bracket 1011416 Right Lateral L-Bracket CJE Table Cart Hardware 1011121 m8 x 58 mm Bolt Thread lengths may...
- Page 3 STEP 1 a. Lay out the Long Bars (CIO). Turn the Bars so the holes are on the sides of the Bars as shown below. Slide an End Deck Plate (CIM) (without the angled surface) onto the Bars. Make sure the Bars are fully inserted into the End Deck Plate. STEP 2 a.
- Page 4 BOTTOM VIEW STEP 4 a. Place one of the Braces (CIQ) into position under Upright Bar hole of the Brace fits around the hole in the Plate. b. Insert an Upright Bar (CIK) through the hole in the End Deck Plate (CIM). NOTE: The end of the Upright Bar with the small round holes should be inserted into the Deck Plate.
- Page 5 STEP 7 a. Insert an m8 x 58 mm Bolt (CIV) through an m8 Flat Washer (CIX), the Lateral L-Bracket (CIT), the hole in the end of the Deck Plate, the Upright Bar (CIK) and the Brace as shown. Slide another Washer (CIX) over the Bolt and loosely secure it with an m8 Nylock Nut (CIY).
- Page 6 STEP 10 a. Insert one end of a Cross Bar (CIP) into one of the Upright Bars (CIK), making sure the small holes on the end of the Cross Bar are facing away from the Deck Plates. b. Insert the other end of the Cross Bar (CIP) into the Upright Bar (CIK) at the other end of the cart. c.
- Page 7 STEP 13 a. Make sure the Cross Bars are pulled in tightly to the Uprights. b. Insert a m4 x 10 Self-Tapping Phillips Screw (CIZ) into the holes in the Cross Bar inside each Upright as shown. c. Place a Plastic Cap (CIS) into the open end of each Upright. d.
Need help?
Do you have a question about the 6520 and is the answer not in the manual?
Questions and answers