Advertisement
Quick Links
N O R M A
N O R M A
N O R M A
N O R M A
A U D I O E L E C T R O N I C S
A
U
D
I
O
E
HS-DA1 Series
S
AFETY
U
SER
L
E
C
T
R
O
N
M
ANUAL
M
ANUAL
R E V O H S - D A C S a f e t y & U s e r
R E V O H S - D A C
S a f e t y & U s e r M M M M
R E V O H S - D A C
R E V O H S - D A C
S a f e t y & U s e r
S a f e t y & U s e r
I
C
S
A N U A L
A N U A L
A N U A L
A N U A L
1 1 1 1
p a g .
p a g
p a g
p a g
Advertisement

Related Manuals for Norma REVO HS-DA1 Series


Summary of Contents for Norma REVO HS-DA1 Series
- Page 1 HS-DA1 Series AFETY ANUAL ANUAL N O R M A N O R M A N O R M A N O R M A A U D I O E L E C T R O N I C S 1 1 1 1 R E V O H S - D A C R E V O H S - D A C S a f e t y &...
- Page 2 N O R M A N O R M A N O R M A N O R M A A U D I O E L E C T R O N I C S 2 2 2 2 R E V O H S - D A C R E V O H S - D A C S a f e t y &...
- Page 3 INDEX SAFETY MANUAL 1 PRELIMINARY INDICATIONS 2 PACKING & UNPCKINGA 3 TRANSPORT AND POSITIONING 4 CONNECTIONS 5 MAINTENANCE AND SUPPORT 6 USAGE 7 REMOTE CONTROL 8 GENERAL 9 RECYCLING, 10 LIMITATION of USE in USA-CANADA-MEXICO USER MANUAL 1 CONTROLS AND CONNECTIONS 2 USE N O R M A N O R M A...
-
Page 4: Safety Manual
NORMA is not responsible for any damage resulting from wrong system grounding or inefficient directives and regulations. Also check that the mains voltage is the same as that which must be fed the equipment. -
Page 5: Maintenance And Support
NORMA is not responsible for any errors, omissions or incompleteness of this manual, as it is not responsible for accidents or damages of any kind that may result from non-compliance, even partial, of the information provided in this manual. - Page 6 10 - LIMITATION of USE in USA-CANADA-MEXICO The use of any NORMA AUDIO, OPAL ELECTRONICS product in USA, CANADA, MEXICO is authorized ONLY if the product has been imported and sold by NORMA’s official distributor, as indicated on NORMA AUDIO website (www.normaudio.com).
- Page 7 User Manual Congratulations! The product you have purchased and you are going to use is the result of a long process of research and development, to bring you the best that current technology allows us to express in electronic intended for audio playback, both in terms of construction quality that listening quality.
-
Page 8: Controls And Connections
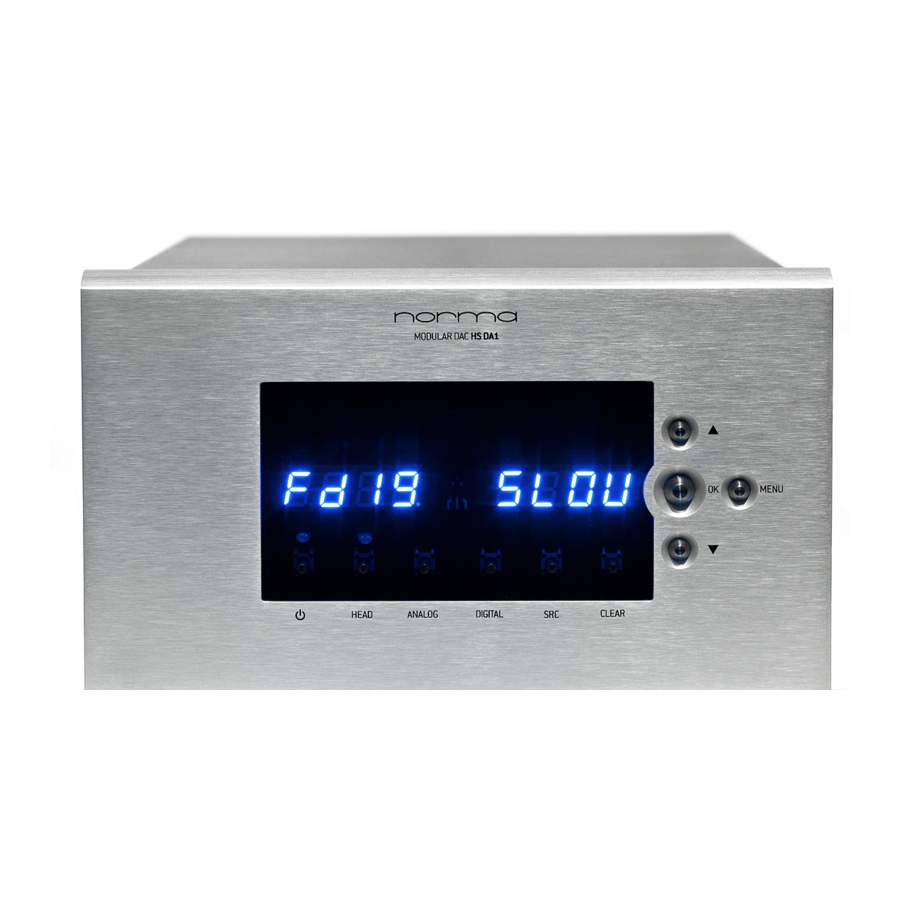
1 – CONTROLS AND CONNECTIONS Refer to the attached drawing in the last pages of the manual 1.1 – Front Panel 1 - Multi-function display The display show the controls and functional states. 2 - Indicator POWER STAND-BY In the state of STAND-BY indicator is illuminated. In the state of POWER ON indicator is off. - Page 9 1.2 - List of Controls and Rear Connections A - ON / OFF switch. B - Mains socket Mains power connector. Slot for connection of the network cable according to IEC / CEE 22. Check that the mains voltage corresponds to that indicated on the label on the rear panel. C - Fuse The AC power fuse.
- Page 10 - The electrical safety is due to its connection to safety ground. Before connecting and use the device, make sure that the grounding system is efficient. . NORMA is not responsible for any damage resulting from wrong system grounding or inefficient directives and regulations or a disconnection in any way made, ground security equipment.
- Page 11 2 – USE 2.1 – Norma IR Remote Description The IR remote can access all operating functions. For a complete description, see the appropriate section of the manual. 2.2 – Turn ON/OFF The REVO series is equipped with a sophisticated power on system, integrated with the system remote control and electronic protections.
- Page 12 2.3.1 – System Settings This section lets you customize all the characteristics of your device. You will find the submenus RESUME, LIGHT, DISPLAY and OUT (HS-DA1 VAR only) rESU RESUME Stores the current settings and makes it default. LIGH LIGHT Adjusts display brightness between values 30, 50.
- Page 13 2.3.3.1 – DAC Input Configuration : Parameters Message Function Possible choice Note FSrC UpSampler OFF - 44.1 - 88.2 - 176.4 - 48.0 - 96.0 - 192.0 KHz, AUTO CLSr Clock Source In / Local drdn Direct Down OFF / ON Fdig Digital Filter SLOW / SHAR...
- Page 14 2.3.3.5 - Digital Filter Setting You can select the digital filter in the two modes SLOW & SHARP In SLOW mode, the response of the filter provides the best performance and linearity for time response. In SHARP mode, the response of the filter provides the best performance and linearity for frequency response.
- Page 15 2.3.3.9 – Default Load Setting It is possible to automatically restore the default parameters. FSrC = OFF CLSr = In drdn = OFF Fdig = Slow dEEn = OFF 2.4 – Input Selection With the device turned on, you can select the desired input both via RC and front panel. On the remote control, press the IN button, then select the desired input with the SEL + and SEL –...
- Page 16 2.6 – Manual Gain Setting (Jumpers) (HS-DA1 Pre version only) The two pictures show the gain jumpers inside the device. You can access them by removing the top cover. The following tables show all the combinations you can achieve ad the correspondent gain values. Low Gain Setting Item Selector 3...
- Page 17 2.7 – Remote Control (16 buttons) 1 - ON/OFF Turns the device on or puts it in stand-by. 2 - MUTE Mutes the outputs. The device will not accept other commands until mutes is pressed again. 3 - VOL +/- Adjusts the volume.
- Page 18 N O R M A N O R M A N O R M A N O R M A A U D I O E L E C T R O N I C S R E V O H S - D A C R E V O H S - D A C S a f e t y &...
Need help?
Do you have a question about the REVO HS-DA1 Series and is the answer not in the manual?
Questions and answers