Coatmaster Flex User Manual
Hide thumbs
Also See for Flex:
- User manual (42 pages) ,
- User manual (61 pages) ,
- Quick start manual (8 pages)
Table of Contents
Advertisement
Quick Links
Advertisement
Table of Contents

Related Manuals for Coatmaster Flex


Summary of Contents for Coatmaster Flex
- Page 1 Flex User Manual flex.coatmaster.com Version: 05-2021...
- Page 2 Distribution and duplication of this document, and utilization and communication of its contents other than for legitimate purposes, are not permitted without the express permission of coatmaster AG. Violations will result in legal action. All rights are reserved in the event of patent grant or utility model registration (ISO 16016).
-
Page 3: Table Of Contents
Navigation Panel ........................14 Turning the Power On/Off ..................... 14 Language Selection ........................ 14 Wi-Fi Settings ......................... 15 Activation ..........................16 Operation with coatmaster® Local server…………………………………………………………………………..17 Operating Instructions ........................18 System Settings ........................18 Main Menu ..........................21 Block Menu ..........................22 Application Menu ........................ -
Page 4: Technical Data
AG has made every effort to manufacture a safe and high-quality device that complies with all applicable regulations. Our strict quality control procedures ensure high quality standards even for high volume production. -
Page 5: Customer Requirements And Device Specification
(including white). In contrast to magnetic induction-based systems, the Flex device permits measurement of coating thickness early in the process, i.e. directly after the application of the coating material, before drying or curing. -
Page 6: Applications
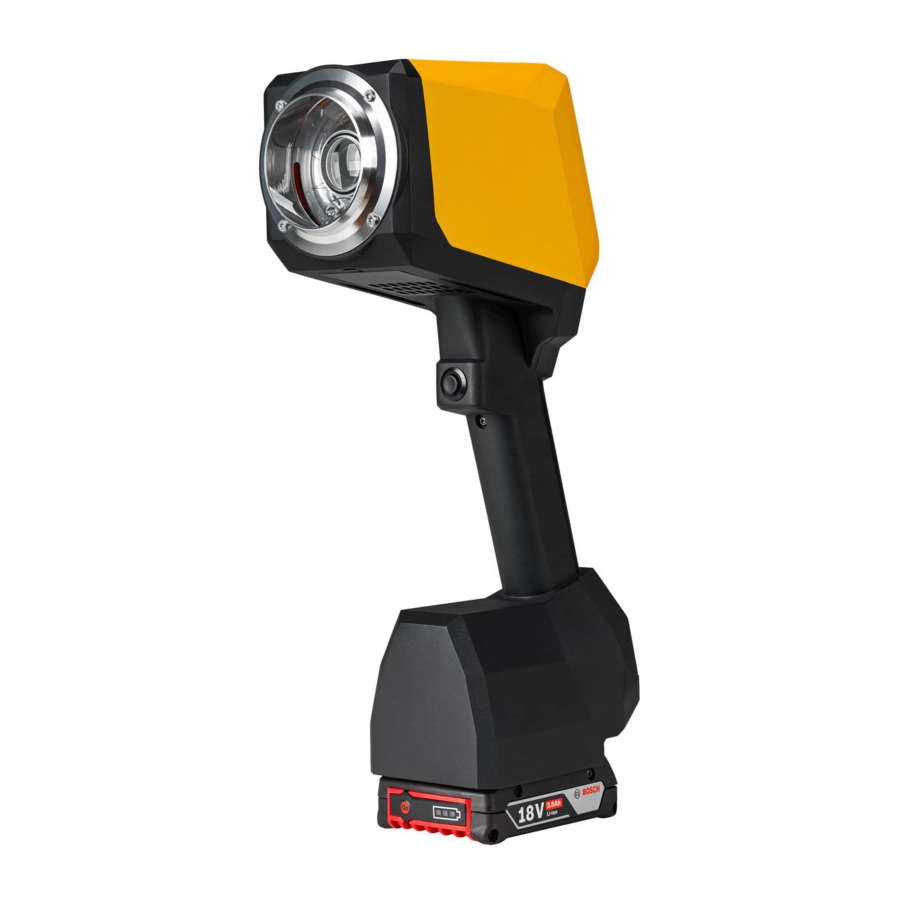
Flex Applications The coatmaster® Flex is a flexible and robust handheld device for non-contact measurement of coatings. The coatmaster® Flex is unique and versatile and can be used in a wide variety of industries and industrial sectors: • Automotive •... -
Page 7: Functionality And Measuring Principle
Generally, coatings have a very irregular surface. Powder coatings before curing have an even rougher surface, but can nevertheless be measured with the coatmaster® Flex. The properties of this roughness are influenced by various factors, such as pre-treatment, the type and roughness of the substrate, the type of coating (e.g. -
Page 8: Safety And Responsibility
Flex Safety and Responsibility This section provides an overview of all relevant safety features for optimum personal protection and safe and trouble-free operation. Keep the operating instructions with the safety instructions so that you can refer to them later. -
Page 9: Signs And Icons
Table 3: Signs and icons Intended Use The coatmaster® Flex is intended exclusively for the measurement of coating thicknesses. The device should only be used as a handheld device. The device should not be mounted on a robot or fixture, or operated for an extended period of time. -
Page 10: Improper Use
The coatmaster® Flex with SpectralBlue contains a Xenon flash lamp. The Evaluation of the photobiological safety of a Xenon flash light according to IEC-62471:2006 shows that the coatmaster Flex flash lamp falls under the exempt group and thus does not pose any photobiological hazard. -
Page 11: Product Safety
Before operating Flex in any environment, check if the measurement area is under surveillance of flame detectors. If the flame detector is not listed in the above table, use the Flex in that area after receiving written confirmation either from coatmaster AG or from the supplier of the flame detector only. -
Page 12: Delivery Scope
Flex Delivery Scope The coatmaster® Flex is delivered with the following components in a robust transport case (scope of delivery can vary): Ⓐ coatmaster® Flex Ⓑ Local Server LS (opt.) Ⓒ Local server power supply LSPS (opt.) Ⓓ LSPS 230v mains cable (opt.) -
Page 13: Set-Up
Set-Up To use your coatmaster® Flex, you must set it up to connect to a Flex server by Wi-Fi connection. The Flex server can either be a coatmaster® Cloud server (through internet connection) or a coatmaster® Local server (no Internet required). -
Page 14: Battery
Flex Battery 7.1.1 Battery Charging First charge the 18V battery pack by sliding the battery pack into the battery charger (see Figure 5: Battery charging). Use only the approved power charger. Battery inserted in charger Standalone battery After battery charging, double-check the status of the battery by pressing the ‘On’ button of the battery pack. -
Page 15: Navigation Panel
On/Off button Ⓐ in the input panel (see Figure 10: Input panel - keys and elements). It takes about 40 seconds for the coatmaster® Flex to boot up. To see the time until our coatmaster® Flex is fully operational, view the boot window on the coatmaster® Flex screen; the boot indicator scale is shown in the display. -
Page 16: Wi-Fi Settings
Flex Wi-Fi Settings To use your coatmaster® Flex, you must set it up to connect to a Flex server by Wi-Fi connection. The Flex server can either be a coatmaster® Cloud server (through internet connection) or a coatmaster® Local server (no Internet required). -
Page 17: Activation
If you have conducted a factory reset and need to re-activate your coatmaster® Flex, the Wi-Fi network you were connected to before resetting will be saved and the coatmaster® Flex will automatically connect to it. Connection to the internet may be provided by mobile phone hotspots. Internet availability of course depends on mobile connection stability. -
Page 18: Operation With Coatmaster® Local Server
Operation with coatmaster® Local server The coatmaster® Local server may be used in cases where not Internet access is possible. It provides a solution for operating the Flex in a local environment, using small computer (the local server) which provides its own Wi-Fi network. -
Page 19: Operating Instructions
Flex Operating Instructions The following steps guide you step-by-step through the individual process and menus. For the navigation in the following sections, the arrow keys and buttons of the input panel are used according to section 7.3 (Figure 10: Input panel - keys and elements). - Page 20 Flex 8.1.2 User Level The coatmaster Flex can be operated in two different User Level modes, the attributes of which are given in Table 5: User Levels. You can toggle between the different modes by selecting the User Level menu. When this...
- Page 21 Figure 23: Factory reset Alternatively, select the ‘Cancel’ field to return to the system settings menu. Only users using the Flex in Admin mode can do a Factory reset. For the Standard User Level this option is greyed out and cannot be activated.
-
Page 22: Main Menu
Flex Main Menu The main menu, and descriptions of the elements of the coatmaster® Flex, are shown in Figure 24: Main display. ① Active application Main Menu ② Active block ③ System settings ④ Measured value in selected unit ⑤... -
Page 23: Block Menu
Flex Use the right arrow key ►Ⓓ twice, and the OK buttonⒸ , to select system settings (see 8.1 System Settings). Figure 25: Display trend chart Use the back button Ⓑ to return to the main menu or to move one menu level up. -
Page 24: Application Menu
Flex If you choose ‘Select’ or ’Remove’, the list with the available blocks will change colour to light orange and you can select the desired block using the up/down arrow keys Ⓓ, and the OK button Ⓒ, from the input panel. - Page 25 ◇ Never look directly into the light source. the coatmaster® Flex must discharge. A WARNING (see section 5) warning message is displayed and, when confirmed with ‘Ok’, a flash is immediately triggered.
- Page 26 Flex Pre-set applications written in bold letters can be neither removed nor edited, even in the Admin mode. 8.4.1 Calibration Menu If the existing applications are not suitable for your use, you can ‘Edit’ an existing, or ’Add’ a new, application (only in the Admin user mode). Selecting ‘Edit’ or ‘Add’ in the application menu will direct you to the calibration menu.
- Page 27 Flex After the material properties are defined, select ‘Next’ to set up the display options. The display options will configure your screen and the bounds in the trend chart (see Figure 36: Principle of Application Bounds). Bounds (limits) can be...
- Page 28 In this example application, the SNR value shown in the calibration report is SNR = 2090 (dimensionless). If the coatmaster Flex is aimed at another surface if it is too far away from the coating, the SNR value for the measurement will decrease.
- Page 29 Figure 39: Calibration menu Now you can proceed to conduct a reference measurement to calibrate your device for this new application. At this point, position your coatmaster® Flex approximately 5 cm distant from the reference sample and press the trigger button (see...
- Page 30 The calibration report provides an evaluation of the calibration performed. You will see the following values in the report: MD (Mean Deviation of coatmaster® Flex from the reference value): The value • ◇ If the value is greater than 10%, check the reference value.
- Page 31 If the signal adjustment is still below 90%, please contact our Technical Support hotline (contact details on page 1). The above values will be calculated and checked automatically by the coatmaster® Flex software after ’Calibrate’ has been activated in the calibration menu.
- Page 32 Flex measurement results at lower or higher thickness. For example, Flex thickness measurements are ok in the range of 80µm, but we see that the Flex measures always around 10µm too high in the range of 40µm. This can occur, for example, if an uncured coating is measured on a cured coating.
-
Page 33: Measurement
Figure 45: Trend chart If the part to be measured is moving, keep up with the movement of the part, so that the relative movement between the part and the coatmaster® Flex is as small as possible, thus ensuring a stable measurement. -
Page 34: Data Transfer/Cloud
8.6.1 Login For a cloud server, you must log in to the coatmaster® cloud on your computer via the Internet to access the data. Alternatively, if you are using a coatmaster® local server, connect your computer to the local server Wi-Fi (see chapter …). Proceed as follows to access to connect to your server: Depending on your coatmaster®... - Page 35 Flex 8.6.2 Applications The application menu in the coatmaster® cloud displays the available applications. The list provides details of the number of blocks and measurements per application. Figure 48: Cloud – application menu To select an application, click on one of the applications in the list. You will automatically be directed to the monitor menu.
- Page 36 Flex 8.6.4 Export Within the export menu of the coatmaster® cloud, you can select dedicated data and download it to your computer. Figure 51: Cloud – export menu – select application ① Click on the desired application. Figure 2: Cloud – export menu – limiting data select The selected application will be copied to the export list in the right half of the window.
-
Page 37: Troubleshooting And Best Practice
Flex Troubleshooting and Best Practice Error Messages ◇ Corrective measure Error Description Messages ◇ Check Internet status and perform a network diagnosis with Did not receive a response from the cloud. ◇ Check the WLAN signal on the router. In the absence of a signal, reconnection ‘Troubleshooter’... - Page 38 Flex ◇ Contact the Technical Support (details on page 1) for further assistance. Wrong light pulse timing. ◇ Contact the Technical Support (details on page 1) for further assistance. Cannot open file. ◇ Check your Wi-Fi settings. Cloud timeout.
-
Page 39: Frequently Asked Questions (Faqs)
◇ leave it and restart the device. • If it happens rarely, Sudden shut- ◇ return Flex to your service partner given on page 1 down If it happens regularly, • The fan of my coatmaster® Flex is not running. -
Page 40: Maintenance And Repair
For any repair or service of the device, excluding light maintenance, please contact our Technical Support hotline (contact details on page 1). Light maintenance: coatmaster® Flex needs to be inspected, at least weekly, for inlet filter cleanliness, and front glass transparency and cleanliness. -
Page 41: Replacement Of The Inlet Filter
11.1 Replacement of the Inlet Filter The inlet filter must be inspected, at least weekly, by the user of the coatmaster® Flex to avoid a malfunction of the device. If it is dirty, change the filter; otherwise, change the filter every second week or after 80 hours of use, whichever is earlier. -
Page 42: Api-Interface Description
Flex 12. API-Interface Description coatmaster flex HTTP REST API Samples Get samples Request URL /api/v1/flex/samples?configId={CONFIG_ID} HTTP GET Response [{"id":268,"name":"0","isCurrent":true}] Create sample Request URL /api/v1/samples?configId={CONFIG_ID}&sampleName={SAMPLE_NAME} HTTP POST Response {"id":268,"name":"{SAMPLE_NAME}","isCurrent":true} Remove samples Request URL /api/v1/samples?configId={CONFIG_ID}?sampleId={SAMPLE_ID} HTTP DELETE Response 200 OK Applications... - Page 43 Flex "id":337, "name":"TEST-UPDATE", "folderId":null, "isMeasureValid":true, "isReadOnly":false }, ... Get application Request URL /api/v1/flex/configurations/{ID} HTTP GET Response "id":2820, "templateId":-1, "name":"calibrationsample", "folderId":null, "flashPower":"FLASH_1", "thicknessBoundsGroup":{ "warning":{ "enabled":false, "lower":1.0, "upper":500.0 "error":{ "enabled":false, "lower":1.0, "upper":500.0 "range":{ "enabled":false, "lower":1.0, "upper":500.0 "isMeasureValid":true, "referenceMeasurements":{ "items":[ "id":2771, "name":"Ref29.08.19 17:18:01", "thickness":27.0,...
- Page 44 Flex "thickness":56.0, "created":"2019-08-29T15:18:13.000+0000", "units":"MICROMETRE" "id":2773, "name":"Ref29.08.19 17:18:23", "thickness":81.0, "created":"2019-08-29T15:18:24.000+0000", "units":"MICROMETRE" "isReadOnly":true, "measureTime":0.1, "coatingId":"POWDER_UNCURED", "substrateId":"METAL", "thicknessRange":"THICKNESS_RANGE_2", "colourRange":"DARK" Measurements Get measurements Request URL /api/v1/flex/measurement/report HTTP POST "query": { "configurationIds": [1, 2, 3], “sampleIds”: [1, 2, 5], "minId": 999, “last”: 100, “maxId”: 10000,...
- Page 45 Flex "40.656", "1", "500", "1", "500", "MICROMETRE" "2820", "calibrationsample", "5599", "1", "266257", "2019-09-25T17:11:13", "-.-", "ERROR_FIT", "", "1", "500", "1", "500", "MICROMETRE" "2820", "calibrationsample", "5599", "1", "266258", "2019-09-25T17:19:53", "-.-", "ERROR_FIT", "", "1", "500", "1", "500", "MICROMETRE" "2820", "calibrationsample", "5599", "1", "266259",...
- Page 46 Flex "columnIds":[ "application_id", "application_name", "sample_id", "sample_name", "measurement_id", "timestamp", "thickness", "diffusivity", "measurement_status", "temperature", "warning_lower", "warning_upper", "error_lower", "error_upper", "units" Reference Authentication All requests require a HTTP header. Requests without this header will result in an error. Authorization: Bearer <<licence-number>> For HTTP POST requests, please set the Content-Type header.
Need help?
Do you have a question about the Flex and is the answer not in the manual?
Questions and answers