Table of Contents
Advertisement
Available languages
Available languages
Quick Links
Advertisement
Table of Contents

Related Manuals for Majestic DAB 842N


Summary of Contents for Majestic DAB 842N
- Page 1 RADIO PLL RDS FM VINTAGE DAB/DAB+ SVEGLIA CON DOPPIO ALLARME INGRESSO USB PER RICARICA SMARTPHONE/TABLET Mod : DAB 842N MANUALE D’ISTRUZIONI Importato da: New Majestic S.p.A. Via Rossi Martini, 41 26013 Crema (CR) Italia www.newmajestic.com...
- Page 2 Usare l’apparecchio solo nella maniera indicata all’interno del seguente manuale d’istruzioni. Un qualsiasi altro utilizzo è da ritenersi improprio e potrebbe provocare danni alle persone e alle cose. La New Majestic S.p.A. non si ritiene responsabile per danni causati da un uso improprio dell’apparecchio stesso. Avvertenze di sicurezza 1.
- Page 3 9. Un’esposizione prolungata alla musica ad elevato volume potrebbe provocare danni all’udito. Si raccomanda di evitare l’ascolto a volume elevato e tramite cuffie/auricolari per lungo tempo. 10. Non posizionare alcuna sorgente di fiamma nuda (come le candele) vicino all’apparecchio e non posisizionare l’apparecchio vicino a fonti di calore, inclusa la luce diretta del sole. 11. Non inserire oggetti nelle aperture di ventilazione dell’apparecchio. 12.
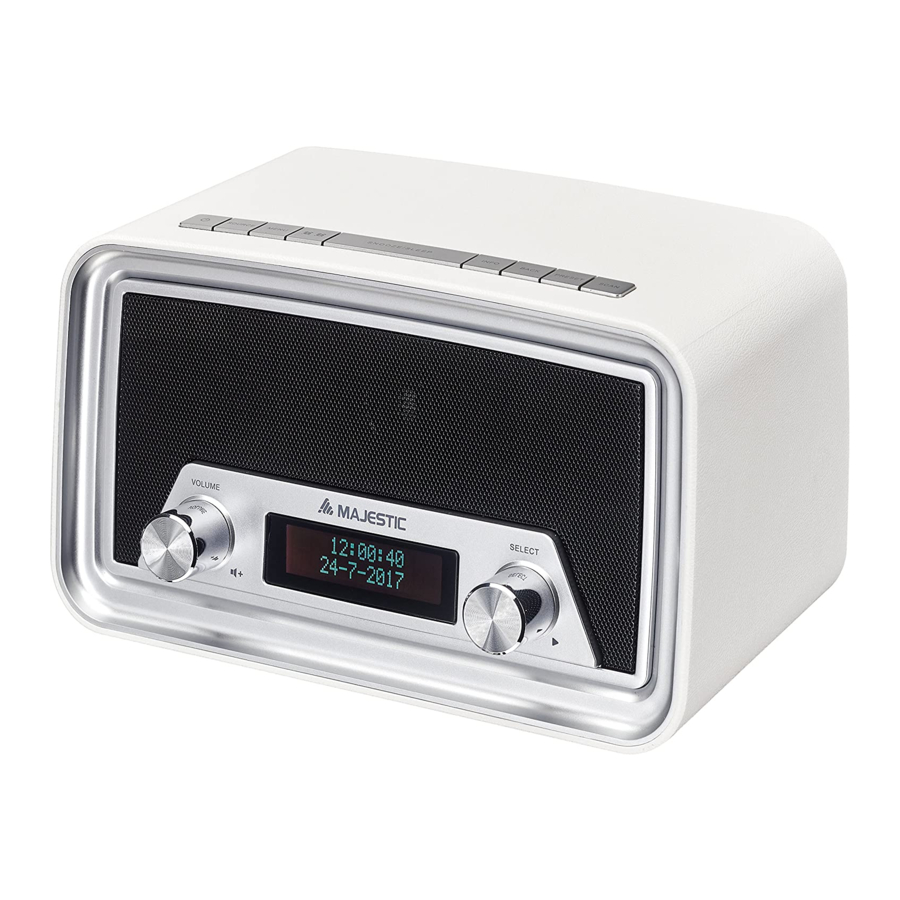
- Page 4 Contenuto Controllare che all’interno della confezione sia tutto incluso come da lista sottostante. Non usare l’apparecchio se danneggiato. 1. Sistema audio radio digitale 2. Adattatore 3. Manuale d’istruzioni Vista prodotto 1. ON/OFF: Selezionare tra la modalità “On” e la modalità “Standby” (visualizzazione ora e data). Disattiva la funzione Sleep e la funzione allarme.
- Page 5 12. SELECT: In modalità DAB, ruotare la manopola per selezionare una stazione radio DAB. In modalità FM, ruotare la manopola per sintonizzarsi su una frequenza FM. Nel menu, ruotare la manopola per scegliere ciclicamente tra le opzioni contenute nel menu. Premere la manopola per confermare la selezione. 13. Display 14. Antenna 15. Presa cuffie 16. USB per la carica di apparecchiature esterne 17. DC IN jack: per la connessione dell’alimentatore. Introduzione Alimentatore 1.
- Page 6 sul display quindi premere il tasto SELECT. 4. Ruotare la manopola SELECT fino a quando “Ora” apparirà sul display quindi premere il tasto SELECT. 5. Ruotare la manopola SELECT fino a quando appare “Impost. Ora/Data” sul display quindi premere il tasto SELECT. 6. Ruotare la manopola SELECT per impostare l’ora/data quindi premere il tasto SELECT per confermare. Antenna L’utilizzo dell’antenna può migliorare la ricezione del segnale radio. 1. Tirare l’antenna verso l’alto 2. Estendere l’antenna partendo dalla base 3. Se necessario, per una ricezione ottimale, regolare la posizione dell’antenna.
- Page 7 Ascolto trasmissioni DAB Selezione modalità DAB 1. Premere il tasto ON/OFF per accendere la radio. 2. Premere SOURCE per selezionare la modalità DAB. Scansione delle stazioni DAB La prima volta che si usa la radio, oppure se la lista delle stazioni radio è vuota, la radio effettuerà la ricerca delle stazioni. E’ possibile effettuare la ricerca delle stazioni radio manualmente. Procedere in questo modo: • In modalità DAB, premere il tasto SCAN per attivare la ricerca automatica delle stazioni.
-
Page 8: Scansione Completa
nella lista delle stazioni radio preimpostate quindi premere SELECT per confermare la selezione. Per modificare una stazione DAB assegnata a un numero predefinito, ripetere i passaggi da 1 a 4 per sovrascrivere la stazione DAB esistente. Visualizzazione delle informazioni DAB Premere ripetutamente INFO per scorrere tra le seguenti informazioni (se disponibili). - Page 9 2. Ruotare la manopola SELECT per sintonizzare la frequenza manualmente. DRC (Controllo Intervallo Dinamico) DRC ottimizza il livello del segnale sonoro, in modo che esso venga percepito al meglio. 1. Premere SELECT per confermare la selezione “DRC”. 2. Ruotare la manopola SELECT per visualizzare le opzioni riportate di seguito.
- Page 10 • Dopo che una stazione radio con segnale forte è stata individuata, la ricerca si arresta e la stazione radio FM verrà trasmessa. Sintonizzazione delle frequenze FM • In modalità FM, ruotare SELECT per sintonizzare manualmente una stazione radio. Memorizzazione stazioni FM È possibile memorizzare fino a 10 stazioni FM 1. Sintonizzare una stazione FM. 2. Tenere premuto PRESET fino a visualizzare sul display “Memor. Preselez.”. 3. Ruotare la manopola SELECT per selezionare un numero predefinito. 4. Premere SELECT per confermare. La stazione FM viene memorizzata con il numero selezionato. Ripetere i passaggi 1-4 per memorizzare più stazioni 5. Per sintonizzarsi su una stazione preselezionata, premere una volta PRESET, quindi ruotare la manopola SELECT per scorrere l’elenco delle stazioni preimpostate e premere SELECT per confermare la selezione.
- Page 11 Scansione: 1. Premere il tasto SELECT per confermare la selezione “Impostazion. di ricerca”. 2. Ruotare la manopola SELECT per secgliere tra le opzioni sottostanti: • Solo stazioni con buona ricezione. • Tutte le stazioni: Cerca tutte le stazioni indipendentemente dalla forza del segnale. 3. Premere SELECT per confermare l’opzione selezionata. Sistema Per ulteriori informazioni, vedere il capitolo “Menu di sistema”. Allarmi: Impostazione degli allarmi: Per impostare l’allarme: 1. In modalità radio, premere ALARM per selezionare tra Allarme 1 e Allarme 2 e quindi premere SELECT per confermare la selezione stessa. 2.
- Page 12 5. Ruotare la manopola SELECT per scegliere la fonte dell’allarme (DAB FM BUZZER), premere SELECT per confermare la selezione. Se si sceglie DAB o FM , si potrà selezionare l’ultima stazione radio ascoltata oppure una delle stazioni preimpostate (se impostate) come allarme. 6. Ruotare la manopola SELECT per scegliere le opzioni di intervallo allarme quindi premere SELECT per confermare la selezione. Opzioni di intervallo: quotidianamente, una volta, fine settimana e giorni feriali.
- Page 13 2. Premere SELECT per confermare le impostazioni. Quando l’impostazione dell’allarme è attiva, sul display apparirà la corrispondente icona di allarme ( per l’allarme 1 e per l’allarme 2). Disattivazione di un allarme sonoro Premere ON / OFF o ALARM per disattivare l’allarme e passare in modalità standby. Snooze • Per interrompere temporaneamente un allarme sonoro, premere SLEEP / SNOOZE. • Per modificare il periodo di snooze, premere ripetutamente SLEEP / SNOOZE. • Il periodo di Snooze può essere selezionato a seconda della durata dell’allarme (vedere il capitolo “Impostazione Allarmi”) Durata allarme Periodo di snooze 15 min 5, 10 min 30 min...
- Page 14 2. Premere SELECT per confermare la selezione. Una volta impostato, sullo schermo verrà visualizzata l’icona di Sleep ( ) Trascorso il tempo impostato l’apparecchio passa automaticamente in standby Menu di sistema Per accedere al menu di sistema: 1. Premere MENU in modalità DAB o FM. 2. Ruotare la manopola SELECT per scorrere le opzioni fino a visualizzare “Sistema”. 3. Premere SELECT per confermare la selezione “Sistema”. 4. Ruotare la manopola SELECT per visualizzare le opzioni riportate di seguito.
- Page 15 Impostazione del mio EQ: 1. Dopo aver selezionato “My EQ”, ruotare la manopola SELECT per selezionare tra Treble e Bass. Premere SELECT per confermare la selezione. 2. Ruotare la manopola SELECT per regolare il livello degli alti o bassi e quindi premere SELECT per confermare le impostazioni. L’asterisco dietro il livello indica l’impostazione corrente. 1. Premere SELECT per confermare la selezione “Ora”.
- Page 16 2. Ruotare SELECT per visualizzare le opzioni del formato ora riportate di seguito. L’asterisco dietro l’opzione indica l’impostazione corrente. • 12: Mostra l’ora in formato 12 ore. • 24: Mostra l’ora in formato 24 ore. 3. Premere SELECT per confermare l’opzione selezionata. Imposta il formato della data 1. Premere SELECT per confermare la selezione “Impostazione formato data”. 2. Ruotare SELECT per visualizzare le opzioni sotto indicate. L’asterisco dietro l’opzione indica l’impostazione corrente.
- Page 17 Livello attivo Questa impostazione definisce il livello di luminosità quando la retroilluminazione è accesa. 1. Premere SELECT per confermare la selezione “livello attivo”. 2. Ruotare la manopola SELECT per visualizzare i livelli di luminosità. L’asterisco dietro l’opzione indica l’impostazione corrente. • Basso • Medio • Alto 3. Premere SELECT per confermare l’opzione selezionata. Livello DIMMER Questa impostazione definisce il livello di luminosità quando la retroilluminazione è disattivata. 1. Premere SELECT per confermare la selezione “livello DIMMER”. 2. Ruotare la manopola SELECT visualizzare i livelli di luminosità. L’asterisco dietro l’opzione indica l’impostazione corrente. • Basso • Medio • Alto 3.
- Page 18 2. Ruotare la manopola SELECT per visualizzare le lingue selezionabili. L’asterisco dietro l’opzione indica l’impostazione corrente. • Inglese • Francese (French) • Tedesco (German) • Italiano (Italian) 3. Premere SELECT per confermare l’opzione selezionata. Impostazioni di fabbrica Questa impostazione cancella tutte le impostazioni definite dall’utente e le sostituisce con le impostazioni predefinite originali. 1. Premere SELECT per confermare la selezione “Ripristino valori di default”. 2. Ruotare la manopola SELECT per selezionare “Si” quindi premere SELECT per confermare le impostazioni di fabbrica. Versione Software Questa opzione mostra la versione corrente del software.
- Page 19 Menu FM Impostazione scansione Sistema Menu Sistema Equalizzatore Retroilluminazione Standby non attivo Lingua Impostazini di fabbrica Versione SW Menu Impostaz Ora/Data Aggiornam autom. Impostaz 12/24 H Impostaz.formato ora data Retroilluminazione Timeout Livello ON Livello DIMMER Menu Allarme Durata Fonte Intervallo Volume On/Off Menu Sleep Sleep Off | 15 | 30 | 45 | 60 | 90...
- Page 20 Essi potrebbero danneggiare la superficie della radio. • Non immergere la radio in acqua e non lasciare che l’acqua entri nell’alloggiamento della radio. Conservazione • Scollegare l’adattatore di alimentazione e pulire la radio prima dell’archiviazione. • Conservare sempre la radio in un luogo asciutto e pulito. AC Adaptor MOD: DAB 842N MODEL: PS07-050150-ABC RADIO SVEGLIA DAB/DAB+/FM INPUT: AC100-240V ~ 50/60Hz 0.3A FREQUENZA: FM: 87.5 - 108 MHz OUTPUT: DC5V 1.5A DAB: 174.928 -- 239.200MHz...
- Page 22 CONDIZIONI GENERALI DI GARANZIA PER I PRODOTTI DELLA New MAJESTIC S.p.A. Gentile Cliente, La ringraziamo per il Suo acquisto e Le ricordiamo che il prodotto risponde alle normative vigenti in fatto di costruzione e di sicurezza. Nel caso si dovessero riscontrare anomalie o difetti del prodotto, la New Majestic S.p.A. offre una Garanzia convenzionale soggetta alle condizioni qui riportate (precisando che la Garanzia convenzionale lascia impregiudicati i diritti del consumatore di cui al D.Lgs. n.206 del 06/09/2005). Per Garanzia si intende esclusivamente la riparazione o la sostituzione gratuita dei singoli componenti o dell’intero bene riconosciuti difettosi nella fabbricazione.
-
Page 23: Dichiarazione Di Conformita' Ue
DICHIARAZIONE DI CONFORMITA’ UE La sottoscritta Società: NEW MAJESTIC S.P.A. Via Rossi Martini 41 26013 CREMA (CR) dichiara sotto la propria responsabilità che il prodotto: TIPO: RADIO SVEGLIA DAB/DAB+/FM RDS PLL MARCA: MAJESTIC MODELLO: DAB 842N è costruito in conformità alle seguenti normative: Draft EN 303 345 v1.1.7 (2017-03) EN 55014-1:2006+A1:2009+A2:2011 EN 55014-2:2015 EN 55020:2007+A11:2011... - Page 24 PLL RDS FM DAB/DAB+ VINTAGE RADIO DUAL ALARM CLOCK USB INPUT FOR SMARTPHONE/TABLET CHARGING Model : DAB 842N INSTRUCTION MANUAL Importer: New Majestic S.p.A. Via Rossi Martini, 41 26013 Crema (CR) Italy...
-
Page 25: General Information
General information This user manual accompanies this digital radio audio system (below: radio). It contains important information on use and care. Before using the radio, read the user manual carefully. This particularly applies to the safety notes. Failure to follow the instructions in this user manual may result in injury or damage to the radio. Safety information Proper use The radio is designed to receive FM and digital radio broadcasts. It is exclusively intended for indoor private use and is not suitable for commercial purposes. Only use the radio as described in this user manual. Any other use is considered improper and may result in personal injury or damage to property. The manufacturer or vendor accepts no liability for damage caused by improper or incorrect use. Safety warnings 1. Connect the radio only to an alternating current (AC) power supply. Make sure the voltage corresponds with the voltage details on the radio. - Page 26 11. Never insert objects into ventilation slots or other openings on the radio. 12. Disconnect the radio from the power socket before lightning storms. 13. Always pull the plug instead of the power cord to disconnect the radio from the power socket. 14. Never open the housing of the radio. All repairs must be carried out solely by a qualified electrician. There are no user-serviceable parts inside. 15. Do not let the power cord hand over edge of table or counter, or touch hot surfaces.
- Page 27 Product contents Check to make sure that all contents have been received. Do not use the radio if there is damage. 1. Digital radio audio system 2. Power adapter 3. User manual Overview of the product 1. ON/OFF: Selects between “On” mode and “Standby” mode (showing clock and date). Cancels sleep function and a sounding alarm. 2.
-
Page 28: Getting Started
options. Press the knob to confirm a selection. 13. Display 14. Antenna 15. Headphone jack 16. USB jack for charging external devices 17. DC IN jack: Connects the power adapter. Getting started Connecting to power 1. Connect the cord of the power adapter to the DC IN jack of the radio. 2. -
Page 29: Controlling The Volume
4. Rotate SELECT until you see “Time” on the display and then press SELECT. 5. Rotate SELECT until you see “Set Time/Date” on the display and then press SELECT. 6. Rotate SELECT to set hour time and then press SELECT to confirm. Using the antenna Using the antenna can improve signal reception. 1. Pull the antenna upward. 2. Extend the antenna by pulling at its end. 3. If necessary, adjust the position of the antenna for best reception. Controlling the volume • Rotate VOLUME to the right to increase and to the left to decrease the volume. - Page 30 Listening to DAB broadcasts Selecting DAB mode 1. Press ON/OFF to turn the radio on. 2. Press SOURCE to select DAB mode. Scanning for DAB stations The first time you use the radio, or if the station list is empty, the radio automatically performs a station search. You may also perform a station search manually. To do so: • In DAB mode, press SCAN to activate the automatic station search. The radio automatically stores radio stations with sufficient signal strength. After the search is complete, the first stored station is broadcast automatically. Tuning to a DAB station 1. In DAB mode, rotate SELECT to cycle through the DAB stations in the station list. 2. Press SELECT to tune to the selected DAB station. Storing preset stations You can store up to 10 DAB stations 1.
- Page 31 To change the DAB station assigned to a preset number, repeat steps 1 to 4 above to overwrite the existing DAB station. Displaying DAB information Press INFO repeatedly to cycle through the following information (if available). • Dynamic label segment (DLS) • Signal strength • Program type (PTY) • Ensemble name • Frequency • Signal error rate • Bitrate codec • Time • Date Using the DAB menus...
- Page 32 2. Rotate SELECT to cycle through the below options. The asterisk behind the option indicates the current setting. • DRC off: No compensation applied. • DRC low: Medium compensation applied. • DRC high: Maximum compensation applied. 3. Press SELECT to confirm the selected option. DRC is on if enable by the radio station you are listening to. Prune This feature removes any stations that are in the list but have no service in your area. 1. Press SELECT to confirm the selection “Prune”. 2. Rotate SELECT to cycle through the below options. • No: Return to the previous menu. • Yes: Remove invalid stations from the station list. 3. Press SELECT to confirm the selected option. System See chapter “System menu” for details. Listening to FM broadcasts Selecting FM mode 1. Press ON/OFF to turn the radio on. 2. Press SOURCE to select FM mode. Scanning for FM stations • In FM mode, press SCAN or SELECT to activate the automatic search for the next available stations.
-
Page 33: Scan Setting
2. Press and hold PRESET until “Preset Store” shows on the display. 3. Rotate SELECT to select a preset number. 4. Press SELECT to confirm. The FM station is stored with the selected preset number. Repeat steps 1-4 to store more preset stations. 5. To tune to a preset station, press PRESET once, then rotate SELECT to cycle through the list of preset stations and then press SELECT to confirm the selection. To change the FM station assigned to a preset number, repeat steps 1 to 4 above to overwrite the existing FM station. -
Page 34: Setting Alarms
System See chapter “System menu” for details. Using the alarms Setting alarms To set the alarm: 1. While in radio mode , Press ALARM to select between Alarm 1 and Alarm 2 and then press SELECT to confirm the selection. 2. Rotate SELECT to set the hour time of the alarm and then press SELECT. 3. Rotate SELECT to set the minute time of the alarm and then press SELECT. - Page 35 7. Rotate SELECT to adjust the volume level and then press SELECT. 8. Rotate SELECT to select alarm on or off and then press SELECT to confirm the selection. When the alarm setting is active, the corresponding alarm icon ( for alarm 1 and for alarm 2) will show on the display. At the set time, the alarm will sound. The volume will increase gradually until it reaches the set volume level. The corresponding alarm icon will also flash on the display.
- Page 36 Duration of alarms Selectable snooze periods 15 min 5, 10 min 30 min 5, 10, 15 min 45 min 5, 10, 15, 30 min 60 min 5, 10, 15, 30 min 90 min 5, 10, 15, 30 min 120 min 5, 10, 15, 30 min Note: If the remaining duration of the alarms is shorter than 10 minutes, the only selectable snooze period is 5 minutes. If the remaining duration is...
- Page 37 Equaliser 1. Press SELECT to confirm the selection “Equaliser”. 2. Rotate SELECT to cycle through the below equalizer options. The asterisk behind the option indicates the current setting. • My EQ (see chapter “Setting My EQ”) • Normal • Classic • Jazz • Pop • Rock • Speech 3. Press SELECT to confirm the selected option. Setting My EQ 1. After “My EQ” has been selected, rotate SELECT to select between Treble and Bass. Press SELECT to confirm the selection. 2. Rotate SELECT to adjust the treble or bass level and then press SELECT to confirm the settings. The asterisk behind the level indicates the current setting. Time 1. Press SELECT to confirm the selection “Time”.
- Page 38 • Update from Any: Update the time and date from any available signals. • Update from DAB: Update the time and date from DAB signals. • Update from FM: Update the time and date from FM signals. • No update: Do not update the time and date. 3. Press SELECT to confirm the selected option. Set 12/24 hour 1. Press SELECT to confirm the selection “Set 12/24 hour”. 2. Rotate SELECT to cycle through the below time format options. The asterisk behind the option indicates the current setting. • 12: Show the time in 12-hour format. • 24: Show the time in 24-hour format. 3. Press SELECT to confirm the selected option. Set date format 1. Press SELECT to confirm the selection “Set date format”. 2. Rotate SELECT to cycle through the below date format options. The asterisk behind the option indicates the current setting. • dd-mm-yyyy • mm-dd-yyyy 3. Press SELECT to confirm the selected option. Backlight 1. Press SELECT to confirm the selection “Backlight”. 2. Rotate SELECT to cycle through the below options. The asterisk behind the option indicates the current setting.
-
Page 39: Inactive Standby
• 90 sec • 120 sec • 180 sec 3. Press SELECT to confirm the selected option. On level This setting defines the brightness level when the backlight is switched on. 1. Press SELECT to confirm the selection “On level”. 2. Rotate SELECT to cycle through the below brightness levels. The asterisk behind the option indicates the current setting. • Low • Mid • High 3. Press SELECT to confirm the selected option. DIMMER level This setting defines the brightness level when the backlight is dimmed. 1. Press SELECT to confirm the selection “DIMMER level”. 2. Rotate SELECT to cycle through the below brightness levels. The asterisk behind the option indicates the current setting. • Low • Mid • High 3. Press SELECT to confirm the selected option. Inactive Standby This setting defines the duration of time before the radio switches itself on automatically. 1. Press SELECT to confirm the selection “Inactive Standby”. - Page 40 Language This setting defines the language used in the menus. 1. Press SELECT to confirm the selection “Language”. 2. Rotate SELECT to cycle through the below language options. The asterisk behind the option indicates the current setting. • English • Français (French) • Deutsch (German) • Italiano (Italian) 3. Press SELECT to confirm the selected option. Factory Reset This setting clears all user-defined settings and replaces them with the original default settings. 1. Press SELECT to confirm the selection “Factory Reset”. 2. Rotate SELECT to select “Yes” and then press SELECT to confirm factory reset. Software Version This option displays the current software version. Charging external device Connect an external device (e.g. smartphone, mp3 player) via a USB cable (not provided) to the USB jack on the back of the radio for charging. The radio cannot access the contents in the connected external device.
- Page 41 DAB Menus Full scan Manual scan Off | Low | High Prune No | Yes System (See “System menus”) FM Menus Scan setting All stations | Strong stations only System (See “System menus”) System Menus Equaliser My EQ | Normal | Classic | Jazz | Pop | Rock | Speech Time (See “Time menus”) Backlight (See “Backlight menus”) Inactive standby Off | 2 hour | 4 hour | 5 hour | 6 hour Language English | Français | Deutsch | Italiano Factory reset...
-
Page 42: Specifications
• Do not immerse the radio in water and do not let water getting into the housing of the radio. Storage • Unplug the power adapter and clean the radio before storage. • Always store the radio in a dry and clean place. AC Adaptor MOD: DAB 842N MODEL: PS07-050150-ABC RADIO SVEGLIA DAB/DAB+/FM INPUT: AC100-240V ~ 50/60Hz 0.3A FREQUENZA: FM: 87.5 - 108 MHz OUTPUT: DC5V 1.5A DAB: 174.928 -- 239.200MHz...
Need help?
Do you have a question about the DAB 842N and is the answer not in the manual?
Questions and answers