Advertisement
Quick Links
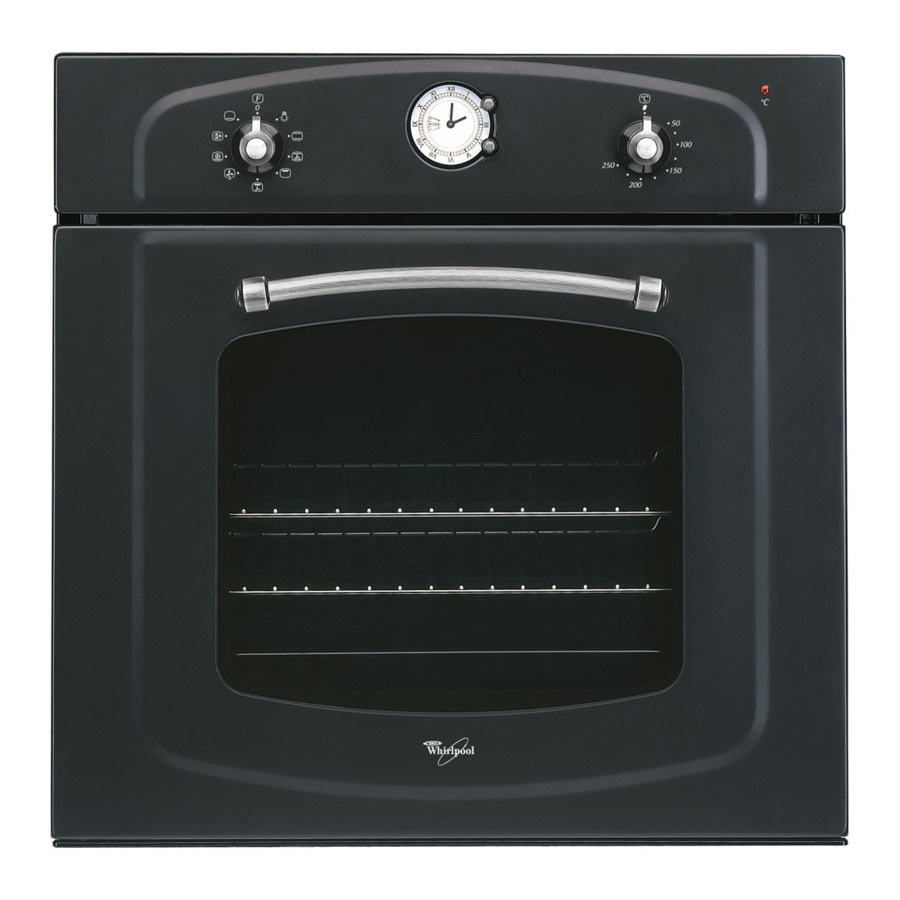
AKP 290
IT
AT FR NL BE SE NO DK FI
Top
shelf
Bottom
shelf
Drip tray:
CONTROL PANEL
1
1. Function selector knob
2. Analog clock
ANALOG CLOCK
The analog clock allows:
1) Viewing the time of the day. To adjust the time of the day, press the button (B)
and turn it anticlockwise to set the time.
2) Programming the cooking start time. The maximum programmed cooking start time is 12 hours.
Programming the cooking time. Select the cooking time (available with any function) to turn the oven on for a
specified period of time. At the end of the specified time the oven will switch off automatically. The minimum
programmed cooking time is 5 minutes and the maximum programmed cooking time is 180 minutes.
a) MANUAL COOKING
1) Turn the button (B) anticlockwise (without pressing), until the symbol is displayed in the window
2) Press the button (A) and turn it anticlockwise until the triangle (D)
The button clicks when turned to the proper position.
3) Turn the selector knob to the required symbol. The oven light switches on.
4) Turn the thermostat knob clockwise to the required temperature. The red thermostat indicator light switches on.
5) At the end of cooking, turn the knobs to OFF (0 - •) because in manual mode the oven will NOT switch off automatically.
5019 310 56638
PRODUCT SHEET
PL CZ SK HU RU BG RO
1. Control panel
2. Cooling fan (not visible)
3. Upper heating element
4. Grill heating element
5. Rear oven lamp
6. Circular heating element (not visible)
7. Fan
8. Lower heating element (hidden)
9. Oven cool door
ACCESSORIES
Wire shelve:
4
2
3
3. Thermostat knob
4. Red thermostat led
.
points to the time shown on the clock (hour hand).
Function
0
OVEN OFF
-
LAMP
• To switch on the oven light.
• To cook meat, fish and chicken on the same level.
• Preheat the oven to the required cooking temperature and place the food
STATIC
inside as soon as the red thermostat L.E.D. switches off.
• Ideally, the second or third shelf level should be used.
• To cook on up to two different shelf levels.
PASTRY/FAN
• If necessary, switch the positions of the dishes to cook food more evenly.
• It is not necessary to preheat the oven (except for pizzas and focaccias).
• To grill steak, kebabs and sausages, to cook vegetables au gratin and to toast
bread.
• Preheat the oven for 3 - 5 min.
GRILL
• The oven door must be kept closed during the cooking cycle.
• When cooking meat, pour a little water into the drip tray (on the bottom level) to
reduce smoke and fat spatters.
• Ideally the meat should be turned during cooking.
• To grill large joints of meat (roast beef and other roast meats).
• The oven door must be kept closed during the cooking cycle.
TURBO GRILL
• When cooking meat, to avoid spatters of fat and smoke, pour a little water into
the drip tray.
• Turn the meat during grilling.
• Ideal for thawing frozen food at room temperature.
• The food should be placed in the oven in its wrapping to prevent it from drying
DEFROSTING
out.
TURBOFAN
• To cook on one level (e.g.: fruit, cakes, timbales, vegetables, pizza, poultry).
• To cook (without preheating) foods that require the same cooking temperature
on one or more levels (e.g.: fish, vegetables, sweets), without transferring
FAN/THERMOVENTILATED
odours from one foodstuff to the other
• To finish cooking fruit or cheese cakes or to thicken sauce.
BOTTOM HEATING ELEMENT
• Use this function for the last 10/15 minutes of cooking.
b) MANUAL COOKING WITH COOKING START TIME
1) Turn the button (B) anticlockwise (without pressing), until the symbol is displayed in the window
2) Press the button (A) and turn it anticlockwise until the triangle (D)
3) Turn the selector knob to the required symbol.
4) Turn the thermostat knob clockwise to the required temperature.
5) At the end of cooking, turn the knobs to OFF (0 - •) because in manual mode the oven will NOT switch off automatically.
c) PROGRAMMED COOKING WITH COOKING START TIME AND COOKING DURATION
1) Turn the button (B) anticlockwise (without pressing) until the required cooking duration is displayed in the window (C) (5 - 180 min.).
2) Press the button (A) and turn it anticlockwise until the triangle (D)
3) Turn the selector knob to the required symbol.
4) Turn the thermostat knob clockwise to the required temperature.
5) At the end of the set cooking time an acoustic signal will sound and the oven will switch off automatically. To exclude the acoustic
signal, turn button (B) anticlockwise (without pressing) until the symbol
6) At the end of the set cooking time, cooking may be prolonged by following the instructions given above, or by using the
manual cooking procedure.
d) PROGRAMMED COOKING WITH COOKING DURATION
1) Turn the button (B) anticlockwise (without pressing) until the required cooking duration is displayed in the window (C) (5 - 180 min.).
2) Press the button (A) and turn it anticlockwise until the triangle (D)
button clicks when turned to the proper position.
3) Turn the selector knob to the required symbol. The oven light switches on.
4) Turn the thermostat knob clockwise to the required temperature. The red thermostat indicator light switches on.
5) At the end of the set cooking time an acoustic signal will sound and the oven will switch off automatically. To exclude the acoustic
signal, turn button (B) anticlockwise (without pressing) until the symbol
At the end of the set cooking time, cooking may be prolonged by following the instructions given above, or by using the
manual cooking procedure
HOW TO OPERATE THE OVEN
• Turn the selector knob to the required function. The oven light switches on.
• Turn the thermostat knob clockwise to the required temperature. The red thermostat led lights up, switching off again when the oven
reaches the selected temperature.
At the end of cooking time:
• Turn the knob to "0".
Oven function chart
Description of function
.
points to the time at which cooking is to start (e.g. in figure: 11.30).
points to the time at which cooking is to start (e.g. in figure: 11.30).
is displayed in the window.
points to the time shown on the clock (hour hand). The
is displayed in the window.
Advertisement

Related Manuals for Whirlpool AKP 290


Summary of Contents for Whirlpool AKP 290
- Page 1 PRODUCT SHEET AKP 290 AT FR NL BE SE NO DK FI PL CZ SK HU RU BG RO 1. Control panel Oven function chart 2. Cooling fan (not visible) 3. Upper heating element Function Description of function 4. Grill heating element OVEN OFF 5.
- Page 2 COOKING TABLES Level Temperature Cooking time Level Temperature Cooking time FOOD Function Pre heating FOOD Function Pre heating (from the bottom) (°C) min. (from the bottom) (°C) min. 50 - 60 90 - 110 Savoury pies, Filled fruit pies, MEAT 100 - 110 45 - 55 Lamb, Kid, Mutton...
Need help?
Do you have a question about the AKP 290 and is the answer not in the manual?
Questions and answers