Table of Contents
Advertisement
Quick Links
Advertisement
Table of Contents

Related Manuals for Burmester 175

Summary of Contents for Burmester 175
- Page 1 OWNER’S MANUAL...
-
Page 3: Table Of Contents
Table of Content About this device . . . . . . . . . . . . . . . . . . . . . . . . . . . . . . . . . . . . . . . . . . . . . . . . . . . . . 4 About These Operating Instructions . -
Page 4: About This Device
The 175 turntable is driven by four motors located in the outer square around the sub- platter . This squaring of the circle and the use of multiple belts ensures that no irregular tension arises on the central bearing . -
Page 5: About These Operating Instructions
About these operAting instructions About These Operating Instructions These operating instructions describe the operation of the 175 turntable . Symbols and markups used Prerequisite Indicates a prerequisite that must be fulfilled before a subsequent action can be carried out . -
Page 6: Important Safety Instructions
Disconnecting the device properly from the power supply To completely separate the 175 from the power supply, use the easily accessible power switch on the back of the external power supply unit and then separate the power... -
Page 7: Scope Of Delivery
• 1 set of belts (4 pieces) • Turntable • Carbon slipmat • External power supply unit • Power cable • Multi-pole power supply cable • Burmester Reference Check record • Operating Instructions • Catalogue • Warranty certificate • Design drawing 175 Turntable... -
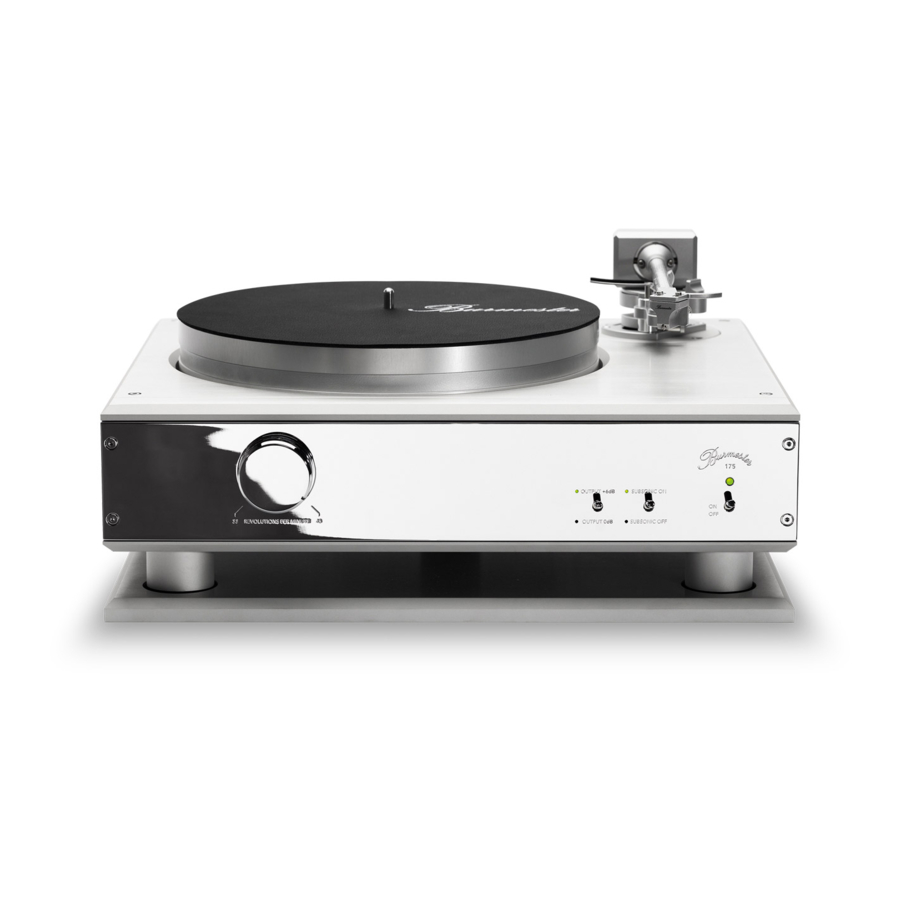
Page 8: Overview Of The Record Player
overview of the record plAyer Overview of the record player The record player 1 Speed setting 2 Turntable 3 Tonearm 4 Power LED (Operation/Standby) 5 Height-adjustable feet 6 Speed display 7 base plate 8 Power switch... -
Page 9: Rear Panel Of The Record Player
Rear panel of the record player 9 Auto Power Down switch 10 Impedance setting for cartridge 11 Phase switch 12 Symmetrical output 13 Power Supply Socket 175 Turntable... -
Page 10: Tonearm
overview of the record plAyer Tonearm 14 Transport lock 15 Lift 16 Adjustable counterbalance 17 Cartridge 18 Cue control lever 19 Anti-skating setting... -
Page 11: Power Supply Unit
Power supply unit 20 Power LED 175 Turntable... -
Page 12: Back Panel Of The Power Supply Unit
overview of the record plAyer Back panel of the power supply unit 21 Power Supply socket 22 Power switch 23 Power socket... -
Page 13: Connect The Record Player
. ► Never connect the record player to a phono input . Switch the power switch (22) to ON . 175 Turntable... -
Page 14: Tune The Record Player
1= GND Adjust the impedance to the cartridge . You can adjust the impedance to your cartridge . For the pre-assembled cartrifge by Burmester, the optimal value is already set (4.7 kΩ). ► Select the optimal setting for your pickup: 4.7 kΩ... -
Page 15: Set Up Anti-Skating
This guarantees a flawless audio experience. The record player is turned off . Place the Burmester reference check record with side A facing upwards on the turntable and switch on the record player . Turn the speed setting (1) to the value 45 . -
Page 16: Adjust The Colour Of The Power Leds
tune the record plAyer Adjust the colour of the Power LEDs You can adjust the colour of the Power LEDs . There are two separate colour schemes available. Each colour scheme applies globally, for the record player as well as the power supply unit . -
Page 17: Operate The Record Player
The device is turned on or in standby mode . The Power LED (4) is on . ► Push the power switch (8) downwards to the OFF setting . The device turns off . The Power LED (4) is not on . 175 Turntable... -
Page 18: Set Speed
tune the record plAyer Set speed The device is turned on . Turn the speed setting (1) to the required setting 45 Generally used for Maxis and Singles 33 Generally used for LP records. OFF The turntable does not turn . Lift and lower the tone arm Lift the tone arm Loosen the transport lock (14) if necessary . -
Page 19: Play A Record
Loosen the transport lock (14) if necessary . Lift the tonearm with the cue control lever (18) . Move the tonearm (3) to the desired position . Lower the tonearm with the cue control lever (18) . Playback begins . 175 Turntable... -
Page 20: Service, Repairs And Maintenance
service, repAirs And mAintenAnce Service, repairs and maintenance WARNING Damage to the surface Liquids and chemicals can damage the surface of the casing . ► Make sure that no liquid gets into the record player . ► Do not use chemicals to clean it . Disposal Legislators stipulate that this device may not be disposed over in household waste (grey bin, yellow bin, green bin, paper or glass). -
Page 21: Technical Data
< 0 .1 dB Tonearm Type Multi-layer carbon arm tube Effective length 238 .2 mm Overhang 16 .2 mm Azimuth setting via clamp screws Weight setting by fine thread Tonearm weight 0 .7 kg Effective mass 2 .8 g 175 Turntable... - Page 22 Width 450 mm Height 97 mm Depth 316 mm Voltage Model 175-115: 100-120 V~ , 50 Hz/60 Hz Model 175-230: 220-240 V~ , 50 Hz/60 Hz Safeguards Model 175-230: F2, F4, F6 Model 175-115: F1, F3, F4, F5, F7 F1, F2, F3: T160 mA H T1.0 A H...
- Page 24 Burmester Home Audio GmbH Wilhelm–Kabus Straße 47 · 10829 Berlin, Germany www.burmester.de 1.0 / 1904...
Need help?
Do you have a question about the 175 and is the answer not in the manual?
Questions and answers