Advertisement
We urge you to take time to familiarize yourself with the mechanics of your Traveler
vise. Rotary tying can be easier and more productive. See tips (opposite page).
Please return your warranty card to validate your warranty.
C2203 Parts List
Item
Part No.
Description
1
290-40840
C2200 End Cap (Traveler)
2
120-01658
Nylon Flat Washer
3
290-40269
Traveler Crank Arm
4
110-00005
Rotary Tension Screw
5
290-40842
C2200 Primary Knob
6
290-40271
Traveler Rotary Head Assly.
7
220-22015
Rotary Shaft Right Hand
7
220-22016
Rotary Shaft Left Hand
8
Lube O-Ring
130-03016
9
130-03024
Ball Bearing
10
290-40313
Traveler Cam Assly.
11
130-03017
Jaw O-Ring
12
290-40336
Primary Jaw
13
290-40337
Secondary Jaw
Vise Assembly
Your vise has been assembled and lubricated at the factory. All you have to do is assemble the
bobbin cradle and attach the vise to the stem. The jaws on your vise have been black oxide
coated and then oiled. After use they should be coated with oil or rust inhibitor such as WD-40 to
prevent rust or oxidation caused by acidity in your fingers. Any light general purpose grease,
preferably silicone grease, can be applied on any moving part or o-ring*.
Please note, our warranty does not cover rust damage.
Rotary Shaft
Cradle Support
Tension Screw
Stem Support
Stem Lock Screw
1. Loosen stem lock screw enough to prevent interference with stem.
2. Slide stem into the hole in pedestal base and secure the stem by tightening the stem lock screw.
3. Slide the cradle support collar onto the pedestal base stem with the flat side up as shown in the
diagram.
4. Slide the cradle support onto the pedestal base stem as shown. Use the cradle support tension
screw to add drag to the cradle support as desired.
5. Attach the vise to the pedestal base stem and tighten. Be careful not to cross the threads when
attaching the vise.
6. Loosen the stem lock screw to turn the vise to the desired position.
7. Slide the cradle arm into the hole in the cradle support. If the cradle is not in a comfortable position
hold the cradle arm firmly and rotate the cradle to the desired position. See detail 1.
8. Slide the cradle support collar and cradle suport up or down so that the cradle is on or just
below the center line of the rotary shaft.
Note:
Qty
Item
Part No.
Description
1
14
130-03038
Jaw Spring
15
2
110-00042
Jaw Adjusting Screw
1
16
120-01450
Jaw Mounting Screw
1
17
120-01147
Cradle Support Lock Screw
290-40255
1
18
Cradle Support
1
110-00003
Cradle Arm Lock Screw
19
20
290-40263
Cradle Support Collar Assly.
1
252-40158
21
Traveler Base Assembly
22
250-40004
1
7" Traveler Stem
2
23
252-40186
Stem Lock Screw
24
290-40264
1
Cradle Arm Assly.
1
25
120-01149
Stem Support Lock Screw
26
252-40180
Stem Support
1
Set
Center Line
Cradle
Cradle Arm
Cradle Support
Cradle Arm Lock Screw
Cradle Support Collar
Pedestal Base
Detail 1
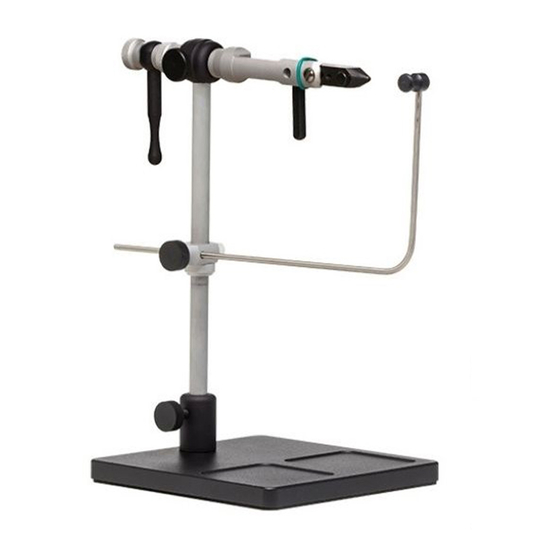
Renzetti Traveler 2200 Series
Model# C2203 Pedestal Base Vise
Qty
1
1
Note:
1
This screw for setting drag only.
1
It is not intended to lock the rotary shaft.
1
1
1
1
1
2
1
5
1
1
1
1
3
18
17
Rotate
23
25
For the complete line of Renzetti products and accessories. Please visit our website:
Made in the USA
True Rotary
10
4
11
6
2
7
2,037,995
R
8
2,535,148
22
19
24
20
26
*Lubricate all threads and moving parts as needed
www.renzetti.com or truerotary.com
Covered under U S Patent & Registration No.:
2,51441; 2,077,565; 2,060,740; 2,567,674
2,535,148; 6,564,494B2; 2,037,995
13
9
14
12
16
15
21
02/12/19
Advertisement
Table of Contents

Related Manuals for Renzetti True Rotary Traveler 2200 Series


Summary of Contents for Renzetti True Rotary Traveler 2200 Series
- Page 1 5. Attach the vise to the pedestal base stem and tighten. Be careful not to cross the threads when attaching the vise. For the complete line of Renzetti products and accessories. Please visit our website: 6. Loosen the stem lock screw to turn the vise to the desired position.
- Page 2 For more rotary tying techniques ask your retailer for the Jaw adjusting Renzetti rotary tying tips video. Screw Detail 7 Detail 8 For the complete line of Renzetti products and accessories. Please visit our website. Position 1 www.renzetti.com Jaw Mounting Screw Position 2 www.truerotary.com...
Need help?
Do you have a question about the True Rotary Traveler 2200 Series and is the answer not in the manual?
Questions and answers