
Related Manuals for Clearfield FieldSmart


Summary of Contents for Clearfield FieldSmart
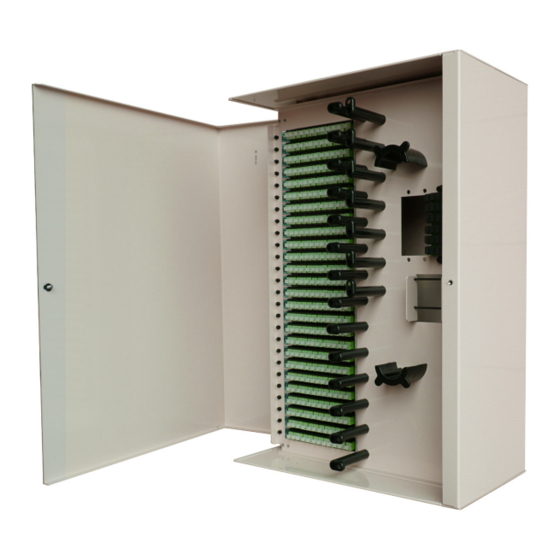
- Page 1 FieldSmart FDP Indoor 288-Port Wall Box Installation Manual ______________________________________________________ Manual 021890 REV A - Oct 2020...
-
Page 2: Table Of Contents
FieldSmart FDP Indoor 288-Port Wall Box Installation Manual _________________________________________________________ Table of Contents Application Description Technical Specifications Mounting Cable Entrance Splicing Installing Cassettes and Managing Slack Installing and Routing Splitters Connector Cleaning Procedure Standard Warranty Proprietary Notice Technical Support Direct: 763.476.6866 • National: 800.422.2537 • www.SeeClearfield.com • techsupport@clfd.net... -
Page 3: Application
This indoor wall box is Clearview optimized, allowing the user to scale the bulkhead from 12 to 288 distributed ports and up to 24 feeder ports. This bulkhead accepts the Clearview Black Patch and Splice Cassettes (Clearfield’s in-cassette splicing solution) utilizing ribbon cable. A side lock provides security enabled doors for extra protection and a solid enclosure to protect fiber terminations from damage. -
Page 4: Mounting
Distribution Cable For distribution cables, or feeder cables exceeding 0.5” (14mm) in diameter, you will need to use the 1” sealcons (Clearfield Kit Part Number: FST-SEALCON-KIT-1 INCH) with grommet inserts for the appropriate cable size as well as two conduit reducer washers per sealcon. - Page 5 FieldSmart FDP Indoor 288-Port Wall Box Installation Manual __________________________________________________________ Remove retaining nut from base of sealcon. Place the retaining nut over the end of your cable. Place one of the conduit reducer washers over the end of the cables, flange down.
- Page 6 FieldSmart FDP Indoor 288-Port Wall Box Installation Manual _________________________________________________________ In order to swap grommets, remove the dome nut from the sealcon and pry the current grommet out, being careful not to damage the compression fitting. Push the new one in to place. Ensure new grommets are installed with the tapered side up.
- Page 7 Note: Clearfield recommends a 96” cable opening. If using ribbon cable and utilizing the Clearfield Fanout to protect the bare fibers, please reference the installation instructions provided with the fanout kit. If using loose tube, these fibers must be ribbonized inside the cassette prior to splicing.
-
Page 8: Splicing
_________________________________________________________ If using a ribbon feeder cable, Clearfield recommends protecting the bare ribbon with a split snake-skin tubing, se- curing the snake-skin to the cable jacket with some tape. If using a loose tube cable, fibers will need to be ribbonized inside the cassette prior to splicing. - Page 9 FieldSmart FDP Indoor 288-Port Wall Box Installation Manual __________________________________________________________ Insert the rubber strain relief boot into the splice tray as shown, in the “Left Exit” configuration. Note: Place the strain relief boot into the cassette’s splice tray after heating the bare ribbon fiber holder into place, but before securing the fiber holder into the tray with a small cable tie.
- Page 10 FieldSmart FDP Indoor 288-Port Wall Box Installation Manual _________________________________________________________ Loose Tube Fiber/Fanout Kit Right Exit Left Exit Remove the splice tray cover from the bottom of the cassette. Insert the buffer/fanout tube through the provided rubber strain relief boot. Note: The fiber will be installed into the cassette in a “Left Exit”...
-
Page 11: Installing Cassettes And Managing Slack
FieldSmart FDP Indoor 288-Port Wall Box Installation Manual __________________________________________________________ Installing Cassettes and Managing Slack To install cassettes into the panel, slide the cassettes into the backside of the bulkhead in their respective places. Engage the t-rail on the side of the cassette with the channels in the bulkhead, sliding the cassette forward until it is fully seated. -
Page 12: Installing And Routing Splitters
FieldSmart FDP Indoor 288-Port Wall Box Installation Manual _________________________________________________________ Install the feeder cassettes into the bulkhead and secure the slack in the back of the wall box as you did for the distribution cables. Installing and Routing Splitters Install the staging plate of the splitter into one of the two open spaces in the staging area of the bulkhead. To do this, align the push/pull grommets with the holes located at the top and bottom of the staging area. - Page 13 FieldSmart FDP Indoor 288-Port Wall Box Installation Manual __________________________________________________________ Route the splitter legs around the radius protection spools at the top and bottom, taking up the extra slack. Note: Install splitters from left to right in the splitter cage and staging area.
-
Page 14: Connector Cleaning Procedure
Inspect Then Connect These are Clearfield recommended products/applications. Use the product you feel will complete your cleaning procedures. Create a “best practice” for your company and follow those procedures. - Page 15 FieldSmart FDP Indoor 288-Port Wall Box Installation Manual __________________________________________________________ Cleaning the Ferrule • Lightly moisten the fiber optic swab (2.5mm/38542F or 1.25mm/38040) by spotting a small amount (about 1”) of Electro-Wash PX or Electro-Wash MX pen onto the QbE. Hold the swab, 1 side down to the wetted area and hold for a count of 1-2-3-4-5.
- Page 16 FieldSmart FDP Indoor 288-Port Wall Box Installation Manual _________________________________________________________ Cleaning an MPO/MTP Connector Male Connector • Use of Chemtronics MTP Connector Cleaning Swabs (CC505F) is rec- ommended. Even after cleaning with a probe cleaner, you should always clean the pins with this (or an equivalent) type swab. Cleans ALL MTP/ MPO connector end faces.
- Page 17 FieldSmart FDP Indoor 288-Port Wall Box Installation Manual __________________________________________________________ • Use the hole on end of pad to clean one alignment pin, then press the end of the swab into the other pin to clean. • Check your work with a fiber scope.
- Page 18 FieldSmart FDP Indoor 288-Port Wall Box Installation Manual _________________________________________________________ Cleaning Using a Probe-Style Cleaning Tool • The probe style cleaning tools are capable of cleaning a connector end face separately or through the adapter. • Slightly engage probe by pulling back but do not allow to click. Lightly “spot” a QbE-2 wipe on the platen with Elec- tro-Wash PX Fiber Optic Cleaner, this will help alleviate “over saturation”...
-
Page 19: Standard Warranty
Clearfield shall repair or replace the defective Product at its sole option and discretion, and return the repaired or replacement Product to Cus- tomer’s site, freight prepaid Note: If the Product is not found to be defective by Clearfield, the product will be returned to the Customer and the customer billed for freight in both directions. -
Page 20: Proprietary Notice
_________________________________________________________ Proprietary Notice Information contained in this document is copyrighted by Clearfield, Inc. and may not be duplicated in full or part by any person without prior written approval of Clearfield, Inc. Its purpose is to provide the user with adequately detailed documentation to efficiently install the equipment supplied. Every effort has been made to keep the information contained in this document current and accurate as of the date of publication or revision.
Need help?
Do you have a question about the FieldSmart and is the answer not in the manual?
Questions and answers