Advertisement
Quick Links
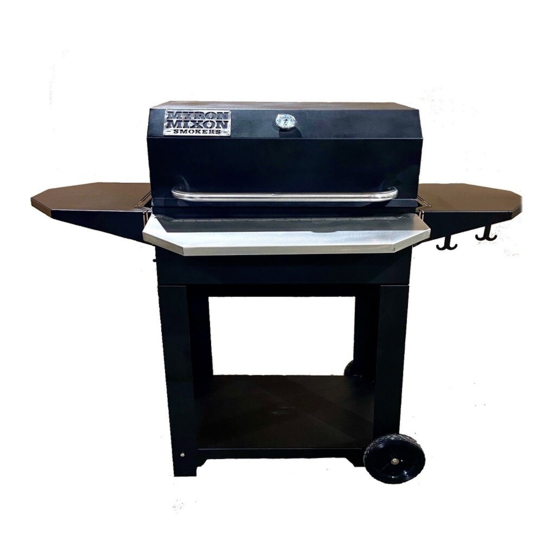
MODEL MAMMCG2020
Myron Mixon Charcoal Grill
Burning charcoal inside can kill you. Burning charcoal gives off carbon monoxide, which
has no odor and can cause death.
DO NOT burn charcoal inside homes, vehicles, tents, garages or any enclosed areas.
Use only outdoors where it is well ventilated.
This manual contains important information necessary for the proper and safe use of
this charcoal grill
Read and follow all safety statements, warnings and instructions before using charcoal
grill and during use.
Do not store or use gasoline or other flammable Liquids or vapors in the vicinity of this
or any other appliance.
KEEP THESE INSTRUCTIONS FOR FUTURE USE.
SAFETY NOTICE
CARBON MONOXIDE HAZARD
WARNING
Advertisement

Subscribe to Our Youtube Channel
Related Manuals for Myron Mixon Smokers MAMMCG2020


Summary of Contents for Myron Mixon Smokers MAMMCG2020
- Page 1 MODEL MAMMCG2020 Myron Mixon Charcoal Grill SAFETY NOTICE CARBON MONOXIDE HAZARD Burning charcoal inside can kill you. Burning charcoal gives off carbon monoxide, which has no odor and can cause death. DO NOT burn charcoal inside homes, vehicles, tents, garages or any enclosed areas.
- Page 3 DO NOT; use your Myron NEVER; start a fire with Mixon charcoal grill under, gasoline, kerosene, diesel fuel or any other petroleum on and around any overhead construction or low hanging based accelerants! branches, dry grass, brush piles, wood piles, awnings, wood furniture, propane,...
- Page 4 Its highly recommended to DO NOT; burn pressure use heavy duty gloves when treated wood your handling coals or lid. Myron Mixon charcoal grill . These items produces toxic gases that can be NOT; leave your harmful. Myron Mixon charcoal grill unattended! Keep a fire extinguisher on hand NOT;...
-
Page 5: Installation Instructions
Installation Instructions Tools Needed: Phillips Head Screwdriver • Hammer • Drill with a 7/16” socket driver or a socket wrench • with 7/16” socket or a 7/16” wrench. 1. Unpack all the parts and lay them out neatly so you can see all your parts. - Page 6 3. Take one of the shorter rear legs and two J nuts and snap them into place as shown. 4. Place the rear leg next to main grill body with the J nuts side up against the body like shown below.
- Page 7 5. You may need a second person to help you. Now reach inside the grill and line up the leg predrilled holes with slots in the bottom of the grill body. Now run the 3/4” bolt through like shown below. Leave the bolt a little loose so you can move the leg a little to line up flush with the side of the main grill body.
- Page 8 7. Take the bottom base and place it with the holes that are on top of the base towards the rear legs. Align the holes up and use 4 of the 1/2” bolts to run through the legs into the base. As shown below.
- Page 9 8. Take the longer front legs and put the J nuts on them like in step 3. Repeat step 5 and 6 securing both front legs to the main grill body. The leg will go longer than the bottom base like shown below. Take 4 of the 1/2” bolts and attach the leg to the bottom base.
- Page 10 9. Take the 1/2” rear axle and slide one wheel on the axle like shown. Slide the axle through the bottom base plate by the rear legs. Slide the other wheel onto the axle and attach the silver cap onto the axle with a hammer.
- Page 11 10. Now with help stand the grill upright like shown.
- Page 12 11. Take the right side tray shown below and attach with 4 of the 3/4” bolts. If your using the optional stainless front tray leave the two front bolts loose. Otherwise tighten all bolts down.
- Page 13 12. Take the left side tray and repeat step 11.
- Page 14 13. May require two people. Take the handle shield and handle shown below and take the 2 Philips head screws. Run the screws through the handle shield through the grill lid and into the handle. Before you tighten the screws flush up the lid sides with the lip on the handle shield see below.
- Page 15 14. Lay the ash pan in the bottom of the grill like shown below.
- Page 16 15. Take the two charcoal pan holders shown below and place them on the bottom row of angle iron first. You must go all the way to the bottom first because the main grill body gets in the way if you try to go to the top ones first.
- Page 17 16. Place the cooking tray onto the grill laying on the inside bends like shown.
- Page 18 17. If you have the optional extra cooking rack place it on top of the regular cooking rack like shown below.
- Page 19 18. If you are using the optional front shelve. It hooks over the bolts on the sides from the side trays that you left loose. Slide it in and tighten the 4 front bolts.
-
Page 21: Limited Warranty
Limited Warranty 1 Year Limited Warranty TERMS OF YOUR LIMITED WARRANTY: Manufacturer warrants to the original purchaser of product, and to no other person, that if this product is assembled and operated in accordance with the printed instructions accompanying it, then for a period of one (1) year from the date of purchase, all parts in such product shall be free from defects in material and workmanship.
Need help?
Do you have a question about the MAMMCG2020 and is the answer not in the manual?
Questions and answers