Advertisement
Quick Links
ISO Registered Company
GLOBE-STYLE PNEUMATIC CONTROL VALVE BODY
I.
DESCRIPTION AND SCOPE
Model 988's and 989's are pneumatically actuated, globe-
style control valves. Sizes are 3/4", 1", 1-1/2" and 2".
Ma te ri als are available in cast carbon steel, Grade WCB
(CS); cast 316L SST, Grade CF3M (SST); and cast CW-
12MW, sim i lar to Hastelloy C (H-C).
Failure position is determined by actuator for:
"D" = Direct action; on increasing air loading pressure, the
actuator stem extends. Fail-safe position is with the stem
retracted.
"R" = Reverse action; on increasing air loading pressure, the
actuator stem retracts. Fail-safe position is with the stem
extended.
These valves are designed for chemical service and most
com mon liquid, gaseous, or steam services.
Models 988 and 989 differ only in the face-to-face di men sions
of flanged units; 988's have a "regular" ("long") body pattern,
and the 989's have a "short" body pattern.
II. REFERENCE
Refer to Technical Bulletin 988-TB or 989-TB for complete
tech ni cal specifications coupled with either Cashco Actuator
Model C27 or C53.
www.cashco.com/techbulletins/988.pdf
www.cashco.com/techbulletins/989.pdf
Refer to following Installation, Operation & Main te nance
Manuals (IOM's) for either actuator and/or devices that
maybe mounted to a Model 988 or 989:
Actuators: www.cashco.com/iom/C27-C53.pdf
INSTALLATION, OPERATION & MAIN TE NANCE MANUAL (IOM)
MODELS 988 and 989
SECTION I
SECTION II
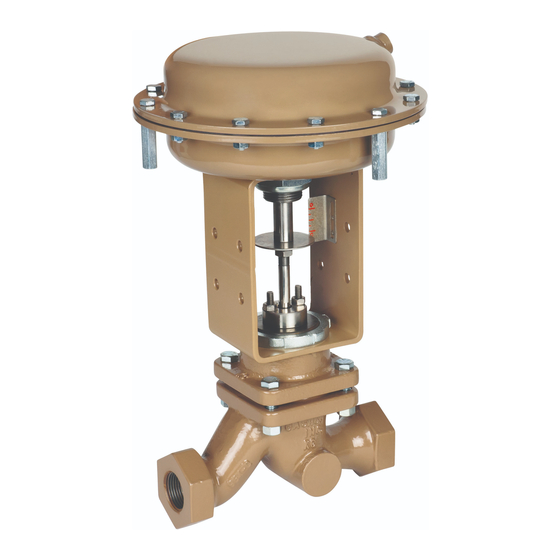
Model 988
with ATC - FO Actuator
Shown with Internal Live-Loaded Packing
ABBREVIATIONS
ATO-FC ............. Air-to-Open, Fail Closed
ATC-FO ............. Air-to-Close, Fail Open
CCW .................. Counter Clockwise
CW ..................... Clockwise
D or DIR ............. Direct Acting
HC ..................... Cast CW-12MW or Wrought Hast C-22
IAS ..................... Instrument Air Supply
LOAD ................. Positioner Output Air Pressure
R or REV ........... Reverse Acting
SIG .................... Output Signal from Instrument
SST.................... Cast or Wrought 316L Stainless Steel
V ........................ Vent
IOM-988/989
02-16
Advertisement

Subscribe to Our Youtube Channel
Related Manuals for cashco 988


Summary of Contents for cashco 988
- Page 1 These valves are designed for chemical service and most com mon liquid, gaseous, or steam services. Models 988 and 989 differ only in the face-to-face di men sions of flanged units; 988’s have a “regular” (“long”) body pattern, and the 989’s have a “short” body pattern.
-
Page 2: Installation
Field hydrostatic testing the completed piping sys tem to 1-1/2 x CWP in psig indicated on the name plate including the Mod el 988/989 is acceptable. If hydro test pressure exceeds the 1-1/2 x CWP limit, the 988/989 must be removed for such testing. - Page 3 IV. STARTUP A. General: Confirm that action of controller and positioner Ensure that the Model 988/989 unit has been – direct or reverse – are pro duc ing the desired prop er ly ad just ed and calibrated, including the re sponse in the con trol unit.
-
Page 4: Maintenance
Using a blunt end tool, hammer rap the tool to Valves originally supplied per Option-55 require loos en yoke nut (25), turning CCW (viewed from special clean ing procedures. Refer to Cashco above) approximately 1/2 revolution. Spec i fi ca tion No. S-1134 for details. When in com pli ance with/to Spec. - Page 5 DO NOT OVER PRES SUR IZE. plug/stem (3) by rotating CW (viewed from above stem end). Rotate jam nuts all the way down to the Release all air pressure from (AA) and re move root of the stem threads. temporary air supply hook up. IOM-988/989-BODY...
- Page 6 (11). Rotate bonnet (2) end-for-end. Place a new guide bush ing (8) into position and press fully Place new bonnet gasket (12) on the body’s bonnet into the bonnet. flange face. Reclean bonnet with suitable solvent. IOM-988/989-BODY...
- Page 7 Continue to loosen pack ing stud nuts (15) to just short of dis en gage ment from packing studs (14). Place packing flange (4) over end of plug/stem (3) DO NOT RE MOVE PACKING NUTS. and over pack ing studs (14). IOM-988/989-BODY...
- Page 8 Discard pack ing. upon reassembly, If seat ring(11) or seat retainer (23) are dam aged, replace. Remove bonnet (2) from vise and invert to al low packing spacer (9) to slide out of the bonnet’s stuff ing box. IOM-988/989-BODY...
- Page 9 (39). Place one of the lower retainers(39) over each Place spacer rings (40) over studs and onto of the packing studs (14). In stall pack ing nuts ledge of lower retainers (39). (15) and finger-tighten. IOM-988/989-BODY...
- Page 10 Size Torque 3/4”, 1”, 1-1/2” 70-75 ft-lbs 95-102 N-M) CAUTION 50-55 ft-lbs (68-75 N-M) Reinstall the actuator assembly (AA) as recorded Take extreme care to not mar internal wall surface of the in Sub-Section V.C. bonnet (2). IOM-988/989-BODY...
- Page 11 Examine gaskets (12, 13) to see if leakage oc curred. Re move and discard both the seat ring gas ket (13) and bonnet gas ket (12). Always use Figure 10: Jammed Packing, Opt-38J new gaskets (12, 13) upon reassembly. IOM-988/989-BODY...
- Page 12 (6) over plug/stem’s (3) end, prop er ly ori ent ed. Using the lan tern ring (27) Recalibrate per Section VI. and pack ing fol low er (5), push the adapter into the bon net’s (2) stuffing box. IOM-988/989-BODY...
- Page 13 3. To determine when stem/plug (3) begins parentheses; i.e. ((AP)). All item numbers that to lift out of the seat, touch the stem above are with respect to this IOM-988/989 are not the packing studs with one finger. (Stem un der scored; i.e. (3).
- Page 14 Decrease pressure in the actuator to approximately mid range of the bench 10. Increase pressure in the actuator until the setting. indicating washer (51) is in alignment with the c. Rotate lower jam nut CCW to shorten the "O" mark on the indicator plate. IOM-988/989-BODY...
- Page 15 (52) CCW designed stroke length. up tight under the upper jam nut. 12. Release all pres sure from actuator. 8. Increase pressure in the actuator to the upper pressure level of the bench setting. IOM-988/989-BODY...
-
Page 16: Troubleshooting Guide
Reduce pressure drop conditions. Convert to reduced trim. Improper actuator bench setting. Calibrate actuator-to-valve. Ensure proper engagement of actuator stem-to-valve stem. Adjust as calibration dictates. Metal seat design instead of composition seat Convert valve to composition seat design. design. IOM-988/989-BODY... - Page 17 Loosen bolting, replace gasket, reinstall new flange bolting. Replace warped flanges. Corrosion of split rings. Replace CS split rings with SST split rings. Improper pipe supports and anchors. Provide piping anchors and guides at control valve station. Restrain bending movements. IOM-988/989-BODY...
-
Page 18: Section Viii
Cashco, Inc. does not assume responsibility for the selection, use or maintenance of any product. Responsibility for proper selection, use and maintenance of any Cashco, Inc. product remains solely with the purchaser. - Page 19 Composition Soft Seated Design MODEL 988/989 BODY ASSEMBLY (BA) Internal Live Loaded Packing — Metal Seated Design ITEM NO. DESCRIPTION ITEM NO. DESCRIPTION ITEM NO. DESCRIPTION Gasket (Seat Ring) Seat Insert (Soft Seat) Body Stud (Packing Flange) Yoke Nut Bonnet Hex.
- Page 20 MODEL 988/989 BODY ASSEMBLY (BA) External Live Loaded Packing — Metal Seated Design ITEM NO. DESCRIPTION ITEM NO. DESCRIPTION ITEM NO. DESCRIPTION Bonnet Gasket Seat Insert (Soft Seat) Body Gasket (Seat Ring) Yoke Nut Bonnet Stud Follower Bushing Plug & Stem Assembly Hex.
Need help?
Do you have a question about the 988 and is the answer not in the manual?
Questions and answers