Table of Contents
Advertisement
Quick Links
Advertisement
Table of Contents

Subscribe to Our Youtube Channel
Related Manuals for Atmos ATMOS C 21


Summary of Contents for Atmos ATMOS C 21
- Page 1 English ATMOS C 21 / ATMOS C 31 ENT Unit GA1GB.110200.0 0124 2019-08 Index: 03...
-
Page 2: Table Of Contents
Connection of the water system (option, only ATMOS C 31) .........13 Troubleshooting ..........30 Electrical protection..........30 Operation ............14 Power supply ............30 ATMOS C 21 / C 31 - Basic unit ......14 Mirror heating ............30 Basic functions ............14 Suction system............31 4.2.1 Main switch ............14 Light sources............31... -
Page 3: Introduction
These operating instructions contain important notes on • Please note that these operation instructions apply for all how to operate the ATMOS C 21 / C 31 safely, correctly and ATMOS C 21 / C 31 models and subsequently feature all effectively. Therefore, they are intended not only for new... -
Page 4: Intended Use
1.0 Introduction Intended use 1.2.2 ATMOS C 31 Name: ATMOS C 31 1.2.1 ATMOS C 21 Main functions: • Suction Name: ATMOS C 21 • Compressed air system for medication spraying and the Main functions: Politzer manoeuvre • Suction • Ear irrigation •... -
Page 5: Function
2.0 Introduction Function • The ATMOS C 21 / C 31 is operated by activating the main switch ( , fig. 1, page 8). • The exact mode of function of the standard equipment and optional functions is described in detail in chapters 4.2 and 4.3. -
Page 6: For Your Safety
(chapter 9.0) must be strictly observed! Attention, Fire Hazard! • The suction system of the ATMOS C 21 / C 31 is only Never place the area of light emission from the light to be used for the suction of fluids in the medical field. guide or from the endoscope onto heat-absorbing Never remove explosive, inflammable or corrosive gases surfaces (dark pieces of cloth, etc.), because this will... - Page 7 2.0 For your safety • The ATMOS C 21 / C 31 may not be operated with units not complying with the requirements of standard EN 60601-1 "Medical Electrical Equipment" and EN 60601- 1-2 "Electromagnetic compatibility (Medical Electrical Equipment)". • The warranty will be rendered invalid in case of...
-
Page 8: Setting Up And Starting Up
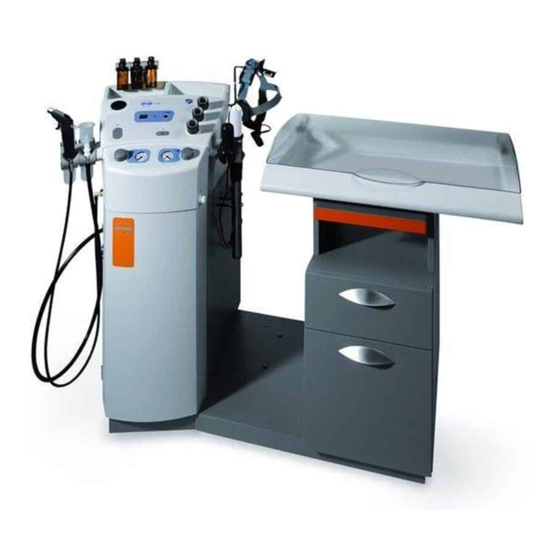
3.0 Setting up and starting up Front view Fig. 1. ATMOS C 21 / C 31 Front view Drawer resp. deposit for used instruments (optional) Main switch Drawer resp. waste bin (option) Sprayer (option) Connections for light guide Laryngoscope holder Vacuum control Surface for medicament bottles etc. -
Page 9: Service Compartment
3.0 Setting up and starting up 3.1.1 Service compartment Fig. 2. ATMOS C 21 / C 31 Service compartment Hose for automatic secretion canister evacuation (optional) Connecting nipple with hose to the vacuum pump Secretion hose Connecting electrodes for automatic secretion canister evacuation (optional) -
Page 10: Setting Up Proposal
3.0 Setting up and starting up Setting up proposal At option 2 - where the instrument deposit is slidable (backwards) - an extra 250 mm distance to the wall is required. 560 mm + 250 mm = 810 mm 22.5" + 9.84" = 31.84"... -
Page 11: Connection To Electrical Power Line
VDE 0107. safe drinking water. • The ATMOS C 21 / C 31 is connected to a earthing For information on the maintenance and cleaning of the contact socket which is to be mounted near the unit water supply, see chapter 5.1.5 in the operating instructions. -
Page 12: Starting Up
The unit has different connections depending on the configuration: Light package LED economy: • 2 connections for ATMOS HL 21 LED and ATMOS LS 21 Light package 2-channel with 2 or 4 channels: Version 1 (fig. 5): • 2 connections for light guide • 2 connections for ATMOS HL 21 LED and ATMOS LS 21 Version 2: •... -
Page 13: Connection Of The Compressed Air Hose (Option)
The photoelectric barriers will operate the wrong units if the handles are transposed! Fig. 6. CPC coupling 3.6.6 Connection of the hose for ear irrigation (option, only ATMOS C 31) The hose for the warm water system is screwed on the CPC coupling. ) Different socket nipples; swapping of the hoses is not possible! Fig. -
Page 14: Operation
Basic functions 4.2.1 Main switch • The ATMOS C 21 / C 31 is switched ON and OFF by means of the main switch ( , fig. 1, page 8). -
Page 15: Emptying The Secretion Canister
Connect the vacuum hose. Bacterial filter plate ) Please observe the operating instructions of the disposable secretion canister system. ) Please observe the valid hygiene and waste disposal measures. ) Only the recommended ATMOS disposable secretion canisters with integrated filter may be used! Fig. 11 Disposable secretion canister systems... -
Page 16: Light Sources
4.0 Operation 4.2.5 Light sources ) Do not look directly into the light outlets. ) Because of the high energy of the light there is a large amount of heat emission at the point of the optical system. ) Switch the light off when you do not require the light over a prolonged period of time. -
Page 17: Options
The canister for the rinsing fluid of the hose rinsing is located in the service compartment at the front of the unit. For optimum cleaning, add the ATMOS special cleanser (Art. No. 080.0006.0) to the rinsing liquid. Optionally the canister can be automatically filled up with fresh water. Water supply is then controlled by a level switch. A safety switch beside the canister in the canister support prevents overflowing, in case the canister overflows or is not available. -
Page 18: Compressed-Air System (Option)
4.0 Operation 4.3.3 Compressed-air system (option) ) Prior to each application, proper function of the display instruments and control valves must be checked! Purpose of compressed-air system: a) Medicaments can be applied to the nasopharynx: • The pump for the compressed-air system switches on after the compressed-air handle has been removed from its holder. - Page 19 4.0 Operation b) Politzer manoeuvres with Politzer olives or Eustachian catheter can be carried out. • The pump for the compressed-air system switches on after the compressed-air handle has been removed from its holder. • The adapter ( , fig. 18) supplied for this purpose is locked into the compressed-air handle. •...
-
Page 20: Connection Of The Ear Irrigation System (Option, Only Atmos C 31)
4.0 Operation 4.3.4 Ear irrigation system (option, only ATMOS C 31) • The ear irrigation system is supplied with water from a heated storage canister (37°C) 4.5 l ( , fig. 22). This canister can easily be filled, cleaned or disinfected. The pump only switches on automatically when required. Water pressure and flow quantity may be regulated with the release lever on the irrigation handle. With the switch , fig 23, the ear irrigation system can be switched on and off. -
Page 21: Mirror Preheater (Option)
4.0 Operation 4.3.6 Mirror preheater (option) • Mirror preheater is switched on when the main switch ( fig. 1, page 8) is activated. ª The rack ( , fig. 25) containing the mirrors is heated up to about 45 °C. ) ENT unit should be switched on about 20 minutes before starting work, to ensure preheating in good time! ) Attention, high temperatures! ) Prior to use of the mirror, always check its temperature Fig. -
Page 22: Cleaning And Care
General information on cleaning and - After cleaning a new filter must be inserted (with bacterial filter plate: smooth side down). See chapter disinfection 6.1. ) Set main switch of the ATMOS C 21 / C 31 to OFF prior - The bacterial filter is a disposable and must be to cleaning and disinfection! disposed of. The bacterial filter must be exchanged at least once a day. ) The described action relating to cleaning and disinfection resp. -
Page 23: Medicament Sprayers
5.0 Cleaning and care 5.1.6 Medicament sprayers 000.0237.0 055.0029.0 • The sprayer tube must be exchanged after each patient. 000.0219.0 506.5121.0 • Dismount the medicament sprayer (fig. 29, 506.5120.0; fig. 30, 506.5225.0) and thoroughly rinse all parts under running water. A detergent or cleaning agent may also be 506.5228.0 used if required. - Use water to thoroughly rinse all residues of these substances. -
Page 24: Recommended Instrument Disinfectants
5.0 Cleaning and care Recommended instrument disinfectants Manual disinfection of instruments Disinfectant Ingredients (in 100 g) Manufacturer Korsolex basic glutaral 15.2 g Bode Chemie, ® (Application concentrate) (ethylenedioxy)dimethanol 19.7 g Hamburg surfactants, salts, corrosion inhibitors Korsolex plus N-(3-aminopropyl)-N-dodecylpropane-1,3-diamine 9.2 g Bode Chemie, ®... -
Page 25: Recommended Surface Disinfectants
5.0 Cleaning and care Recommended surface disinfectants Coated surfaces Disinfectant Ingredients (in 100 g) Manufacturer Green & Clean SK Di alkyl dimethyl ammonium chloride < 1 g Metasys, Rum Alkyl dimethyl ethyl benzyl ammonium chloride < 1 g (Austria) Alkyl dimethyl benzyl ammonium chloride <... -
Page 26: Recommended Endoscope Disinfectants
6.0 Maintenance and Service • Maintenance, repairs and period tests may only be • The ATMOS C 21 / C 31 are equipped with maintenance- carried out by persons who have the appropriate free pumps for suction and compressed air. Nevertheless, technical knowledge and are familiar with the product. -
Page 27: Changing The Bacterial Filter
"maximum" (right stop). • As soon as the vacuum gauge shows a vacuum value > -0.3 bar, while the suction hose is open, the filter has to be replaced. Changing the bacterial filter Please do only use original ATMOS bacterial filters. The device may never be operated without DDS bacterial filter / oversuction stop. Fig. 32. Lid with bacterial filter plate Bacterial filter plate / integrated bacterial filter: •... -
Page 28: Changing The Rinsing Container
6.0 Maintenance and Service Changing the rinsing canister ) Prior to removing the rinsing canister, switch off the treatment unit by the main switch. • Slide the rinsing canister to the very top and pivot it outwards with the level switch. The canister must be pivoted over the edge of the canister support. •... -
Page 29: Changing The Heating Coil Of The Mirror Quick-Heater
6.0 Maintenance and Service Changing the heating coil of the mirror quick-heater ) Grid and sleeve might get very hot. Allow them to cool down before changing the heating coil! • Switch off the main switch of the ENT unit ( , fig. 1, page • Remove grid ( , fig. 37). • Remove the heating coil ( , fig. 38) from the plug connections. -
Page 30: Troubleshooting
7.0 Troubleshooting Electrical protection • The supply line voltage reaches the individual components via the main switch ( , fig. 1, page 8). The power supply is secured by means of melting fuses on the rear of the unit (fig. 39). Fig. 39. Fuse support The following trouble-checks for any problems you may have with the unit are listed according to the respective functions. ) If nevertheless the errors cannot be resolved, please inform the service staff. Do not start any attempts to repair the unit yourself! ) Pay also attention to corresponding chapters in separate operating instructions! -
Page 31: Suction System
7.0 Troubleshooting Suction system Error indication Possible cause Remedy Weak suction or no suction at all • Suction hose is clogged • Rinse the suction hose with water (hose can also be removed) • Float of overflow safety closes the • Check filling level in the secretion canister suction opening • Lid of secretion canister is not •... -
Page 32: Compressed-Air System
7.0 Troubleshooting Compressed-air system Error indication Possible cause Remedy Compressor does not start • No voltage • Check voltage • Electrical defect • Have the unit checked by a service technician Compressor does not start but the • Compressed air handle and •... -
Page 33: Consumables, Accessories, Spare Parts
8.0 Consumables, Accessories, Spare Parts Consumables Consumables for suction system Bacterial filter plates (25 pcs) ...........................320.0065.0 DDS bacterial filter,10 pcs, 50 pcs, 100 pcs .....................340.0054.0 Special cleanser for suction systems, 2 bottles a 500 ml ................. 080.0006.0 Consumables for automatic secretion canister evacuation Tube cassette for tube pump..........................069.0126.0 Consumables for disposable secretion canister Receptal external canister 2 l .........................443.0256.0 ®... - Page 34 Teflon element for endoscopes, diameter 2.8 mm - 4 mm ................508.0777.5 Tank for flexible endoscopes (ATMOS, Olympus) ....................508.0790.0 Tank for flexible endoscopes (Storz) ........................508.0792.0 Adapter for light conductor with ATMOS/Storz connection ................530.6100.0 Adapter for light conductor with Olympus connection ..................530.6101.0 Adapter for light conductor with Pentax connection ..................530.6102.0 Adapter for light conductor with Wolf connection .....................530.6103.0...
- Page 35 8.0 Consumables, Accessories, Spare Parts Further Accessories and Spare Parts Instrument tray set, melamine, consisting of 2 large and 2 small trays ............506.7031.0 Instrument tray set, aluminium-anodized, consisting of 2 large and 2 small trays, holder for ear speculae / Politzer olives ......................506.7032.0 Instrument tray set, stainless steel, consisting of 2 large and 2 small trays, holder for ear speculae / Politzer olives ......................506.7033.0 Ear irrigation bowl ............................505.0353.0...
-
Page 36: Technical Data
In 10 steps from 10-100 % variable Colour temperature: 5.500 K ± 10 % Power supply for ATMOS Electricity: 700 mA ± 5 % LS21 LED and ATMOS HL In 10 steps from 10-100% variable 21 LED Compressed air-ear Temperature: 37°C ± 2°C... - Page 37 Column: 94.0 x 47.0 x 53.5 cm Basic cabinet base: 94.0 x 132.5 x 60.0 cm Double cabinet base: 94.0 x 132.3 x 60.0 cm Weight Column ATMOS C 21: max. 46,0 kg ColumnATMOS C 31: max. 70,0 kg Cabinet base: 32.0 - 82.0 kg, (depending on configuration) Period tests Repeat test of the electrical safety every 12 months.
-
Page 38: Disposal
10.0 Disposal • The ATMOS C 21 / C 31 does not contain any hazardous goods. • The material of the housing can be recycled completely. • The component parts of the ATMOS C 21 / C 31 must be disposed off correctly and the materials are to be separated carefully. -
Page 39: Hygienic Plan
11.0 Hygiene Plan Cleaning and disinfection plan ATMOS C 21 / ATMOS C 31 ® ® What When Qualifi ed and trained Recommendations staff who are familiar with reprocessing. (Please fi ll in the Reusable parts Cleaning Disinfection Sterilisation responsible person ->... - Page 40 ® measures mentioned in this cleaning Endoscopes - automatic disinfection: • Terralin ® Protect (Schülke & Mayr) and disinfection plan are a recommendation of ATMOS Medizin- • Gigasept Instru AF (Schülke & Mayr) ® • Korsolex Basic (Bode Chemie) ®...
-
Page 41: Notes On Emc
• The use of other accessories, other converters and cables than stated may lead to an increased emission or a reduced interference immunity of the equipment or system. 12.1 Guidelines and Manufacturer's Declaration - Emissions The ATMOS C 21 / C 31 is intended for use in the electromagnetic environment specified below. The customer or user of the ATMOS C 21 / C 31 should ensure that it is used in such an environment. Emissions Test Compliance Electromagnetic Environment - Guidance... - Page 42 12.3 Guidelines and Manufacturer´s Declaration - Immunity The ATMOS C 21 / C 31 is intended for use in the electromagnetic environment specified below. The customer or user of the ATMOS C 21 / C 31 should ensure that it is used in such an environment. IEC 60601- Test Immunity Test...
- Page 43 ATMOS C 21 / C 31 is used exceeds the above compliance level, the ATMOS C 21 / C 31 is to be observed to verify the intended use. If abnormal performance characteristics are noted, additional measures might be necessary, e.
- Page 44 ATMOS MedizinTechnik GmbH & Co. KG Ludwig-Kegel-Straße 16 79853 Lenzkirch / Germany Phone: +49 7653 689-0 atmos@atmosmed.de www.atmosmed.com...
Need help?
Do you have a question about the ATMOS C 21 and is the answer not in the manual?
Questions and answers