Table of Contents
Advertisement
Quick Links
Advertisement
Table of Contents

Subscribe to Our Youtube Channel
Related Manuals for Riken Keiki GP-147


Summary of Contents for Riken Keiki GP-147
- Page 1 PT1E-1110 Combustible Gas Detection Alarm System GP-147 Operating Manual...
-
Page 2: Table Of Contents
<Contents> 1. Outline of the Product ......................3 1-1. Preface ............................ 3 1-2. Purpose of use ........................3 1-3. Definition of DANGER, WARNING, CAUTION and NOTE ............. 4 2. Important Notices on Safety ....................5 2-1. Danger cases .......................... 5 2-2. -
Page 3: Outline Of The Product
1-1. Preface Outline of the Product 1-1. Preface Thank you for choosing our combustible gas detection alarm system GP-147. Please check that the model number of the product you purchased is included in the specifications on this manual. This manual explains how to use the alarm system and its specifications. It contains information required for using the alarm system properly. -
Page 4: Definition Of Danger, Warning, Caution And Note
1 Outline of the Product 1-3. Definition of DANGER, WARNING, CAUTION and NOTE 1-3. Definition of DANGER, WARNING, CAUTION and NOTE This message indicates that improper handling may cause serious damage on DANGER life, health or assets. This message indicates that improper handling may cause serious damage on WARNING health or assets. -
Page 5: Important Notices On Safety
2 Important Notices on Safety 2-1. Danger cases Important Notices on Safety 2-1. Danger cases DANGER This is not an explosion-proof unit. - 5 -... -
Page 6: Warning Cases
2-2. Warning cases WARNING Specified devices Connect only the combustible gas detector heads provided by RIKEN KEIKI to the alarm system. Otherwise, the alarm system or equipment connected to it may be damaged. Power supply Before turning on the alarm system, always check that the voltage is properly applied. -
Page 7: Precautions
2 Important Notices on Safety 2-3. Precautions 2-3. Precautions CAUTION Do not use a transceiver near the alarm system. Radio wave from a transceiver or other radio wave transmitting device near the alarm system or its cables may disturb readings. ... -
Page 8: Product Functions
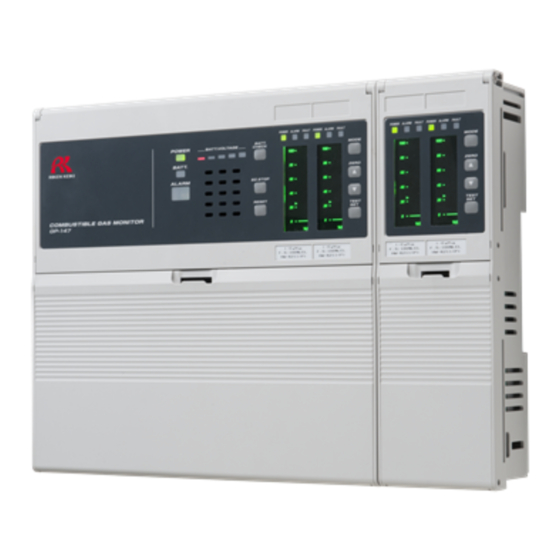
3 Product Functions 3-1. Outline drawing Product Functions 3-1. Outline drawing Mounting hole (back of the case) Indicator unit (2-point model) 2 – 8-point model: 2 pcs 10 – 12-point model: 3 pcs Base unit ø7 mounting hole (back of the case) 2 –... -
Page 9: Product Components And Names
3 Product Functions 3-2. Product components and names Installation dimension 取付寸法 n: Number of points 点数n W W1 P P1 P2 □ □ □ □ □ □ 3-2. Product components and names The alarm system consists of a base unit and indicator unit (4-point model or more). The base unit consists of a buzzer part and indicator part (2-point model), and the indicator unit consists of an indicator part (2-point model). - Page 10 3 Product Functions 3-2. Product components and names <Inside Base Unit> Voice unit (option, Japanese only) Connector (CN6, 6P) Switching regulator Pump switch UPS battery (*) Power switch - 10 -...
-
Page 11: Installation Diagram
3 Product Functions 3-3. Installation diagram 3-3. Installation diagram Wall mounting type Installation dimension n: Number of points {(n/2) + 1} pcs Rear cable lead-in port n: Number of points M6 or ø7 2 – 8-point: 4 pcs 10/12-point: 6 pcs Installation Diagram for Wall Mounting Type Rack mounting type Number of... -
Page 12: Names And Functions For Each Part
3 Product Functions 3-4. Names and functions for each part 3-4. Names and functions for each part 3-4-1. Base unit (buzzer part) (2) BATT. VOLTAGE bar meter (green/orange)* (1) POWER lamp (green) (4) BATT. CHECK switch* (3) BATT. lamp (orange)* (7) BZ. - Page 13 3 Product Functions 3-4. Names and functions for each part 3-4-2. Indicator unit (same as the base unit indicator part) (10) (11) (12) (13) (14) (15) Number in Name Function the figure LCD display Displays gas concentration and status message. POWER lamp Power lamp.
-
Page 14: Block Diagram
3 Product Functions 3-5. Block diagram 3-5. Block diagram Base unit Indicator part Buzzer part Lamps Lamps Switches Switches Buzzer concentration concentration level display level display Controller Controller battery 12 V 2.3 A x 2 Alarm processing part /external signal processing •... -
Page 15: How To Use
4 How to Use 4-1. Before using the alarm system How to Use 4-1. Before using the alarm system Not only the first-time users but also the users who have already used the alarm system must follow the operating precautions. Ignoring the precautions may damage the alarm system, resulting in inaccurate gas detection. -
Page 16: Precautions For Installation Sites
4 How to Use 4-2. Precautions for installation sites 4-2. Precautions for installation sites CAUTION Do not install the alarm system in a place exposed to direct sunlight or sudden changes in the temperature. When selecting installation points, avoid a place where it is exposed to direct sunlight or radiant heat (infrared rays emitted from a high-temperature object), and where the temperature changes suddenly. -
Page 17: Precautions For System Designing
4 How to Use 4-3. Precautions for system designing 4-3. Precautions for system designing CAUTION An unstable power supply and noise may cause malfunctions or false alarms. The descriptions in this section must be reflected on the designing of a system using the alarm system. - Page 18 4 How to Use 4-3. Precautions for system designing (4) Alarm contact The alarm contact of the alarm system is used to transmit signals to activate an external buzzer or alarm lamp. Do not use the alarm system for controlling purpose (e.g., controlling the shutdown valve). CAUTION The "b"...
-
Page 19: Grounding
4 How to Use 4-4. Grounding Coil Load Power Power supply Alarm contact supply External relay (low voltage relay) * SK1, SK2: Surge absorbing parts 4-4. Grounding Connect the earth terminal to your grounding terminal. WARNING Before turning on the alarm system, never fail to connect the earth terminal to a grounding terminal. Terminal For stable operation of the alarm system and safety, it must be connected to a grounding terminal. -
Page 20: How To Install
4 How to Use 4-5. How to install 4-5. How to install 4-5-1. How to install the wall mounting type unit <4 - 8-point Model> Screw each four fixing screw to the four corners on the wall. Be careful not to get your fingers caught by the upper door which may be closed by shaking the main unit hard during installation. - Page 21 4 How to Use 4-5. How to install 4-5-2. How to install the rack mounting type unit (1) Fit GP-147 into the fit-in hole. * See the installation diagram in Section 3-3 (Page 11) for the installation dimensions. (2) Open the upper and lower doors and screw the mounting brackets B (with screws and cap nuts) onto the mounting brackets A attached already at four areas (six areas for 10/12-point model).
-
Page 22: Connection Between Devices
4 How to Use 4-6. Connection between devices 4-6. Connection between devices 4-6-1. Connection of power supply The power supply specification of the alarm system is 100 to 120 VAC or 200 to 240 VAC, 50/60 Hz. Prepare a power supply that complies with the specification. Before supplying power, connect the earth terminal of the alarm system to your grounding terminal. -
Page 23: Wiring
4 How to Use 4-7. Wiring 4-7. Wiring Base unit external terminals (6) (7) (8) (9) (10) (1) (2) (1) (2) Screw size: M3 Power input 100 - 120 VAC or 200 - 240 VAC (50/60 Hz) Not used Power output for external buzzer, 24 VDC (load current: 10 mA or less) Common alarm voltage output, 0/6/12 VDC (load current: 10 mA or less) Common alarm contact output, no-voltage "c"... - Page 24 4 How to Use 4-7. Wiring CH2 (right) (12) Individual alarm contact output 2 (gas alarm [standard] or fault alarm [option]) (11) (10) Individual alarm contact output 1 (gas alarm) External output signal 0/6/12 VDC (load current: 10 mA) Diffusion type detector head Suction type detector head Screw size: M3...
-
Page 25: How To Operate
5 How to Operate 5-1. Preparation for start-up How to Operate 5-1. Preparation for start-up Before connecting a power supply, read and understand the following precautions. Ignoring these precautions may cause an electric shock or damage the alarm system. Connect the alarm system to a grounding circuit. -
Page 26: Basic Operating Procedures
5 How to Operate 5-2. Basic operating procedures 5-2. Basic operating procedures Normally, the detection mode is activated after the power is turned on. The "maintenance mode selector switch" is hereinafter called "MAINT switch". Preparation for start-up Power-on Initial clear (approx. 25 seconds) Press the TEST/SET switch Alarm setpoint check Detection mode... -
Page 27: How To Start The Alarm System
5 How to Operate 5-3. How to start the alarm system 5-3. How to start the alarm system (1) Before turning on the power switch, check that the alarm system is installed properly. (2) Open the front cover of the main unit to find the power switch located at the center in the lower section. (3) Move the power switch up to turn ON or down to turn OFF. -
Page 28: Detection Mode
5 How to Operate 5-4. Detection mode 5-4. Detection mode 5-4-1. Display operation The alarm system uses the following two types of equipment to display operation status. (1) LCD display: Displays detected gas concentration, etc. (2) LED lamp: Indicates the power, gas alarm or fault alarm status. The LCD display and LED lamp function according to the unit status. - Page 29 External output: 0/6/12 VDC specification [standard]: 0 V, 4-20 mA specification [option]: 0.5 mA When a fault occurred simultaneously with another, the errors are displayed alternately. A memory error cannot be cleared. Please contact RIKEN KEIKI. A sensor disconnection error can be cleared by recovering the sensor from the disconnection state.
- Page 30 5 How to Operate 5-4. Detection mode 5-4-2. External output operation 0/6/12 VDC specification [standard] (1) Signal transmission method Voltage output (non-isolated) (2) Transmission path CVVS (3) Transmission distance 10 m or less (4) Connection load resistance 1 MΩ or more (5) Status signal level 1.
- Page 31 5 How to Operate 5-4. Detection mode The following figure shows the relation between "gas concentration" and "external output". External output Detection mode Maintenance mode Zero suppression Gas concentration Full scale CAUTION The 4-20 mA output is already adjusted. If readjustment becomes necessary after installation, it must be done by a qualified service engineer.
-
Page 32: Gas Test Mode
5-5. Gas test mode <How to Enter the Gas Test Mode> There are two methods for entering the gas test mode on GP-147. (1) Move the MAINT switch to put one channel into the maintenance mode. (2) Press the MODE key to put two channels into the maintenance mode at the same time. -
Page 33: Alarm Test Mode
5 How to Operate 5-6. Alarm test mode 5-6. Alarm test mode This is used when dummy signals the same as the signals of the gas concentration (0/6/12 VDC or 4 - 20 mA) are generated to check the alarm lamp, alarm buzzer and alarm contact activation of the alarm system and the transmission to external circuits. -
Page 34: Simplified Calibration (Zero/Span Adjustment)
5 How to Operate 5-7. Simplified calibration (zero/span adjustment) 5-7. Simplified calibration (zero/span adjustment) There are two ways to perform calibration for the alarm system: executing simplified calibration from the gas test mode and executing calibration from the maintenance mode (regular maintenance mode). This section describes how to perform the simplified calibration. - Page 35 5 How to Operate 5-7. Simplified calibration (zero/span adjustment) (2) Press the ZERO (▲) key for over 3 seconds. Blinking After CAL is displayed, zero adjustment is performed automatically. Maintenance mode active When the adjustment is completed, PASS is displayed and the span adjustment mode is entered automatically.
-
Page 36: Ups Unit Operation (* For The Case Of Ups Specification)
5 How to Operate 5-8. UPS unit operation (* for the case of UPS specification) 5-8. UPS unit operation (* for the case of UPS specification) 5-8-1. Hardware functions (1) External power supply monitoring function The switching power supply voltage is monitored while the external power supply is in operation. If it drops to or below 20 V, the UPS is switched on automatically assuming that the external power supply is turned off (blackout occurs). - Page 37 5 How to Operate 5-8. UPS unit operation (* for the case of UPS specification) (2) Battery voltage display function The battery voltage is read and displayed with the bar meter. 26 V or more: (1), (2), (3), (4), (5) Steady-on Color: Green 25 V or more: (1), (2), (3), (4)
-
Page 38: How To Exit
5-9. How to exit 5-8-4. Backup point selection function On GP-147, whether to perform backup can be selected for each indicator using the selector switch. Power can be supplied only to the necessary point in the event of a blackout to perform continuous monitoring of gas leakage efficiently. -
Page 39: Operations And Functions
6 Operations and Functions 6-1. Gas alarm activation Operations and Functions 6-1. Gas alarm activation Gas alarm: Triggered when the concentration of detected gas reaches or exceeds the alarm setpoint value. <Self-latching> NOTE The alarm setpoint (standard) is factory-set. Although the alarm delay time (standard: 2 seconds) works in the alarm system to prevent a false activation, it can be cancelled if not needed. -
Page 40: Fault Alarm Activation
(initial clear). When a fault occurred simultaneously with another, the errors are displayed alternately. If the alarm system has problems and is repeatedly malfunctioning, contact RIKEN KEIKI immediately. * Display example: E-1 sensor disconnection error NOTE For information on malfunctions (error messages), see "9. -
Page 41: Gas Alarms Triggered By A Factor Unrelated To Gas Detection
The alarm system may react to an interference gas. Contact RIKEN KEIKI for interference gases. A drift caused by aging deterioration of the sensor may be a cause. Check the reading at daily maintenance and perform calibration for the detector head as needed. - Page 42 6 Operations and Functions 6-4. Other functions <Zero Follower Function> Some types of detector heads connected to the alarm system might have sensitivity variations after being used for a long period. This function corrects the fluctuation of the reading at the zero point (zero drift) among the sensitivity variations over time by a program manipulation to stabilize the zero point.
-
Page 43: Maintenance
To maintain the safety operation of the alarm system, please use our maintenance service. The followings are typical maintenance services. Please contact RIKEN KEIKI for more information. Main services Power supply check : Checks the power supply voltage. Verifies that the power lamp lights (Verifies that relevant points can be identified on the system.) - Page 44 7 Maintenance 7-1. Maintenance intervals and items Alarm test : Inspects the alarm circuit by using the alarm test function. Checks the alarm lamps. (Checks the alarm activation.) Checks the external alarm. (Checks the activation of the external alarm, such as a buzzer.) Span adjustment : Performs span adjustment by using the calibration gas.
-
Page 45: Regular Maintenance Mode
7 Maintenance 7-2. Regular maintenance mode 7-2. Regular maintenance mode WARNING After the adjustment is completed, never fail to press the MODE key to return to the detection mode. If the alarm system remains in the regular maintenance mode, it automatically returns to the detection mode in ten hours. - Page 46 7 Maintenance 7-2. Regular maintenance mode <Regular Maintenance Mode> User Mode Press the TEST/SET key with "1-3" displayed. Then press the TEST/SET key again for over three seconds. Regular Maintenance Mode Test Perform various tests. => P48 Zero Adjustment Perform zero adjustment. =>...
- Page 47 7 Maintenance 7-2. Regular maintenance mode Environmental Environmental setting 2: Configure various settings. Setting 2 => P58 Various Settings Check various displays => P61 (heater current, fault detail). Enter the factory mode. This is not used by the user. Return to the user mode "1-0". To 2-0 - 47 -...
- Page 48 7 Maintenance 7-2. Regular maintenance mode <Test 2-0> Press the TEST/SET key. 2-0. 0 Not used. 2-0. 1 Not used. 2-0. 2 Fault Alarm Test Conduct a fault alarm test. => P49 2-0. 3 LED and LCD Test Test LED and LCD. =>...
- Page 49 7 Maintenance 7-2. Regular maintenance mode <Fault Alarm Test 2-0. 2> (1) Select 2-0.2 from the menu screen. (2) Press the TEST/SET key. (3) Select ON/OFF with the ▲/▼ key. (4) Press the TEST/SET key to confirm it. (5) Return to "2-0.2" with the MODE key. Pressing the MODE key during a fault alarm test clears the setting and returns to "2-0.2".
- Page 50 7 Maintenance 7-2. Regular maintenance mode <Memory Test 2-0. 4> (1) Select 2-0.4 from the menu screen. (2) Press the TEST/SET key. (3) Press the TEST/SET key again. (4) After "CAL" is displayed, a memory test starts automatically. (5) If the test is successful, "PASS" appears and "2-0.4" returns automatically. * If the test fails, use the MODE key to return.
- Page 51 7 Maintenance 7-2. Regular maintenance mode <Environmental Setting 1 2-4> In the environmental setting 1, specify the settings of functions. (* It is recommended that setting changes should be recorded in a log.) The environmental setting 1 includes setting menus which are usually not used. Be careful not to change these settings by mistake.
- Page 52 7 Maintenance 7-2. Regular maintenance mode 2-4. 5 Set the suppression type. Select CUT/SLOP with the ▲/▼ key and press the TEST/SET key to confirm it. When CUT (cut off) is selected, values exceeding the suppression value are directly displayed. When SLOP (slope) is selected, values exceeding the suppression value are gently displayed.
- Page 53 7 Maintenance 7-2. Regular maintenance mode 2-4. A Sets the external output Set the external output for the maintenance mode. during the maintenance mode. => P56 2-4. B Adjust the external output (4 - 20 mA). External Output Adjustment * The setting is applicable only for the 4-20 mA =>...
- Page 54 7 Maintenance 7-2. Regular maintenance mode <Alarm Setpoint Setting 2-4. 2> (1) Select 2-4.2 from the menu screen. (2) Press the TEST/SET key. (3) Change the alarm value with the ▲/▼ key. (Set range: 10 - 100) (4) Press the TEST/SET key to save the setting. After the setting is completed, "2-4.2"...
- Page 55 7 Maintenance 7-2. Regular maintenance mode <Energized/De-energized Alarm Contact Setting 2-4. 8> (1) Select 2-4.8 from the menu screen. (2) Press the TEST/SET key. (3) Select AL_C (Gas alarm contact)/E_C (Fault contact) ※ with the ▲/▼ key, and press the TEST/SET key.
- Page 56 7 Maintenance 7-2. Regular maintenance mode <Maintenance Mode External Output Setting 2-4. A> * The setting is applicable only for the external output with 4-20 mA specification. (1) Select 2-4.A from the menu screen. (2) Press the TEST/SET key. (3) Select 2.5/4.0/HOLD/4-20 with the ▲/▼ key. (4) Press the TEST/SET key to save the setting.
- Page 57 7 Maintenance 7-2. Regular maintenance mode <External Output Adjustment 2-4. B> The setting is applicable only for the external output with 4-20 mA specification. The adjustment requires an ammeter separately. (1) Connect an ammeter to the external connection terminals 8 (+) and 9 (-). (2) Select 2-4.B from the menu screen.
- Page 58 7 Maintenance 7-2. Regular maintenance mode <Environmental Setting 2> In the environmental setting 2, specify the settings of functions. (* It is recommended that setting changes should be recorded in a log.) The environmental setting 2 includes setting menus which are usually not used. Be careful not to change these settings by mistake.
- Page 59 7 Maintenance 7-2. Regular maintenance mode 2-5. 5 Set the buzzer for a fault state. Select ON/OFF with the ▲/▼ key and press the TEST/SET key to confirm it. When ON is selected, the buzzer sounds at a fault state. 2-5.
- Page 60 7 Maintenance 7-2. Regular maintenance mode <Heater Current Adjustment 2-5. 0> CAUTION Execute this before performing calibration (zero/span adjustment) after sensor replacement. After cycling the power or recovering from a blackout and so on, always perform zero calibration after making sure that a gas to be detected is not present around the unit. ...
- Page 61 7 Maintenance 7-2. Regular maintenance mode <Measured Gas Selection 2-5. 2> (1) Select 2-5.2 from the menu screen. (2) Press the TEST/SET key. (3) Select the measured gas with the ▲/▼ key. (Set range: 0 - 100) (4) Press the TEST/SET key to save the setting. After the setting is completed, "2-5.2"...
-
Page 62: Calibration Method
7 Maintenance 7-3. Calibration method 7-3. Calibration method Perform calibration on the detector head (sensor) connected to the indicator in each mode (zero adjustment mode and span adjustment mode) using the calibration gas. Perform calibration using the calibration gas. Zero adjustment gas (collected in a gas sampling bag) WARNING... - Page 63 7 Maintenance 7-3. Calibration method <Span Adjustment 2-2> This is used to perform the span adjustment on the detector head (sensor). (1) Select 2-2 from the menu screen. (2) Press the TEST/SET key. (3) Introduce the calibration gas. (4) Press the TEST/SET key when the reading is stabilized. * SET is unavailable below 10% of the full scale.
-
Page 64: Storage, Relocation And Disposal
CAUTION When using a relocated or stopped/stored alarm system again, never fail to perform calibration. For information on readjustment including a calibration, please contact RIKEN KEIKI. 8-3. Disposal of products When the alarm system is disposed of, it must be treated properly as an industrial waste in accordance with the local regulations. -
Page 65: Troubleshooting
This simply helps to find the causes of malfunctions which frequently occur. If the alarm system shows a symptom which is not explained in this manual, or still has malfunctions even though remedial actions are taken, please contact RIKEN KEIKI. NOTE Read also the operating manual of the detector head connected to the alarm system. - Page 66 9 Troubleshooting 8-3. Disposal of products <Abnormalities of Readings> Symptoms Causes Actions The reading rises (drops) and Drifting of sensor Perform zero adjustment. it remains so. output Presence of Disturbances by interference gases, such as solvents, interference gas cannot be eliminated completely. For information on actions, such as removal filter, please contact RIKEN KEIKI.
-
Page 67: Product Specifications
10 Product Specifications 10-1. Specifications Product Specifications 10-1. Specifications Structure: Wall mounting or rack mounting type, non splash-proof Paint color: Door: Munsell N7. 2 (light gray) UPS (uninterruptible power system): Available [standard] or unavailable [option] External dimensions and weight: 2-point model: Approx. 290 (H) x 305 (W) x 73 (D) mm, approx. 3.9 kg 4-point model: Approx. - Page 68 10 Product Specifications 10-1. Specifications Appearance: Mounting hole (back of the case) 2 - 8-point model: 2 pcs 10 - 12-point model: 3 pcs Indicator unit (2-point model) Base unit ø7 mounting hole (back of the case) Mounting hole (back of the case, used by 2 - 8-point model: 2 pcs 10/12-point model only) 10 - 12-point model: 3 pcs...
- Page 69 10 Product Specifications 10-1. Specifications 1. Base unit (including the buzzer part, indicator part (2-point model) and UPS battery) Structure: Incorporated type (Up to 5 indicator units can be used) Common alarm contact output: No-voltage "c" contact (contact capacity: 250 VAC 2 A, resistance load) ...
-
Page 70: List Of Accessories
10 Product Specifications 10-2. List of accessories 3. Indicator unit Structure: 2-point model (per unit), incorporated type Concentration display: LCD (bar meter display (2 colors: red and green)) Individual alarm contact output: No-voltage "a" contact [standard] or "b" contact [option] (2 contacts) (contact capacity: 250 VAC 2 A, resistance load) ... -
Page 71: Definition Of Terms
11 Definition of Terms Definition of Terms % LEL A percentage unit of the concentration of a combustible gas assuming the lower explosive limit (LEL) of the combustible gas as 100. LEL (Lower Explosive Limit) refers to the lowest concentration of a combustible gas in air capable of causing explosion when ignited. -
Page 72: Appendix Power Consumption Calculation Method And Simplified Safety Period Chart
Appendix Power Consumption Calculation Method and Simplified Safety Period Chart Appendix Power Consumption Calculation Method and Simplified Safety Period Chart Obtain the power consumption of GP-147 according to the following table. (1) Power consumption of commercial power supply used for main unit (VA) Continuous Part detection Base unit 21.1 (VA) - Page 73 Appendix Power Consumption Calculation Method and Simplified Safety Period Chart [Calculating formula] GP-147 (xx_point model) Base unit and indicator unit (1) A + B x __________ units = __________ Total detector heads: __________ units Isobutane sensor (2) C x __________ units =__________...
Need help?
Do you have a question about the GP-147 and is the answer not in the manual?
Questions and answers