Table of Contents
Advertisement
Quick Links
LPRT 517892
by
AGA Professional Series Outdoor Gas Grills
Tabletop Model
Wheeled Cart Model
For Outdoor Use Only.
Do Not Use Indoors.
User Guide &
Installation Instructions
CAUTION: THIS UNIT IS HEAVY, PROPER EQUIPMENT AND ADEQUATE MANPOWER MUST BE USED IN MOVING THE
RANGE TO AVOID DAMAGE TO THE UNIT OR THE FLOOR.
REMEMBER, when replacing a part on this appliance, use only spare parts that you can be assured conform to the safety and
performance specification that we require.
DO NOT use reconditioned or copy parts that have not been clearly authorised by AGA.
PLEASE READ THESE INSTRUCTIONS BEFORE USING THIS APPLIANCE
AND KEEP IN A SAFE PLACE FOR FUTURE REFERENCE.
For use in GB and IE
10/2020 EINS 517893
Advertisement
Table of Contents

Related Manuals for Evo AGA Professional Series


Summary of Contents for Evo AGA Professional Series
- Page 1 LPRT 517892 AGA Professional Series Outdoor Gas Grills Tabletop Model Wheeled Cart Model For Outdoor Use Only. Do Not Use Indoors. User Guide & Installation Instructions CAUTION: THIS UNIT IS HEAVY, PROPER EQUIPMENT AND ADEQUATE MANPOWER MUST BE USED IN MOVING THE RANGE TO AVOID DAMAGE TO THE UNIT OR THE FLOOR.
- Page 2 Useful Information It maybe useful to make a note of your AGA appliance Serial Number when it is being installed. The serial number can be found on the right hand side of the control panel. My AGA Details: Model Nos: Professional Series Wheeled-Cart: AGA-10-0082-LP-CE Professional Series Tabletop: AGA-10-0025-LP-CE Serial No:...
-
Page 3: Table Of Contents
Contents General Warnings Outdoor use advice Safety Precautions Grill Overview Cook surface pre-seasoning How to light your grill Cooking Techniques Cooking Techniques Using the lid Cooking Chart 10. Cleaning and Caring 11. Installation and Technical 12. Product Dimensions 13. Technical Information 14. -
Page 4: General Warnings
General Warnings FOR YOUR SAFETY FOR YOUR SAFETY If You Smell Gas: Do not store or use gasoline or other Shut off gas to appliance. flammable vapours and liquids in the vicinity of this or any other appliance. Extinguish any open flame. An LP Tank not connected for use shall not Remove grill cooking surface. -
Page 5: Outdoor Use Advice
Outdoor use advice This appliance shall only be used in an above ground open-air situation with natural ventilation, without stagnant areas, where gas leakage and products of combustion are rapidly dispersed by wind and natural convection. Any enclosure in which the appliance is used shall comply with one of the following: •... -
Page 6: Safety Precautions
• VERY IMPORTANT: Never attempt to place any other cooking utensils (skillets, pots, pans) directly on the burners. Only the Evo cooking grill surface is to be placed over the burners. Only use grill with the supplied grill cooking surface. Buildup of non-ignited gas under other utensils is very dangerous. -
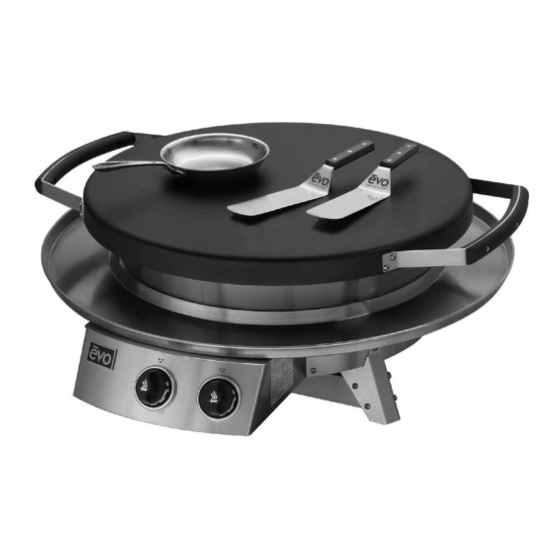
Page 7: Grill Overview
Grill Overview Front of Grill Control panel with inner and outer burner control Serial number and safety information sticker. knobs and electronic ignition. Right side of panel Solid rubber wheels mounted on stainless steel axle contains serial number, certification number and and nylon bearings provide durable transport for safety instructions. - Page 8 Top of Grill 11. Hood constructed of easy to clean stainless steel for 13. Handle for moving your hood onto the cooking surface, converting your grill into a patio oven, for roasting, and for moving your hood to the resting position. smoking, steaming or warming.
- Page 9 Back of Grill 15. Rear handle for lifting and pushing your grill into 19. Electronic ignition is battery operated. The ignitor position. uses one AA type battery (installed in ignitor). 16. Stainless steel waste tray mounted to slide rails under 20.
-
Page 10: Cook Surface Pre-Seasoning
Very much like cast iron pan cooking, a seasoned The Evo cooktop is one seamless piece of spun metal with Evo cook surface is a traditional and healthy alternative to unique characteristics which may be visible until the patina plastic non-stick coated pans. - Page 11 Cleaning Kit: We recommend using the grill cleaning kit (Fig. 1.2) that came with your Evo grill. In this kit is an insulated blue handle to grip the cleaning pads and two types of cleaning mediums; woven heat resistant nylon scouring pads and grill cleaning screens (highly abrasive).
-
Page 12: How To Light Your Grill
How to light your grill Ignitor lighting your grill Fig. 1.3 Notice: For your grill ignitor to function please check the battery is installed. Do not attempt to use the ignitor to light the grill burners without first properly installing a functional battery. - Page 13 Checking burner flames Fig. 1.4 Light burner using either ignitor or match. Rotate control knobs from High to Low while viewing flame through the flame portals. You should see a smaller flame in the Low High Flame position from that seen in the High position. Always check flame prior to each use.
-
Page 14: Cooking Techniques
Red Snapper are usually purchased in the form of fillets. temperatures of the cook surface “heat zones. ” Evo’s circular Fillets of fish are ideal to cook on the Evo grill because they grill top is divided into two distinct zones. The centre control are flat and will cook quickly and efficiently. - Page 15 Evo’s hot cook surface and covering the surface with Evo’s hood, you can quickly convert your Evo grill into a smoker. Depending on the size of the wood chips, you may want to use the method of placing the chips into a metal container such as folded aluminum foil.
-
Page 16: Cooking Techniques Using The Lid
You can use Evo’s hood if you intend to steam everything on the cook surface, or to set up individual steam areas we recommend using a pot cover. -
Page 17: Cooking Chart
Cooking Chart METHODS FOODS TIPS Vegetables Meat – steaks, cutlets, chops Kebabs Flatten thicker pieces to give even thickness and Poultry – breast, uniform cooking times. Sausages Sear MEDIUM or LOW thighs Use oil based marinades to prevent burning. Bacon Ensure all meat other Game - breast than steaks reaches a core... - Page 18 APPROXIMATE COOKING TIMES Cooking times are approximate and will be dependent on the food selected, including cut and thickness and also the air temperature! FOOD TYPE HEAT TIME Bacon Medium or low 2-3 minutes each side. Sausage Medium to brown then low 20-25 minutes.
-
Page 19: Cleaning And Caring
We recommend you use the connected to grill, store outdoors in well-ventilated area out cook surface cleaning kit that came with your Evo grill. Use of the reach of children. Cover grill if stored outdoors. warm soapy water to clean around grill handles and then wipe dry. -
Page 20: Installation And Technical
11. Installation and Technical WARNING! Please read the Warning, Cautionary notes at the start of this section. If the information contained within these instructions is not followed, property damage or personal injury may occur. DO NOT store or use gasoline or other flammable vapors and liquids in the vicinity of this or any other appliance. -
Page 21: Product Dimensions
12. Product Dimensions Professional Series Wheeled-Cart AGA-10-0082-LP-CE 40” 1016mm 46” 37” 1168mm 940mm 36”... - Page 22 Professional Series Tabletop AGA - 10-0025-LP-CE 30” 762mm Diameter 36” 914mm 14” 356mm Gas Inlet Hose Connection 23” 584mm 4” 102mm...
-
Page 23: Technical Information
AT, DE, NL, CH 17.5 kW Gas Cylinder The Evo Professional Series gas grill is desgined for use with Quick Connection Cylinder such as the Calor 5kg or 13kg patio gas with the following dimensions: • 5kg - height 314mm, diameter 306mm •... -
Page 24: Connection Of Lpg Tank To The Grill
14. Connection of LPG tank to the grill Removing Leg Support (Fig. 1.5) Fig. 1.5 For Propane Models From right side of grill, grasp removable leg support at each end and lift upward. Once the leg support is disengaged from the keyway fasteners, lift leg support outward. -
Page 25: Fitting Of Cooking Plate
15. Fitting of cooking plate Drip Pan To Burner Unit Fig. 1.8 Some parts may contain sharp edges. Wear protective gloves as necessary. Lower drip pan over burner skirt with the round clean- out hole of drip pan positioned on the left side of the control panel. -
Page 26: Assembly / Disassembly
16. Assembly / Disassembly Legs to Lower Rack Fig. 1.11 Phillips Screw (10) Some parts may contain sharp edges. Wear protective gloves as necessary. Position bottom of right leg with label marked RIGHT to lower rack and slide over axle. Visually align screw holes and place phillips screw (10) Nyloc Hex Nut (11) into first mounting hole. - Page 27 Leg Supports To Leg Frame Fig. 1.14 Some parts may contain sharp edges. Wear protective gloves as necessary. Propane (LP) models have two leg supports (left-side and front) that are installed using phillips screws and nyloc hex nuts. The third leg support (right-side) is a removable with keyway cutouts that install over pre-installed fasteners (see Removable Leg Support below).
- Page 28 Leg Assembly To Burner Unit Fig. 1.16 Some parts may contain sharp edges. Wear protective gloves as necessary. Stand completed leg assembly in an upright position with the control panel facing forward. Place burner unit over leg assembly with control panel centered between front legs with right and left wheels on each side.
- Page 29 Rear Handle To Burner Unit Fig. 1.18 Some parts may contain sharp edges. Wear protective gloves as necessary. Install Rear Handle to rear of burner unit using two each of phillips screw (60), and nyloc hex nut (61). Hood Handle & Hood Support Install handle to outside of hood by locating phillips screws (70) through the handle and into the hood.
- Page 30 For further advice or information contact your local AGA Specialist. With AGA Rangemaster’s policy of continuous product improvement, the Company reserves the right to change specifications and make modifications to the appliances described and illustrated at any time. AGA Rangemaster Station Road Ketley Telford Shropshire TF1 5AQ...
Need help?
Do you have a question about the AGA Professional Series and is the answer not in the manual?
Questions and answers