Table of Contents
Advertisement
Quick Links
Flavor Burst
®
Color Touch Panel
CTP-SNS Model
*for installation and maintenance
information on your Color Touch Panel,
please consult your model's full
Operations Manual.
www.flavorburst.com/support/
*Visit
"Color Touch Panel Files" to update your
panel to the most current program.
Manufactured by
Flavor Burst Company
499 Commerce Drive
Danville, IN 46122
For general information and to locate a
distributor near you, call or visit our website:
Phone: (317) 745-2952
Toll Free Number: (800) 264-3528
Fax: (317) 745-2377
www.flavorburst.com
Warranty
An installation and warranty form is provided with every Color Touch Panel "CTP-SNS" system, located
inside the unit with this manual. It is important that the operator carefully review the warranty and
installation documents accompanying the unit before using this system. Any questions or concerns
regarding the warranty should be clarified upon delivery or installation. For more information, contact
your local authorized Flavor Burst
©2020 Flavor Burst Company
All Rights Reserved
®
distributor.
Printed in February
Printed in
The United States of America
Advertisement
Table of Contents

Subscribe to Our Youtube Channel
Related Manuals for Flavor Burst CTP-SNS


Summary of Contents for Flavor Burst CTP-SNS
- Page 1 Warranty An installation and warranty form is provided with every Color Touch Panel “CTP-SNS” system, located inside the unit with this manual. It is important that the operator carefully review the warranty and installation documents accompanying the unit before using this system. Any questions or concerns regarding the warranty should be clarified upon delivery or installation.
- Page 2 PAGE INTENTIONALLY LEFT BLANK...
-
Page 3: Table Of Contents
TABLE OF CONTENTS FCC Conformity Statement..…….……..…..………………………………….……..….…..2 Introduction……………………………...………………………………………….………….3 Safety Precautions……………………………..…………….………..……..….…………..3 Color Touch Panel – Ports & Features……..…………….………..……..….…………..4 Drawing a Serving……..………………………….…….…..…….…………………………..7 Maintenance Menu...………………………………………….………………..………9 Accessing Flavor Burst Maintenance Menu………………...……………..…...9 Equipment Setup Functions..…………………………………….………………..……11 Equipment Setup Wizard…………………………………..………………..…...11 Priming Functions...…………………………………..………………..…...14 Password Setup…………………………………..……………………………...…..15 System Calibration..…………………………………..………………..…...17 Flavor Options......…………………………………….………………..…….23 Enable or Disable Syrup Trays..………………………..…………....…23... -
Page 4: Fcc Conformity Statement
FCC Conformity Statement This equipment complies with FCC radiation exposure limits set forth for an uncontrolled environment. This equipment should be installed and operated with minimum distance 20cm between the radiator & your body. FCC warning: Any changes or modifications not expressly approved by the party responsible for compliance could void the user's authority to operate the equipment. -
Page 5: Introduction
Failure to follow this full-color, touch-controlled command center for instruction may result in electrocution. your Flavor Burst system. The panel not only displays the flavors available with your Flavor DO NOT operate the system with larger Burst system, it also offers different serving fuses than specified on the system data sizes that are adjustable through the panel’s... -
Page 6: Color Touch Panel - Ports & Features
COLOR TOUCH PANEL – PORTS & FEATURES General System Overview (See Figure 1) ITEM DESCRIPTION FUNCTION Secondary switch port used if switch port #1 fails, or when using the Color Touch Panel to receive information from two freezers SWITCH PORT #2 (for the “44”... - Page 7 Color Touch Panel – Ports & Features...
- Page 8 PAGE INTENTIONALLY LEFT BLANK...
-
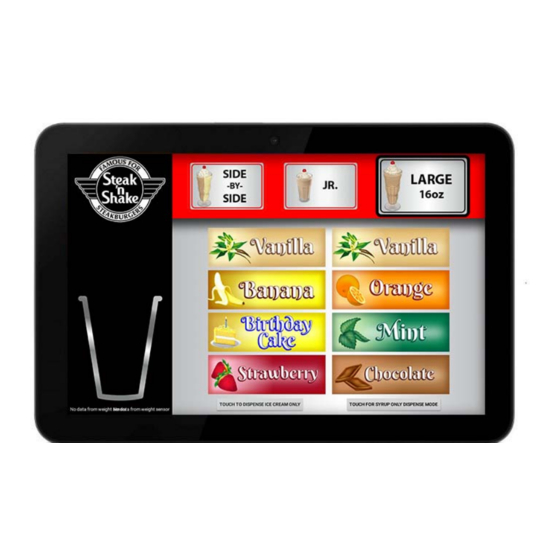
Page 9: Drawing A Serving
3. Depending on what you want to dispense, DRAWING A SERVING do one of the following: This section is a quick reference on how to Dispense Both Ice Cream and Syrup: draw a serving. If this is your first time Simply select the syrup flavor. - Page 10 Dispense Syrup Only: Select the TOUCH 4. When the screen indicates that the serving FOR SYRUP ONLY DISPENSE MODE is finished, remove the cup. If you button. A flashing message will display dispensed ice cream product, you may need indicating it is in “Syrup Only” mode. Select to twist the cup until the tail of the ice cream the syrup flavor.
-
Page 11: Maintenance Menu
Maintenance Menu to familiarize yourself with how it operates and customize the panel to your preferences. Accessing Flavor Burst Maintenance Menu 3. Certain sensitive areas of the Maintenance The Maintenance Menu is where all of your Menu are protected with a password. - Page 12 PAGE INTENTIONALLY LEFT BLANK...
-
Page 13: Equipment Setup Functions
EQUIPMENT SETUP FUNCTIONS 4. Touch the “Set date” key. Equipment Setup Wizard The Equipment Setup Wizard is a program designed to guide the operator and installer through the process of setting up the hardware of the whole system. This process may involve handling the electronics board and connections inside the cabinet. - Page 14 9. Touch the hour number of the time shown in 12. Leave the “use 24-hour format” deactivated the left side of the box, and move the hand in most cases. on the clock face to the current hour. Then touch the minutes of the time shown and move the clock hand to the current minute.
- Page 15 15. Cup Bounce Sensitivity As a failsafe, the 17. Change Switch Input Ensure the switch system detects when there is a reduction in cord from the flavor burst door assembly is weight from the cup holder while the ice fully plugged into the freezer. Press the cream is being dispensed.
-
Page 16: Priming Functions
The priming function fills the syrup line with new or fresh syrup. This is done when first setting up the Flavor Burst system with all new syrups, sometimes when switching flavors, and after the syrup line has been flushed with sanitizer solution. -
Page 17: Password Setup
Password Setup The Administrator Password protects the following areas of the Maintenance Menu: The Color Touch Panel has password Equipment Setup Wizard protection in some areas of the Maintenance Priming Functions Menu. This serves to prevent anyone from Password changing important settings without your System Calibration authorization, such as setup connections and Setup Trays and Dispense Speeds... - Page 18 3. To change the password, type in the new 6. Type in the Administrator Password and password on each line and press the press OK to access the restricted areas. CHANGE PASSWORD button. NOTE: ONCE THE ADMINISTRATOR PASSWORD IS ENTERED, THE USER WILL HAVE ACCESS TO ALL THE MAINTENANCE MENU SECTIONS WITHOUT HAVING TO ENTER IT AGAIN, UNTIL THE USER LEAVES...
-
Page 19: System Calibration
System Calibration 3. As instructed, remove everything from the cup holder and then press BEGIN. In order for the Flavor Burst system to dispense properly, you must calibrate a few sensors in this section. NOTE: CALIBRATE THE SYRUPS ONCE A WEEK FOR 4 WEEKS WHEN THE SYSTEM IS FIRST INSTALLED. - Page 20 5. Remove locking pin and disconnect the 8. Reinstall the Door Assembly lid. Auto Draw Lift bracket. Then, open the Door Assembly. 9. Place the weight on the back bar of the cup holder as shown. Press NEXT. 6. Twist as you remove the weight. It may be seated snuggly.
- Page 21 15. Place a container under the spout. Syrup will be dispensed during this process. When first installing the Flavor Burst system, it may take some time for the pumps to acclimate. Therefore, it is...
- Page 22 16. The next screen lists out all the flavors Ice Cream Dispense Calibration The weight selected for calibration. Press BEGIN when sensor determines how long the freezer you are ready. draws ice cream product according to the serving size chosen. But at times, the spout can “hang on to”...
- Page 23 20. The calibration runs three separate cycles. 23. With the cup and ice cream back into the Follow the instructions on the screen. Press cup holder and touch WEIGH NOW. START to begin the first cycle. 21. Allow the system to dispense ice cream into 24.
- Page 24 Press DONE. 27. Everything is calibrated once each section shows a green “CALIBRATED” button. NOTE: DO NOT ATTEMPT TO USE THE FLAVOR BURST SYSTEM WITHOUT IT BEING FULL CALIBRATED.
-
Page 25: Flavor Options
3. Press the BACK button in the top left corner FLAVOR OPTIONS to return to the main screen. Enable or Disable Syrup Trays Each bag of syrup and its pump system can be disabled through the Color Touch Panel, in the event syrup stock has run out or you do not wish to offer that flavor. -
Page 26: Change Syrup / View Usage
Change Syrup / View Usage 3. The empty flavor will show a red status bar and low percentage remaining. Touch the This section allows the user to see how much CHANGE SYRUP button for this flavor. syrup is left in each tray by showing a percentage and bar line. - Page 27 5. With a paper towel under the connection, 8. Place the bag into the tray and ensure the disconnect the syrup bag from the syrup bag fitment is accessible through the tray connector. slot. 9. Settle the bag into the tray and return it to 6.
- Page 28 11. Go back to the screen, and press NEXT. 12. The following screen asks to confirm whether or not the syrup bag has been replaced with a new bag. 13. Once replaced, the flavor will show 100%.
-
Page 29: Maintenance Functions
The cleaning process takes approximately 20- through the necessary steps to clean and 30 minutes, depending on whether you are maintain your Flavor Burst system. Use these cleaning one line or all 8. Use only the instructions along with any cleaning / approved sanitizing product Stera-Sheen®... - Page 30 4. Touch and hold the logo in the upper left 8. Prepare detergent water by mixing several corner of the Touch Panel until the drops of Dawn dish soap with a gallon of ® Maintenance Menu appears. warm water (108°F / 42°C). 9.
- Page 31 12. Connect the large end of the flush adapter 15. Place the funnel into the cup holder, under assembly to the syrup bag connector. the spout. Place the end of the funnel tube Twist until the connection is secure. Insert into a bucket.
- Page 32 20. With the funnel still under the spout, prime 17. Once all the lines have flushed, disconnect the cleaned syrup lines by pressing START. all the flush adapters. This only takes a few moments for each syrup line and then the process is complete. 18.
-
Page 33: View Equipment Cleaning Videos
22. Brush and clean the bucket and funnel View Equipment Cleaning Videos assembly with detergent water. Then rinse them with warm water (108°F / 42°C) and The Touch Panel allows for cleaning and dry with single service towels. instructional videos to be uploaded for viewing by the operator. - Page 34 3. If the Equipment Video List screen doesn’t show any videos, you can select videos. This requires the Administrator Password. Touch the ASSEMBLE LIST OF VIDEO FILES button and enable the videos you wish to add to the list using the toggle buttons.
-
Page 35: Serving Options
General Settings SERVING OPTIONS This section shows the percentage of syrup left Edit Sizes in the syrup bag that remains before the system disables that flavor. A “Syrup Container Empty” This section allows the operator to define how message will appear on the flavor button that is long the system dispenses ice cream and syrup disabled, notifying you that the syrup bag has according to each container serving size:... - Page 36 PAGE INTENTIONALLY LEFT BLANK...
-
Page 37: Multimedia Files Setup
3. To swap out a video for another one that is MULTIMEDIA FILES SETUP already loaded to the Touch Panel, touch the CHANGE SOURCE button. This is Edit Cleaning Videos List handy when you’ve updated a cleaning video. The description and enabled/disabled This section allows the operator to add, delete, status will remain the same as the old video. - Page 38 6. Change the description or name for the new 9. To add more videos previously uploaded to video. The Equipment Cleaning Videos the Touch Panel, touch the ADD VIDEO List will display this name. Press OK. button at the bottom of the screen. 7.
-
Page 39: Transfer Files To Touch Panel
Transfer Files to Touch Panel 4. Touch the TRANSFER VIDEO FILE button. New cleaning video files can be uploaded directly to the Touch Panel via USB drive. Video properties must be set to these specifications: 1280 x 800px full-screen 30 fps 2 Mbps bitrate 192 Kbps audio 5. - Page 40 PAGE INTENTIONALLY LEFT BLANK...
-
Page 41: Other
This screen shows the name, the service number and the product re-order number of your local distributor. It also shows information on the Flavor Burst App Version and Database Version, which may help in troubleshooting in the future. 1. Press the “Contact and System Info” section in the Maintenance Menu. -
Page 42: Motor Log
Motor Log Diagnostics This screen shows all the commands sent to This section allows you to test the pumps, the pumps and motors. It should be cleared motors, and switches of the system and will periodically. detect if anything isn’t working properly. 1. - Page 43 3. Select which motors you wish to test by 5. To run the test on the enabled motors, touching the squares next to each motor. A touch the MOTORS ARE OFF button. The green checked square indicates a motor to button will then read MOTORS ARE ON be tested.
- Page 44 7. Bank C / Bank D Motor Tests These banks 11. Place a cup into the cup holder. are not attached to the system and are therefore irrelevant. 8. Serial 2 Result and QC Mode are irrelevant 12. Select a flavor to test, and then touch the also.
-
Page 45: System Update
System Update 4. If a WiFi connection cannot be made, copy the update file to a thumb drive. Insert the Color Touch Panel program updates will be thumb drive into the bottom of the Touch available online. In order to access the Panel, and touch the CHECK USB button. -
Page 46: Exit Application And Other Power Options
Touch Panel might be necessary. You may also wish to exit the Flavor Burst App entirely to gain access the Touch Panel’s Android system. 1. Exit Back to Product Screen To exit the... -
Page 47: Warning And Message Screens
5. Open Flavor Burst App When powered on, Warning and Message Screens the Touch Panel should automatically load the Flavor Burst app. If for some reason Some messages and warnings might pop up you find yourself outside the app, open the while you are using the Touch Panel. - Page 48 2. Insert Cup The cup holder has a built-in 3. No Lid Installed There is a switch just weight sensor. When there is no cup in it, behind the Touch Panel at the top of the this message will come on screen, Door Assembly.
- Page 49 4. System Cleaning Due A full cleaning the system (including pumps, syrup lines, and other parts) is required every 30 days to comply with sanitation requirements. A message and flashing icon will appear on the main dispense screen when this cleaning procedure is due.
- Page 50 PAGE INTENTIONALLY LEFT BLANK...
-
Page 51: Testing The System
TESTING THE SYSTEM 3. Dispense Both Ice Cream and Syrup: simply select the syrup flavor. The system Once the system is enabled to dispense flavors, will automatically start dispensing both ice test each flavor to ensure they all dispense cream and syrup. It will automatically stop properly and that the Injector/Blending when the serving is complete. - Page 52 4. When the screen indicates that the serving 7. Adjust the flavor-to-ice-cream ratio as well is finished, remove the cup. If you as the dispense rate for each size. See dispensed ice cream product, you may need section SERVING OPTIONS “Edit Sizes” of to twist the cup until the tail of the ice cream the Maintenance Menu.
- Page 54 © 2019 Flavor Burst is a registered trademark of the Flavor Burst Company. Taylor is a registered trademark of the Taylor Company. All rights reserved.
Need help?
Do you have a question about the CTP-SNS and is the answer not in the manual?
Questions and answers