Table of Contents
Advertisement
Quick Links
SUPPLIED MATERIAL
1
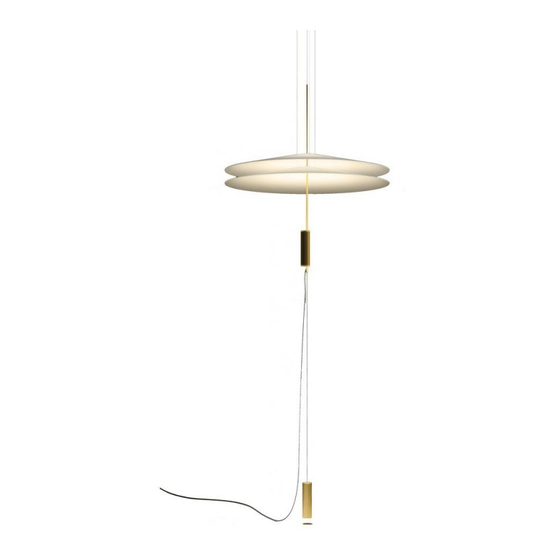
Gloves / Guantes / Handschube
2
Regulator / Regulador / Dimmer
3
Counterweight / Contrapeso / Gegengewicht
4
Levelling disc / Disco nivelador / Ausgleichsscheibe
5
Decorative cover / Embellecedor / Blende
Shades / Pantallas / Schirme
6
Lighting fixture / Estructura luminaria / Leuchten-Struktur
7
TECHNICAL SPECIFICATIONS
Flamingo
Design by Antoni Arola & Enric Rodríguez
MATERIAL SUMINISTRADO
1.
2.
ESPECIFICACIONES TÉCNICAS
MONTAGEANLEITUNG
GELIEFERTES MATERIAL
3.
4.
5.
1515
1525
1535
1 un.
1 un.
1 un.
1 un.
1 un.
1 un.
1 un.
1 un.
1 un.
1 un.
1 un.
1 un.
1 un.
1 un.
1 un.
2 un.
2 un.
3 un.
1 un.
1 un.
1 un.
6.
7.
TECHNISCHE DATEN
Advertisement
Table of Contents

Related Manuals for VIBIA Flamingo


Summary of Contents for VIBIA Flamingo
- Page 1 Flamingo Design by Antoni Arola & Enric Rodríguez ASSEMBLY INSTRUCTIONS INSTRUCCIONES DE MONTAJE MONTAGEANLEITUNG SUPPLIED MATERIAL MATERIAL SUMINISTRADO GELIEFERTES MATERIAL 1515 1525 1535 1 un. 1 un. 1 un. Gloves / Guantes / Handschube 1 un. 1 un. 1 un.
- Page 2 ASSEMBLY INSTRUCTIONS INSTRUCCIONES DE MONTAJE MONTAGEANLEITUNG 1. Fix the box (A) to the ceiling with suitable screws and plugs (not supplied). 2. Adjust the height of the light fitting by pulling the steel cable out to the desired height. NOTE: To help you decide the height, the mark printed on the protective tube indicates the position of the bottom shade.
- Page 3 ASSEMBLY INSTRUCTIONS INSTRUCCIONES DE MONTAJE MONTAGEANLEITUNG 3. Fit the levelling disc (C) to the fixing points on the cable and adjust the height so that it is properly levelled with the mark printed on the protective tube. IMPORTANT: Fit the disk on the last fixing point on the cable.
- Page 4 ASSEMBLY INSTRUCTIONS INSTRUCCIONES DE MONTAJE MONTAGEANLEITUNG 4. To adjust levelling more precisely, the three suspension points (D) located in the ceiling rose can be tightened or loosened to raise or lower them 2 mm. from their position. 5. Remove the levelling disc (C). 4.
- Page 5 ASSEMBLY INSTRUCTIONS INSTRUCCIONES DE MONTAJE MONTAGEANLEITUNG 6. Remove the protection. 7. Fit the decorative cover (E) supplied, with the three pins (F) inserted into their housings. 6. Retirar los protectores. 7. Montar el embellecedor (E) suministrado, con las tres torretas (F) insertadas en su alojamiento.
- Page 6 ASSEMBLY INSTRUCTIONS INSTRUCCIONES DE MONTAJE MONTAGEANLEITUNG 8. Fit the shades (G) to the fixing points on the cable. IMPORTANT: gloves provided during the assembly process in order to avoid possible transfer of dirt from hands to the diffusers. If handled directly the plastic diffusers can become marked.
- Page 7 ASSEMBLY INSTRUCTIONS INSTRUCCIONES DE MONTAJE MONTAGEANLEITUNG 10. Fit the counterweight by inserting the steel cable and letting it hang suspended 2 cm. from the ground. 11. Connect the cable to the regulator and then plug in the power. Montar contrapeso introduciendo el cable de acero y dejarlo que cuelgue suspendido a 2 cm.
- Page 8 Flamingo Design by Antoni Arola & Enric Rodríguez IMPORTANT IMPORTANTE HINWEIS Use the gloves provided Usar durante el montaje los Nutzen Sie während der during the assembly process guantes suministrados, para Montage die mitgelieferten in order to avoid possible evitar un posible trasvase de...
Need help?
Do you have a question about the Flamingo and is the answer not in the manual?
Questions and answers