Table of Contents
Advertisement
Quick Links
Quick Start Guide
EC3-750
Wi-Fi Extender
⑨
⑥
⑤
① ②
③
④
⑩
11
12
Tech Support
E-mail: support@juplink.com
Tel : +1 (833) 923 - 2468 (toll free)
Service Time: EST : 09:00-17:00/PDT: 06:00-14:00
Website: www.juplink.com
Operating Conditions
Working Temperature: 0~45°C / 32~113°F
Working Humidity: 10%~90% RH
, non-condensing
Storage Temperature: -40~85°C / -40~185°F
Storage Humidity: 5%~95% RH
, non-condensing
To customize your wireless network connection and other advanced repeater
settings, please go to www.Juplink.com/Support/ to download EC3-750
firmware updates and User Guide for more information.
Mode 1: Repeater Mode
Step 1: Power On
1. Move the Mode switch to "Repeater".
2. Plug the repeater into a power outlet near the router.
3. Ensure the Power ON/OFF switch is turned to "ON" .
Step 2: Configure
1. Extend your Wi-Fi device to the repeater's SSID:
Juplink-EC3-750 or Juplink-EC3-750_5G.
2.Launch a web brower on a device which has
been connected to repeater, and enter
router.juplink.com in the address bar to log in.
3. Enter User Name: admin/ Password: admin to access the settings page.
4. Click on Repeater Wizard.
Note:
It may take about 10-20 seconds to scan the network.
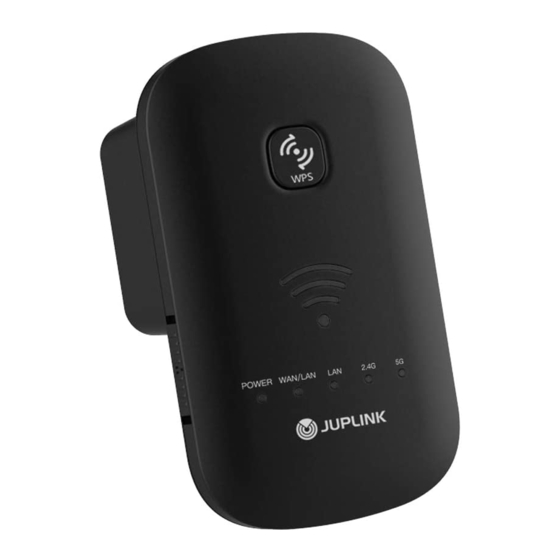
LED Status Indicators
③ ④ 2.4G/5G Wi-Fi Signal LED
⑧
⑦
Button & Interface
Button/Interface
⑩
What's in the Box:
Method 1: Using A Web Browser (recommended)
Status
LED
Off
① POWER
On
Off
② WAN/LAN&LAN
On
Off
On
Flashing
Off
⑤ WPS
On
Flashing
One LED on
⑥ Wi-Fi Signal Strength
Indicator LED
Two LEDs on
(Three curve LEDs)
Three LEDs on
It is a slide switch on the right side panel.
⑦ ON/OFF switch
Ensure the switch is turned ON before using the extender.
Press the RESET button for about 5sec (until the WPS LED flashes),
⑧ RESET
to restore to factory defaults.
⑨ WPS
Press to enable WPS function. For details, go to "Step 2: Configure".
Left port can serve as LAN or WAN port / right side can only serve as LAN port
11
and can be connected to your computer or another terminal device using a
LAN&WAN / LAN
RJ45 cable when necessary.
Move the mode switch on the left side panel to use the device in repeater, AP or
12
Mode switch
router mode. Caution: Please be aware that after moving the switch to another
mode, the device will be rebooted.
EC3-750 Wi-Fi Extender*1 ; Quick Start Guide*1 ; Troubleshooting *1
Detached UK plug*1 ; Detached EU plug *1.
Note:
When the Extender is working in repeater mode, it does not boost your network speed, but supports wider
wireless coverage, that is, you can enjoy Wi-Fi connection where your router signal may not reach directly.
5. Select your network by clicking "Choose"
button in the corresponding line and
enter your password details in Key field.
6. Click the "Save" button. The settings are
now being saved, that is why the repeater
will ask you to wait for 90 seconds.
Afterwards you can remove the Ethernet
cable, and install the Wi-Fi repeater
at the selected location.
Note:
Default password are automatically copied from router network.
Default SSID is [SSID of your router] + suffix of [2.4GEXT] or + suffix of
[5GEXT], depending on the band the extender is connected to your
router. You can also modify the SSID of the extended network,
the same as that of the existing network you chose to extend.
Optional: If you want to modify the SSID, please follow the steps below.
1. Go to the Wi-Fi Settings page, enter the SSID and password that you wish to apply to
the extended Wi-Fi network.
Description
Powered off
Powered on
Cable connection not ok
Cable connection ok
No Wi-Fi signal or powered off
Normal connection but no transmissing data
Transmissing data
Function not enabled or powered off
WPS is enabled and connected
WPS is enabled and connection being established
Weak reception, strength below 25%
Good reception, strength between 50~75%
Excellent reception, strength above 75%
Description
XXX_MYWiFi
XXX_HomeWiFi
XXX_HomeWiFi_1
XXX_HomeWiFi_2
XXX_HomeWiFi
XXX_HomeWiFi_5GEXT
XXX_HomeWiFi_2.4GEXT
Advertisement
Table of Contents

Subscribe to Our Youtube Channel
Related Manuals for Juplink EC3-750


Summary of Contents for Juplink EC3-750
- Page 1 Operating Conditions Working Temperature: 0~45°C / 32~113°F What’s in the Box: EC3-750 Wi-Fi Extender*1 ; Quick Start Guide*1 ; Troubleshooting *1 Working Humidity: 10%~90% RH , non-condensing Detached UK plug*1 ; Detached EU plug *1.
- Page 2 Save. 5. Launch a web brower on a device which has been connected to repeater, and enter router.juplink.com in the address bar to log in. 2. Enter wireless settings. 3. Connect to LAN port of the extender or use wireless Internet access.
- Page 3 Why can’t the repeater find the Wi-Fi network of my router/modem, such as Comcast,Verizon? The encryption method in the Comcast,Verizon router may not be recognized by EC3-750 Wi-Fi Extender. Try the following to solve the problem: ① Log in to Comcast or Verizon router and enter the wireless settings page.
- Page 4 Why does it always prompt for failure during extension? • Check if the wireless signal indicator is green or off. Off indicates extension failure. • If you can't find the uplink wireless network during extension, please try the following: ① Set the SSID of the router and that of the repeater to combinations of numerals and letters. ②...
Need help?
Do you have a question about the EC3-750 and is the answer not in the manual?
Questions and answers