JCM Technologies KEEROLL User Manual
Hide thumbs
Also See for KEEROLL:
- User manual (20 pages) ,
- User manual (20 pages) ,
- User manual (48 pages)
Advertisement
Quick Links
Advertisement

Related Manuals for JCM Technologies KEEROLL


Summary of Contents for JCM Technologies KEEROLL
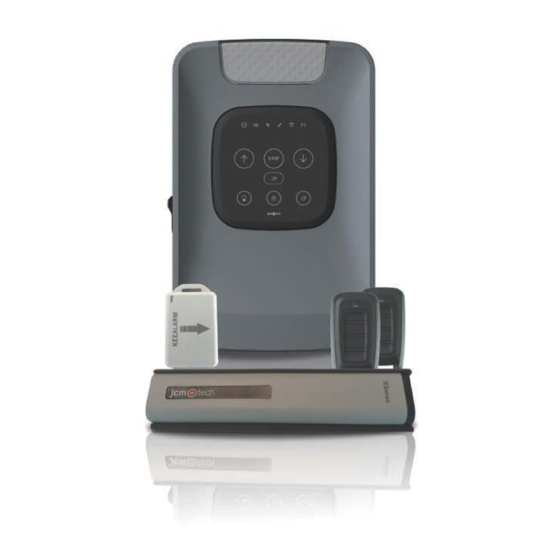
- Page 1 (KEEROLL + RS3 TGL868 + KEEALARM + 2 MUV)
-
Page 2: Installation
KEEALARM Communi cati on’s quali ty Impact detection adj ustment Maintenance Program maintenance manoeuvres Reset manoeuvres counter Reset transmi tters Reset safety elements Fuse replacement RadioSens3 Batteries replacement Technical Data Technical Data: KEEROLL Technical Data: Safety elements Technical Data: Transmitters... - Page 3 Troubleshooting KEEROLL RadioSens3 Notes Regulatory Data EU Declaration of conformity...
- Page 4 Disconnect the power supply whenever you proceed to the installation, maintenance or repair of the equipment.
- Page 5 Designed for automation of garage doors, in accordance wi th the general descri ption. Not guaranteed for other uses. The manufacturer reserves the ri ght to alter equipment specifications without pri or notification.
- Page 6 Designed for residenti al aluminium roll er shutters, the KEEROLL soluti on has di rect communi cati on wi th the user and the i nstaller. Its capacitive front with il luminated keys provides comfort and security. The door can be opened and closed by any person without the need for technical know-how.
- Page 7 Press to open, stop and close the door. Press to close the door in dead man mode. Block function: KEEROLL control panel incorporates a bl ock button on the cover to prevent the door from bei ng opened acci dentally.
- Page 8 Radi oSens3 is an impact detection system i nstall ed at the last slat of the roll er shutter. It detects the obstacle and reopens wi thout causing any damage. The communication system between the RS3 T868 and the KEEROLL is permanentl y monitored (two-way li nk via radio).
- Page 9 Remove the front cover of the control panel . Install the bottom part on the wal l i n a vertical position, at least 1,5 meters over the ground and in accordance wi th the assembly i nstructions below.
- Page 10 Install the transmi tter foll owing the steps and recommendations below. Pass the cables through the hol es indicated (only i f you use the lock connecti on). Instal l the transmitter i n a horizontal position, at the mi ddle of the last slat (i t must have a tolerance of mi ni mum 2mm of movement).
- Page 11 Before installing the KEEALARM it must be programmed. See " Programming -> KEEALARM programming"...
- Page 13 START OPEN...
- Page 14 Dipswitch 1 at ON. Door wil l move in dead man mode. Keep pressed move up and down the door. Press , to change the phase of the motor i n case the door is not movi ng in the proper sense.
- Page 15 Press , key l ights ON, a beep wi ll be heard. Keep pressed key unti l reach the desired channel configuration (see bel ow sequence for the different con- figurations). Press each transmitter button to be programmed, a beep will be heard each ti me a transmitter is programmed. Press agai n to exi t radi o programming, lights OFF.
- Page 16 Enter Installer mode: Press , the mai ntenance indicator l ights ON, a beep wi ll be heard. Select dipswitch 2 at ON: Autocl ose time. Press , with the door totall y closed, on cover and the control panel will ini- ti ate and auto-programming sequence.
- Page 17 Press , key l ights ON, a beep wi ll be heard. Keep pressed key until reach the 4th channel configuration ("Transmi tter programming" table for the different con- figurations). In channel 4 configuration (4 fl ashes), sl ide the Keeal arm device in front of the magnetic part to acti vate the alarm. A beep wil l be heard to indi cate that the devi ce i s programmed.
- Page 18 Once the control panel i s correctl y wi red and programmed, check that all the system (accessori es i ncluded) is worki ng properl y. Press the transmitter button and check that the door opens. Press agai n, and check that the door stops/closes. Check that the LED is at OFF.
- Page 19 To ensure that the radio communication i s good enough, check that the LED is at OFF. If i s permanentl y activ- ated, please check Radi oSens3/RadioBand3. To adjust the i mpact detection of the RadioSens3 system, change the sensi bi lity selector between 0 and 4.
- Page 20 Enter Installer mode : Press , the maintenance i ndicator li ghts ON, a beep wil l be heard. The fol lowing functi ons can be done i nside this maintenance mode. Keep pressing to set up the maxi mum number of manoeuvres: If the maintenance alarm i s activated, when you press a few quick fl ashes will li ght ON and the number...
- Page 21 Press and keep pressed until Keep pressed and press , to erase safety ele- keys starts flashing, a beep wil l be heard. ments, some beeps wil l be heard fol lowed by a l ong beep. When you power suppl y the equipment, if the frontal panel does not li ght, remove the front cover and replace the fuse with another fuse wi th the same characteristi cs.
- Page 25 UM_3201323_KIT-KEEROLL-ALARM_EN_Rev01...
- Page 28 JCM TECHNOLOGIES, S.A. hereby declares that the product KEEROLL and RS3 TGL868 compl ies with the relevant fundamental requirements of the RED Di rective 2014/53/EU, as wel l as with the Machi ne Di rective 2006/42/EC whenever i ts usage i s foreseen; and with the 2011/65/EU RoHS Directive.
Need help?
Do you have a question about the KEEROLL and is the answer not in the manual?
Questions and answers