Advertisement
Quick Links
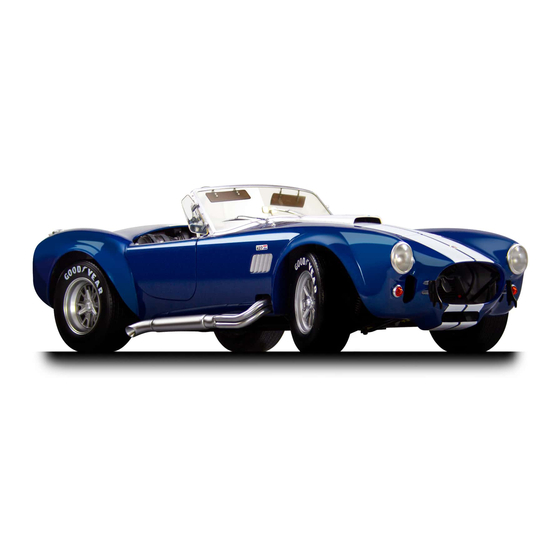
In the 1960s, Carroll Shelby's Cobras dominated racetracks worldwide, first winning races coast to coast
across North America, then in 1965, winning the World Manufacturer's GT Championship, achieving the
ultimate goal of defeating Ferrari. The Semi-Competitions were modified from full competition models
just enough to make them street legal. Only 29 models were produced, making them one of the most
Your 1:8 model replicates the original 1965 Semi-Competition Cobra in intricate detail. From the
dashboard dials to the writing on the wheels, every piece is precisely reproduced.
STAGE 01: HOOD ASSEMBLY
Air intake, Hood locks and Badge
STAGE 02: LEFT FRONT WHEEL
Wheel, Tire, Brake discs
STAGE 03: STEERING WHEEL
AND EXHAUST PARTS
Steering wheel, Emblem, Seat, Roll bar, Exhaust
cylinder and muffler
AGORAMODELS
Pack 01 | Build Instructions
sought-after American sports cars by collectors.
In your first model pack, you will assemble:
STAGE 04: ENGINE AND
EXHAUST PARTS
Engine block, Carburetor, Air filter, Exhaust pipes
STAGE 05: OIL FILTER
AND EXHAUST PARTS
STAGE 06: EXHAUST PIPES
1
SHELBY COBRA 427 S/C
Advertisement

Related Manuals for Agora SHELBY COBRA 427 SEMI-COMPETITION 1965


Summary of Contents for Agora SHELBY COBRA 427 SEMI-COMPETITION 1965
- Page 1 Pack 01 | Build Instructions In the 1960s, Carroll Shelby’s Cobras dominated racetracks worldwide, first winning races coast to coast across North America, then in 1965, winning the World Manufacturer’s GT Championship, achieving the ultimate goal of defeating Ferrari. The Semi-Competitions were modified from full competition models just enough to make them street legal.
- Page 2 Advice from the experts Spare screws are included with each part. Occasionally, you may be instructed to keep spare or unused screws for a later stage. Keep these spares in a safe place and label them correctly. Please make sure you don’t mix up the screws. They look quite similar, but the threads do vary slightly.
- Page 3 Stage 01: Hood Assembly In this first stage of building the Shelby Cobra, you will assemble parts of the hood. S T A G E 0 1 P A R T S L I S T Name Quantity Hood Air intake Hood latch Hood lock ring Rubber strips...
- Page 4 Take the hood and lay it carefully, upside down on your work surface. It’s a good idea to lay it on top of the Agora cleaning cloth, or other modeling-board surface, so that you don’t scratch the paintwork. Using a pair of tweezers, pick up a rubber strip, peel back the adhesive backing, and position the strip on the hood in the position shown.
- Page 5 Stage 01: Hood Assembly S T E P 3 A T T A C H T H E H O O D H A N D L E S Note that the hood handles are marked left (L) and right (R). Take the left hood handle and push it through the hole on the left hand side of the hood.
- Page 6 Stage 01: Hood Assembly Stage 01 complete! AGORAMODELS SHELBY COBRA 427 S/C...
- Page 7 Stage 02: Left Front Wheel In stage 02, you will build the left front wheel. S T A G E 0 2 P A R T S L I S T Name Quantity Tire Wheel hub Hubcap Brake caliper Inside rim Outside rim Three-eared knock-on Brake disc...
- Page 8 Stage 02: Left Front Wheel S T E P 1 S O F T E N T H E T I R E The first step in assembling the wheel is to soften the tire by soaking it in a hot water-bath, filled with water straight from a kettle.
- Page 9 Stage 02: Left Front Wheel S T E P 3 F I T T H E T I R E T O T H E R I M Remove the tire from the water-bath and dry on a cloth or kitchen roll. Take care, it may still be very hot so use tweezers to remove it from the water.
- Page 10 Stage 02: Left Front Wheel S T E P 4 ASSEMBLE BRAKE COMPONENTS Push the hubcap into the center of the three-eared knock-on. This is a friction fit and will stay in place without screws. Align the wheel hub with the brake disc and position the pieces together. Align the tiny hole on the brake caliper with the tiny lug on the wheel hub.
- Page 11 Stage 02: Left Front Wheel S T E P 5 COMPLETE THE WHEEL Place the wheel hub assembly in the inside of the wheel, aligning the lug on the brake disc with the corresponding notch on the wheel. Secure in place from the outside of the wheel using a TYPE OD02 screw.
- Page 12 Stage 02: Left Front Wheel Stage 02 complete! AGORAMODELS SHELBY COBRA 427 S/C...
- Page 13 Stage 03: Steering Wheel and Exhaust Parts In stage 03 you will prepare the exhaust pipes for full assembly in stage 4. S T A G E 0 3 P A R T S L I S T Name Quantity Steering wheel Steering wheel emblem Driver’s seat...
- Page 14 Stage 03: Steering Wheel and Exhaust Parts S T E P 1 F I X T H E C O B R A E M B L E M T O T H E S T E E R I N G W H E E L Assemble the steering wheel by pushing the Cobra emblem into the recess in the center of the wheel.
- Page 15 Stage 03: Steering Wheel and Exhaust Parts Stage 03 complete! AGORAMODELS SHELBY COBRA 427 S/C...
- Page 16 Stage 04: Engine & Exhaust Parts In stage 04, you will start building the engine, and assemble more exhaust pipes. S T A G E 0 4 P A R T S L I S T Name Quantity Air filter bottom Air filter top Air filter grille Carburetor top...
- Page 17 Stage 04: Engine & Exhaust Parts S T E P 1 A S S E M B L E T H E A I R F I LT E R To start assembling the air filter, take the air filter bottom in one hand and wrap the air filter grille around the ridge on the circumference.
- Page 18 Stage 04: Engine & Exhaust Parts S T E P 2 A T T A C H T H E C A R B U R E T O R Align the carburetor bottom with the air filter assembly – the ‘D’ shape of the air filter and carburetor determines the orientation of the parts.
- Page 19 Stage 04: Engine & Exhaust Parts S T E P 3 A S S E M B L E T H E E X H A U S T PA R T S Align the notch on the exhaust collector with the exhaust cylinder and tip assembly from stage 3.
- Page 20 Stage 04: Engine & Exhaust Parts Exhaust elbow 4 Exhaust elbow 2 Note the correct orientation of the exhaust plate – the raised corners should face outwards towards the pipes (picture 10). AGORAMODELS SHELBY COBRA 427 S/C...
- Page 21 Stage 04: Engine & Exhaust Parts Stage 04 complete! AGORAMODELS SHELBY COBRA 427 S/C...
- Page 22 Stage 05: Oil Filter and Exhaust Parts In stage 05, you will start to assemble the next side exhaust and build the oil filter. S T A G E 0 5 P A R T S L I S T Quantity Name Oil filter part 1...
- Page 23 Stage 05: Oil Filter and Exhaust Parts S T E P 1 B E G I N A S S E M B LY O F T H E S E C O N D S I D E E X H A U S T Take the exhaust tip and align with the notch on the end of the exhaust cylinder.
- Page 24 Stage 05: Oil Filter and Exhaust Parts S T E P 2 A S S E M B L E T H E O I L F I LT E R A N D M O R E E N G I N E P A R T S Take the oil filter holder and align the notch on oil filter 2 with the projecting lug.
- Page 25 Stage 05: Oil Filter and Exhaust Parts Stage 05 complete! AGORAMODELS SHELBY COBRA 427 S/C...
- Page 26 Stage 06: Exhaust Pipes In stage 06, you will complete the second side exhaust. S T A G E 0 6 P A R T S L I S T Quantity Name Exhaust elbow part 5 Exhaust elbow part 6 Exhaust elbow part 7 Exhaust elbow part 8 Exhaust plate...
- Page 27 Stage 06: Exhaust Pipes S T E P 1 A S S E M B L E T H E E X H A U S T P I P E S The process here is the same as the exhaust assembly in stage 4.
- Page 28 Stage 06: Exhaust Pipes Stage 06 complete! AGORAMODELS SHELBY COBRA 427 S/C...
Need help?
Do you have a question about the SHELBY COBRA 427 SEMI-COMPETITION 1965 and is the answer not in the manual?
Questions and answers