Table of Contents
Advertisement
Quick Links
M
ODE D
H
ANDLEIDING VOOR INSTALLATIE EN GEBRUIK
I
NSTALLATIONS
I
NSTALLATION AND OPERATION MANUAL
I
STRUZIONI DI UTILIZZO E INSTALLAZIONE
I
NSTRUCCIONES DE USO E INSTALACIÓN
MODO DE EMPREGO E DE INSTALAÇÃO
WEVP 231 E BIS
Type : VPMN 231 + VPPL A 231
'
'
EMPLOI ET D
INSTALLATION
-
UND
Ed. 07-07
B
EDIENUNGSANLEITUNG
Advertisement
Table of Contents

Related Manuals for Extel WEVP 231 E BIS


Summary of Contents for Extel WEVP 231 E BIS
- Page 1 ANDLEIDING VOOR INSTALLATIE EN GEBRUIK NSTALLATIONS EDIENUNGSANLEITUNG NSTALLATION AND OPERATION MANUAL STRUZIONI DI UTILIZZO E INSTALLAZIONE NSTRUCCIONES DE USO E INSTALACIÓN MODO DE EMPREGO E DE INSTALAÇÃO WEVP 231 E BIS Type : VPMN 231 + VPPL A 231 Ed. 07-07...
- Page 2 1. DESCRIPTIF / BESCHIJVING / BESCHREIBUNG DESCRIPTION / DESCRIZIONE / DESCRIPCIÓN / DESCRIÇÃO Moniteur - Monitor - Monitor - Monitor - Monitor - Monitor - Monitor Transformateur - Trafo - Transformator - Transformer - Trasformatore - Transformador - Transformador Caméra - Camera - Kamera - Video camera - Telecamera - Cámara - Câmara Support mural - Muursteun - Wandhalterung - Wall mounting - Supporto murale - Soporte mural - Suporte mural 2 Sachets de visserie - Zakje schroeven - 2 Schraubensätze - 2 bags of screws - 2 sac-...
- Page 3 GÉNÉRALITÉ Ce visiophone est composé d’un poste de réponse intérieur avec écran et d’une platine extérieure avec interphone et caméra permettant de voir et communiquer avec le visiteur qui a sonné. Il est facile d’ins- tallation puisque seulement 2 fils sont nécessaires pour toutes les fonctions : sonnerie, image vidéo, interphone et commande de l’ouvre-porte.
- Page 4 2. NOMENCLATURE / ONDERDELEN / NOMENKLATUR / KEY / DESIGNAZIONE ELEMENTI / NOMENCLATURA a. Ecran 1. Combiné de réponse. 2. Ecran de contrôle noir et blanc 4’’ sur lequel apparaît le visage du visiteur. 3. Témoin “INTERCOM” : ce voyant s’allume en position INTERCOM avec le deuxième écran en option WEVPMS 231 E BIS.
-
Page 5: Indoor Monitor
2. Schwarz/weiß Kontrollbildschirm 4'', auf dem das Gesicht des Besuchers erscheint. 3. Kontrolleuchte «INTERCOM»: leuchtet bei INTERCOM-Betrieb mit dem zweiten, Monitor, Option Extel WEVPMS 231 E BIS 4. Taste INTERCOM: (bei installierter Option WEVPMS 231 E BIS) Durch Drücken dieser Taste können Sie den zweiten Monitor aufrufen und mit ihm kommunizieren. - Page 6 3. Spia “ intercom ” : questa spia si accende quando c’è intercomunicazione collo secondo schermo proposto in accessorio EXTEL WEVPMS 231 E BIS. 4. Tasto “ intercom ” : (se è stato installato l’accessorio WEVPMS 231 E BIS secondo schermo) ;...
-
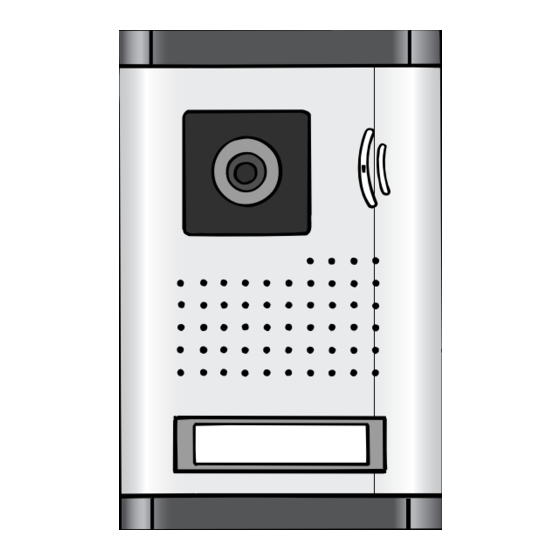
Page 7: Platine De Rue, Caméra Extérieure
b. Platine de rue, caméra extérieure 1 . Objectif de la caméra C-MOS avec iris automatique 2 . Eclairage infrarouge : permet de voir le visiteur même dans une ambiance peu éclairée (visiteur à moins de 30 cm. Au-delà prévoir un éclairage complémentaire). - Page 8 b. Cámara exterior C-MOS Objetivo de la cámara con iris automático. Iluminación infrarroja: permite ver a la persona que llama incluso en caso de poca iluminación (persona a menos de 30 cm, para distancias superiores es necesaria una iluminación complementaria). Altavoz: permite ser escuchado en el exterior.
-
Page 9: Installation Der Außenstation (Außen-Kamera)
1,60m a. Installation de la platine de rue (caméra extérieure) 1. Encastrer la boîte plastique en prenant soin de ne pas obstruer les écrous de fixation de la platine. 2. Fixer le caméra en faisant en sorte que l’objectif soit à une hauteur d’environ 1,60m. 3. - Page 10 a. Installing the street unit (outdoor video camera) 1. Fix the plastic box being aware to not obstruct the holes intended for mounting screws. 2. Fix the camera so that the lens is at a height of about 1.60 m. 3.
- Page 11 b. Installation du poste de réponse (moniteur) 1 . Fixer le support mural .L’écran doit être placé à une hauteur d’environ 1,60m. 2 . Raccorder les fils venant de la caméra extérieure et du transformateur en respectant le schéma de câblage (P14). 3 .
-
Page 12: Installation Der Innenstation (Monitor)
Absicherung: Der Trafo verfügt über einen eingebauten thermischen Schutz (PTC). Im Schadensfall oder bei einem Kurzschluss wird der Schutz des Trafos wie folgt wiederhergestellt: 1. Stecker aus der 230 V ~ -Steckdose ziehen (mind. 2 Min. ausgesteckt lassen). 2. Gegebenenfalls Fehler beheben. 3. -
Page 13: Instalación Del Puesto De Respuesta (Monitor)
Il trasformatore deve imperativamente essere montato sul binario DIN del pannello modulare montato in sporgenza su un supporto non metallico in un luogo asciutto e ventilato utilizzando i 2 pie- dini neri da incastrare sui lati del trasformatore . È sottinteso che i pannelli copri-morsetti devono imperativamente essere rimontati;... -
Page 14: Camera Adjustments
c. Réglages sur la caméra ■ La caméra possède 2 réglages au dos de la platine de rue ■ Si besoin vous •Réglage du volume sur le pouvez modifier de combiné (2) quelques degrés •Réglage du volume sur la l’inclinaison de la caméra (3) caméra (1) Utilisez un... -
Page 15: Ajustes De La Cámara
Vedere P.19 Ver P.19 Ver P.19 : inclus dans les kits automatismes Extel : Ingesloten in de kits automatismen van Extel : In den Automatik-Bausätzen Extel inbegriffen blanc/wit/weiß/white : Included in Extel automatic gate opener kits : Incluso nei kit automazioni Extel... - Page 16 • Attention : il ne faut en aucun cas doubler les fils pour en augmenter la section. • Opgelet : de draden in geen geval verdubbelen om de doorsnede te vergroten. • Vorsicht: Die Drähte dürfen auf keinen Fall (zur Erhöhung des Querschnitts) verdoppelt werden. •...
-
Page 17: Raccordement Du Visiophone
(gâche ou serrure électrique). Pour la commande d’un automatisme de portail intercaler l’option WE 8111 BIS (fourni d’origine avec les automatismes EXTEL) entre la caméra et votre automatisme de portail en respectant la polarité. Pour la commande d’une gâche, aucune polarité à respecter. -
Page 18: Connecting The Videophone
•Camera terminal “D-” and “D+” to command your door-opener (catch or electric lock). For automatic gate opener command, intercalate the optional WE 8111 BIS (supplied with all EXTEL automatic gate opener) between the camera and your automatic gate opener with the correct polarity. -
Page 19: Collegamento Del Videocitofono
• The staple or the electric door lock you are going to install on terminals D- and D+ of the camera must have a mechanical memory, just as all the items of EXTEL • For wiring, respect the letters printed at backside of the monitor and written on the stick at backside of the came- ra•... - Page 20 •El cerradero o la cerradura eléctrica que va a conectar en los bornes D- & D+ de la cámara, deberán estar obligatoriamente equipados de una memoria mecánica al igual que todas las referencias EXTEL.•Para efec- tuar el cableado preste mucha atención a la etiqueta pegada en la parte de atrás del monitor y de la cámara.
-
Page 21: Utilisation Du Visiophone
5. MODE D’EMPLOI / GEBRUIKSAANWIJZING / BEDIENANLEITUNG / DIRECTIONS FOR USE / MODALITÀ D’USO / MODO DE EMPLEO / MODO DE UTILIZAÇÃO a. Utilisation du visiophone • Lorsqu’une personne appuie sur le bouton extérieur, l’appel se fait entendre, l’écran s’illu- mine et le visage du visiteur apparaît. -
Page 22: Using The Videophone
a. Using the videophone • When a visitor calls, your handset will ring, the monitor will be lit up and you will be able to see the visitor. •Once you have identified the visitor, pick up the handset from the monitor and speak with him (for about 2 mn 30 at maximum before the image disappears automatically). -
Page 23: Einstellungen Der Video Sprechanlage
a. Utilização do videofone • Quando uma pessoa preme o botão exterior, ouve-se a chamada, o ecrã ilumina-se e o rosto do visitante aparece. • Uma vez identificado o visitante, atenda o telefone do ecrã e converse com este (durante cerca de 2 mn 30 máx. - Page 24 Um Ihren zusätzlichen Monitor zu gebrauchen, beziehen Sie sich bitte auf die Bedienungsanleitung vom Visiophonset WEVP 231 E BIS. Sollten Sie Hilfe benötigen steht Ihnen unsere technische Website zur Verfügung www.cfi-extel.com c. Use the videophone with additional monitor WEPVPMS 231 E BIS (wiring p.
- Page 25 - abrir una cerradura eléctrica Para el uso de su monitor adicional, gracias por referirse a las instrucciones de uso del kit videoportero WEVP 231 E BIS Si fuera necesario, nuestra página Web técnica está a su disposición: www.cfi-extel.com/Asistencia técnica: (34) 93 772 85 47/exteliberica@extelitalia.com c.
- Page 26 6. CARACTÉRISTIQUES / TECHNISCHE GEGEVENS / ECHNISCHE EIGENSCHAFTEN / CHARACTERISTICS / CARATTERISTICHE / CARACTERÍSTICAS / CARACTERÍSTICAS Straatunit (camera) Trafo Monitor Referentie : 820231 830231 Referentie : Referentie : 810231 C-MOS / 55° Kleurencamera Hoek van de beeldopname : Adapter 230 VAC / 14 VDC Voeding : 230 V - 50 Hz : 10,5 V Voeding...
- Page 27 90301 •Alle elektrische schootplaten Extel : WECA 90201, WECA 90301, WECA 90501. •Alle elektrische sloten Extel : WE 5001/2 bis, WE 5002/2 bis, WE 5003/2 bis en WE 5004/2 bis •Alle automatismen Extel : WEATV2, WEATB2 en WEATC2. •Extra monitor WEVPMS 231 E BIS.
-
Page 28: Assistance Technique / Garantie
Vous pouvez également appeler notre Assistance Technique : AUDIOTEL 0892 350 069 Ou consulter notre Site technique EXTEL : “www.cfi-extel.com”, Rubrique : Assistance technique. Cet appareil est garanti 1 an dans nos ateliers. Le ticket de caisse vous sert de preuve d’achat. -
Page 29: Technische Hulpverlening / Garantie
- Kabel van slechte kwaliteit of doorgesneden - Een korte bedrading uitvoeren om de installatie te controleren Technische website EXTEL raadplegen : “www.cfi-extel.com”, Rubriek : technische hulpverlening. Dit toestel geniet 1 jaar garantie in onze werkplaatsen. De kassabon dient als aankoopbewijs. -
Page 30: Assistenza Tecnica / Garanzia
También puede llamar a nuestra Asistencia Técnica: (34) 93 772 85 47 ( exteliberica@cfi-extel.com) O consultar nuestra página Web técnica EXTEL: “www.cfi-extel.com”, Rúbrica: Asistencia técnica. Este aparato está garantizado 1 año en nuestros talleres. El recibo de caja sirve como prueba de compra.
Need help?
Do you have a question about the WEVP 231 E BIS and is the answer not in the manual?
Questions and answers