Advertisement
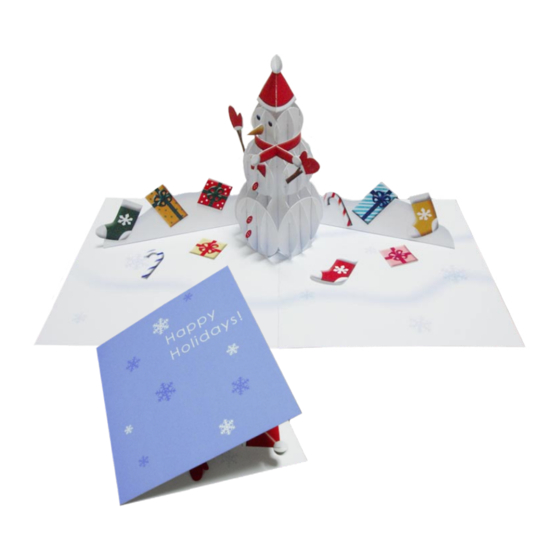
Pop-up Card(Snowman): Assembly Instructions
PAGE01
Cut out the parts and fold them along the fold lines on each.
Part A
Part B
Part C
Part D
Part H (2 pieces)
Part I (2 pieces)
Part J (2 pieces)
Slot parts A and B together at slot No. 1.
Slot part C onto the part you made in step 2, at slot No. 2.
Slot part D onto the part you made in step 3, at slot No. 3.
Part E
Part F
Part G (4 pieces)
Snowy mountain
Advertisement
Table of Contents

Subscribe to Our Youtube Channel
Related Manuals for Canon Creative Park Pop-up Card (Snowman)


Summary of Contents for Canon Creative Park Pop-up Card (Snowman)
- Page 1 Pop-up Card(Snowman): Assembly Instructions Cut out the parts and fold them along the fold lines on each. Part A Part B Part C Part D Part E Part F Part G (4 pieces) Part H (2 pieces) Part I (2 pieces) Part J (2 pieces) Snowy mountain Slot parts A and B together at slot No.
- Page 2 Pop-up Card(Snowman): Assembly Instructions Slot part E onto the part you made in step 4, at slots No. 4, 5, 6, 7 and 8. Slot part H onto the part you made in step 7, at slots No. 17, 18 and 19. Slot part F onto the part you made in step 5, at slots No.
- Page 3 Pop-up Card(Snowman): Assembly Instructions Fold the ends of the scarf along the fold line, and glue to the back. Attach together at the hat's glue tabs. Use a cylindrical rod to curl the scarf and make it flexible. Assemble the pom-pom by slotting together. Wrap it around the snowman's neck, using the slot to cross it at the front.
- Page 4 Pop-up Card(Snowman): Assembly Instructions Attach the base together at the glue tab. Add decorations to the card as you wish. Insert the snowman's lower glue tabs into the slot and glue them to the Stick on a colored paper cover onto half of the rear side of the base paper. underside of the base paper.
Need help?
Do you have a question about the Creative Park Pop-up Card (Snowman) and is the answer not in the manual?
Questions and answers