Table of Contents
Advertisement
Quick Links
SPECIFICATION & INSTALLATION GUIDE
FREEFRAME FP7 v3
Mobile Stand for Flat Panel Display
with Motorized Raise and Lower
Copyright ©2015 Wilson & Gilkes. All rights reserved.
www.gilkon.com.au
email:
sales@whiteboardsandpinboards.com.au
phone: 1300 849 152
All specifications are subject to change without notice.
Advertisement
Table of Contents

Related Manuals for GILKON FREEFRAME FP7 v3


Summary of Contents for GILKON FREEFRAME FP7 v3
- Page 1 SPECIFICATION & INSTALLATION GUIDE FREEFRAME FP7 v3 Mobile Stand for Flat Panel Display with Motorized Raise and Lower www.gilkon.com.au email: sales@whiteboardsandpinboards.com.au phone: 1300 849 152 Copyright ©2015 Wilson & Gilkes. All rights reserved. All specifications are subject to change without notice.
-
Page 2: Table Of Contents
3. PACKAGE CONTENTS Page 4 4. SPECIFICATIONS Page 5-6 5. INSTALLATION: Attach feet & gussets Page 7 6. INSTALLATION: Stand FREEFRAME FP7 v3 upright Page 8 7. INSTALLATION: Attaching the display Page 9 8. INSTALLATION: Attach laptop shelf (optional) Page 10 9. -
Page 3: Disclaimer
1. DISCLAIMER Wilson & Gilkes Pty Ltd, intends to make this manual accurate and complete. However, Wilson & Gilkes Pty Ltd makes no claim that the information contained herein covers all details, conditions or variations, nor does it provide for every possible contingency in connection with the installation or use of this product. -
Page 4: Warnings & Safety Instructions
● When the FREEFRAME FP7 v3 is not in use, lock the castors. ● Make sure the fully raised height of the FREEFRAME FP7 v3 does not exceed the height of the building/room the FREEFRAME FP7 v3 will be used in. -
Page 5: Package Contents
NOTE: Packaged contents may look different to content shown in diagrams OPTIONAL Mobile Learning Display Kit Camera Mount (Qty: 1) Electric Mobile Feet Gusset (Qty: 2) (Qty: 4) FREEFRAME FP7 v3 Frame (Qty: 1) Vesa Mount (Qty: 1) Keyboard & Mouse Pocket (Qty: 1) Fastener kit Fastener kit... -
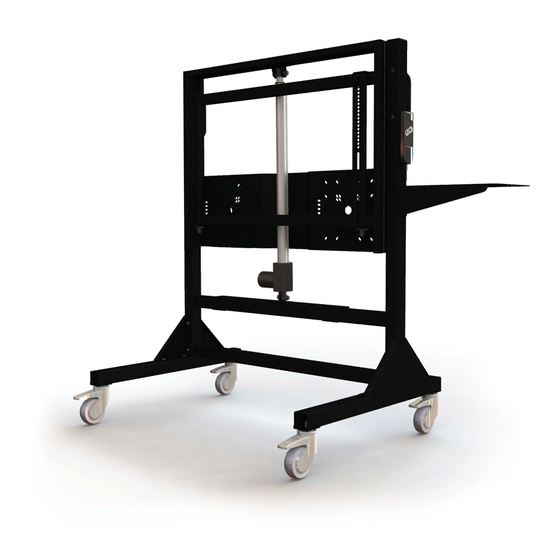
Page 6: Specifications
4. SPECIFICATIONS Mobile Stand for Flat Panel Displays with Motorized Raise and Lower Model: FP7 v3 Copyright ©2015 Wilson & Gilkes. All rights reserved. All specifications are subject to change without notice. - Page 7 Depth 758mm Depth of FREEFRAME FP7 v3 Page 5 Width 1050mm Width of fully assembled FREEFRAME FP7 v3 without display screen Page 5 attached Copyright ©2015 Wilson & Gilkes. All rights reserved. All specifications are subject to change without notice.
-
Page 8: Installation: Attach Feet & Gussets
(1) Lift FREEFRAME FP7 v3 out of the carton. WARNING! If required, use the carton as support for the ● FREEFRAME FP7 v3 UNIT EXCEEDS 15KG. TWO MEN OPERATION REQUIRED. attaching the feet. (2) Attached the feet & gussets to the uprights... -
Page 9: Installation: Stand Freeframe Fp7 V3 Upright
6. INSTALLATION: Stand FREEFRAME FP7 v3 upright (1) Once the feet are attached, tilt the FREEFRAME FP7 v3 assembly forward to stand on the castors on the feet. WARNING! ● Apply brakes to castors (2) Lock the castors in place to stop the FREEFRAME FP7 v3 from moving. -
Page 10: Installation: Attaching The Display
7. INSTALLATION: Attaching the display (1) To mount the display onto the mobile stand, attach hook arms to the mounting points at the back of the display. The lock of the hook arms should be at the lower side of the display screen. -
Page 11: Installation: Attach Laptop Shelf (Optional)
8. INSTALLATION: Attach laptop shelf (OPTIONAL) (1) Attach the shelf to the mobile stand with 2 M8 x 16 button head screws. Firmly tighten screws with supplied Allen key. Copyright ©2015 Wilson & Gilkes. All rights reserved. All specifications are subject to change without notice. -
Page 12: Instruction: Raising & Lowering
9. INSTRUCTION: Raising & lowering (1) To raise or lower the board, use the switch mounted on the rear side of the FREEFRAME FP7 v3. Copyright ©2015 Wilson & Gilkes. All rights reserved. All specifications are subject to change without notice. -
Page 13: Instruction: Moving Freeframe Fp7 V3
10. INSTRUCTION: Moving FREEFRAME FP7 v3 WARNING! ● Wheeling FREEFRAME FP7 v3 in the incorrect way may cause the stand to tip backwards. (1) Correct way to push the FREEFRAME FP7 v3, from the handles on the side for more stable movement. -
Page 14: Instruction: Assembly For Mobile Learning Display Kit (Optional)
11. INSTRUCTION: Assembly of Mobile Learning Display Kit (OPTIONAL) (1) Assemble camera mount using x2 M6 x 12 BHC Screws & Washers. (2) Assemble VESA mount plate using x4 M4 x 10 PH Screws & Washers. (3) Assemble Keyboard & Mouse Pocket using x4 M5 Flange Nuts.
Need help?
Do you have a question about the FREEFRAME FP7 v3 and is the answer not in the manual?
Questions and answers