Table of Contents
Advertisement
Available languages
Available languages
Quick Links
Advertisement
Chapters
Table of Contents

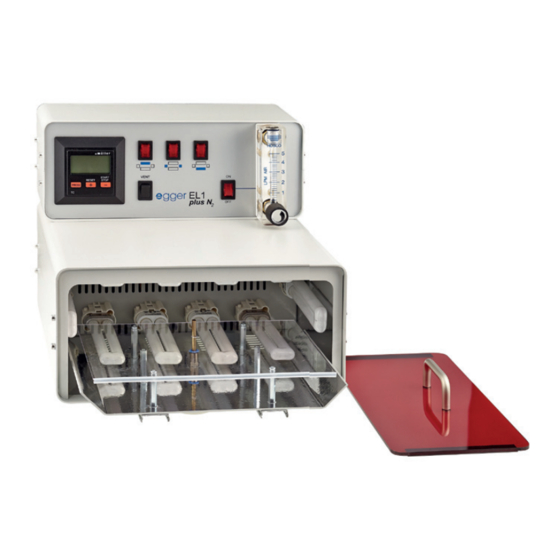
Summary of Contents for Egger EL 1 plus N2
- Page 1 EL 1 plus N Bedienungsanleitung Operating instruction REF 51110 (230 V) Deutsche Anleitung: Seite 1-12 English version see: page 13-24 egger Otoplastik + Labortechnik GmbH Aybühlweg 59 87439 Kempten/Germany...
-
Page 2: Table Of Contents
EL 1 plus N Bitte lesen Sie die Betriebsanleitung aufmerksam, bevor Sie mit dem Gerät arbeiten! Bewahren Sie die Betriebsanleitung zum späteren Ge- brauch an einem sicheren Ort auf! Inhaltsverzeichnis Seite Legende Allgemeines Wichtige Information Sicherheitshinweise 2.1 Sicherheitsbewusst arbeiten... -
Page 3: Allgemeines
Das Lichtpolymerisationsgerät egger EL 1 plus N ist eine schen. Weiterentwicklung des Gerätes egger EL 1. Anstelle von Glyzerin verwendet das egger EL 1 plus Das Lichtpolymerisationsgerät egger EL 1 plus N wurde Gas* zur Endhärtung der Otoplastiken, Schalen und für die unten beschriebenen Anwen-dungen speziell ent-... -
Page 4: Sicherheitsbewusst Arbeiten
• Lüftungsschlitze am Gerät nicht abdecken. Keine bitte sofort uns bzw. Ihrem Händler melden. Gegenstände durch die Lüftungsschlitze stecken. • Das Gerät nur an zugelassene Steckdosen anschließen. Das Lichtpolymerisationsgerät egger EL 1 plus N enthält: • Anerkannte Regeln für Arbeitssicherheit beachten. 1 Gerät mit Lichtschutzdeckel • Mit diesem Gerät werden lichthärtende Materialien... -
Page 5: Ersatzteile/Zubehör
EL 1 plus N 3.3 Ersatzteile und Zubehör für Lichtpolymerisations- • Verbinden Sie das Ende des Druckschlauches mit gerät egger EL 1 plus N2 dem Druckminderer der Gasflasche. • Stecken Sie den Druckschlauch in die Schnellkupplung UVA- Lichtröhre REF 50103 an der Geräterückseite (bis Anschlag). -
Page 6: Bedienung
EL 1 plus N Einschalter für Gas 3.5 Bedienung des Lichtpolymerisationsgerätes egger EL 1 plus N2 • Ort: Frontplatte des Gerätes. • Funktion: Aktivierung des Gases. In Stellung „EIN“ Hauptschalter findet die Polymerisation unter Nitro-gengas statt. Die • Ort: Rückseite des Gerätes. -
Page 7: Arbeiten Mit Den Lichtpolymerisaten
Display blinkt das Glockensymbol. Der Timer springt nach sonal verarbeitet werden. Die Verarbeitung der Lacke Ablauf automatisch auf die zuletzt eingestellte Zeit. sollte unter einem Abzug erfolgen (z. B. egger S/AB Timer REF 61400). Die Lackierpinsel immer nur für eine Lackart Rücksetzen des Timers auf 0:00:00 verwenden. -
Page 8: Mit Gas Nachpolymerisieren
Bei einem IdO-Gerät kann das spezielle Erkogum • Nach der Polymerisation wird die Otoplastik in der (REF 30911) direkt an der geöffneten Batterieklappe Plastikbox unter Gas im Lichtgerät egger EL 1 plus befestigt werden. für 5 Minuten nachpolymerisiert. Dieser Vorgang... -
Page 9: Wartung
EL 1 plus N 4.7 Modifikationen/Reparaturen mit den Modellier- • Stecken Sie die neuen Röhren einfach in die Fassung pasten bis diese eingerastet sind. Die LP/H Modellierpasten können vielseitig für verschie- • Das Gerät ist nun wieder einsatzbereit und kann mit dene Modifikationen und Reparaturen bei allen Arten von dem Stromnetz verbunden werden. -
Page 10: Anordnung Der Lichtröhren
BLAU Geben Sie bitte folgende Daten an: Gerätetyp: BLAU BLAU Elektrisches Lichtpolymerisationsgerät egger EL 1 plus N 5.4 Austausch der Reflektorfolie (REF 51110) Serien-Nr.: Die Polymerisationsleistung des Lichtgerätes hängt von der Sauberkeit der Lichtkammer ab. Die eingebauten Re- flektoren (REF 51104) optimieren die Bestrahlungsstärke siehe Typenschild) und müssen immer in sauberem Zustand sein, da sich... - Page 11 EL 1 plus N Operating instruction REF 51110 (230 V)
- Page 12 EL 1 plus N Operating instructions egger EL 1 plus N REF 51110 (230 V), REF 51119 (115 V) Please read the operating instructions carefully before working with the device! Please keep the operating instructions in a safe place for...
-
Page 13: General
Consequently, this guarantees an The electrical light-curing unit egger EL 1 is used optimal surface and depths polymerization. for the polymerization of UV-curing LP materials, mo- The built-in controllable ventilator prevents the light deling pastes and lacquers. -
Page 14: For A Safety Conscious Work Environment
• The device must be repaired by the manufacturer only. 3.2 Technical data of the light-curing unit egger EL 1plus N • The unit must be switched off during service and Power supply: 230 V +/- 10% (or 115 V) -
Page 15: Spare Parts And Accessories
3.4 Assembling and connecting the unit • Plug in the mains cable. The electrical light-curing unit egger EL 1 plus N cor- • Before opening the gas cylinder valve, the outlet... -
Page 16: Operation
EL 1 plus N Gas switch 3.5 Operation of the light unit egger EL 1 plus N • Position: Front plate of the unit. Main switch • Function: Starts the gas flow. If the switch is positi- • Position: Reverse side of the unit. -
Page 17: Polymerization Without Gas
Processing of the lacquers should be done beneath Reset the timer to 0:00:00 an absorbing device (e.g. egger S/AB Timer REF 61400). • Simultaneously press the 3 buttons briefly and the Always use the lacquering brushes for one type of lac- timer will go to 0:00:00. -
Page 18: Post-Curing With Gas
• Insert the curing material into the plastic box. • Then, let the lacquer cure in the egger light unit for • The curing materials must not touch each other! about 2 – 4 minutes. The earmold can then immedi- • Insert shells and ventings into the plastic box with the... -
Page 19: Maintenance
EL 1 plus N 4.7 Modifications/Repairs with Modeling Pastes • The unit is now ready for action and can be connec- The LP/H modeling pastes can be universally used for ted to the mains supply. various modifications and repairs with all kinds of hard • Used light tubes are hazardous waste and the legal... -
Page 20: Arrangement Of The Light Tubes
In case of improper handling of the electric light- curing unit egger EL 1 plus N all guarantee and warranty claims will become extinct! egger Otoplastik + Labortechnik GmbH · Aybühlweg 59 · 87439 Kempten / Germany...


Need help?
Do you have a question about the EL 1 plus N2 and is the answer not in the manual?
Questions and answers