Advertisement
Table of Contents
9889 Garrymore Ln
Missoula, MT 59808
888-687-3552 | +1-406-549-0769
www.aquacreek.com
Check entire box and all packing materials for parts. Before beginning assembly, read the
instructions and identify parts using the fi gures and parts listed in this document.
It is critical that all parts be carefully inspected prior to installation. If any damage occurred in
transit, Aqua Creek Products, LLC must be notifi ed within three days of receipt of unit.
Proper installation cannot be overstressed, as an improper installation voids Aqua Creek's
warranty and may affect the safety of the user.
Copyright © 2018 Aqua Creek Products All Rights Reserved
Cycle Attachment
LEAVE THIS MANUAL WITH LIFT OWNER
Lift safety can only be ensured if the lift is installed
and operated according to these instructions.
• NEVER permit children to play on or around the lift
• Do not allow children to use the lift without adult
supervision
• NEVER apply direct water pressure to the
electronics
• NEVER use the lift with a dry pool
• For safety reasons, NEVER swim alone
READ CAREFULLY
Instructions
PART #: F-019CA-01
MANDATORY
Read and follow all instructions
1
Revised 2/21/18
Advertisement
Table of Contents

Related Manuals for Aqua Creek Products F-019CA-01


Summary of Contents for Aqua Creek Products F-019CA-01
- Page 1 It is critical that all parts be carefully inspected prior to installation. If any damage occurred in transit, Aqua Creek Products, LLC must be notifi ed within three days of receipt of unit. Proper installation cannot be overstressed, as an improper installation voids Aqua Creek’s warranty and may affect the safety of the user.
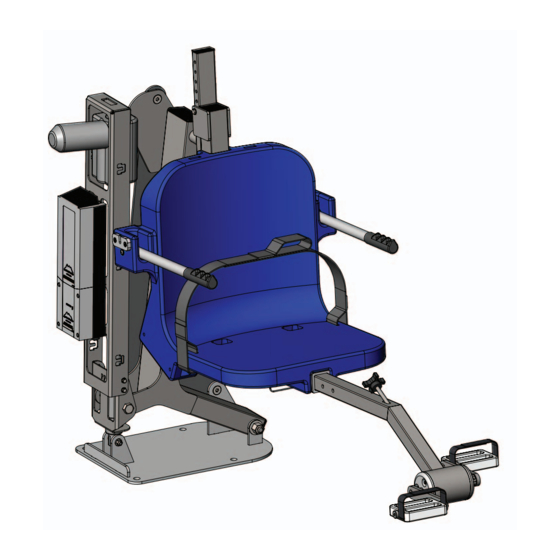
- Page 2 CA Sleeve (1) TENSION CA SLEEVE ADJUSTMENT KNOB PEDAL STRAP (2) 5/16" SPRING MAIN FRAME WITH LENGTH ADJUSTMENT HOLES (1" INC.) PLASTIC PEDAL (2) HUB CAP CRANK ARM FIGURE 1 Copyright © 2018 Aqua Creek Products All Rights Reserved Revised 2/21/18...
-
Page 3: Spring Pin
STEP 3: Install 5/16” spring pin into aligned INSERT IN NEAREST HOLE) holes, and clip the spring over the end. The Cycle Attachment is now ready for use. FIGURE 3 Copyright © 2018 Aqua Creek Products All Rights Reserved Revised 2/21/18... - Page 4 FIGURE 4 Once the Cycle Attachment has been installed onto an Aqua Creek Products’ lift it is ready for use. Make sure to always fasten the safety belt when using the lift. Once in the water, hold onto the hand-grips and pedal normally.
-
Page 5: Adjustment Options
Tension may be adjusted once in the water, and may be adjusted at any time during exercise, as shown in FIGURE 5 on the previous page. Try diff erent tension settings and length adjustments to fi nd your own “comfort zone”. Copyright © 2018 Aqua Creek Products All Rights Reserved Revised 2/21/18... -
Page 6: Parts List
3/8 NYLOCK JAM NUT, 316 SS SPA PIN 5/16 X 4 1/2 SS PIN, SS, SNAP PIN 5/16 X 4 1/2 BS 1/2 X 5 18-8 BOLT, 18-8 SS, 1/2 X 5 SHOULDER Copyright © 2018 Aqua Creek Products All Rights Reserved Revised 2/21/18... - Page 7 (ITEM #’s F-019CA) Aqua Creek Products, LLC (a.k.a. Aqua Creek) warrants to the original end user purchaser that products manufactured by Aqua Creek, when properly installed in accordance with assembly and installation instructions and properly used and maintained, shall be...
Need help?
Do you have a question about the F-019CA-01 and is the answer not in the manual?
Questions and answers