Table of Contents
Advertisement
Quick Links
Advertisement
Table of Contents

Related Manuals for Axia A60-005 GL

Summary of Contents for Axia A60-005 GL
- Page 1 Ceramic Hob Instruction Manual / Installation Manual MODEL: A60-005 GL...
-
Page 2: Table Of Contents
Content Foreword ..................3 1.1 Safety Warnings ................3 1.2 Installation .................. 3 1.2.1 Electrical Shock Hazard ........... 3 1.2.2 Cut Hazard ..............3 1.2.3 Important safety instructions ........... 3 1.3 Operation and maintenance ............4 1.3.1 Electrical Shock Hazard ........... 4 1.3.2 Health Hazard .............. -
Page 3: Foreword
Foreword Safety Warnings Your safety is important to us. Please read this information before using your cooktop. Installation 1.2.1 Electrical Shock Hazard Disconnect the appliance from the mains electricity supply before carrying out any work or maintenance on it. ... -
Page 4: Operation And Maintenance
incorporates an isolating switch providing full disconnection from the power supply. Failure to install the appliance correctly could invalidate any warranty or liability claims. Operation and maintenance 1.3.1 Electrical Shock Hazard Do not cook on a broken or cracked cooktop. If the cooktop surface should break or crack, switch the appliance off immediately at the mains power supply (wall switch) and contact a qualified technician. -
Page 5: Cut Hazard
1.3.4 Cut Hazard The razor-sharp blade of a cooktop scraper is exposed when the safety cover is retracted. Use with extreme care and always store safely and out of reach of children. Failure to use caution could result in injury or cuts. 1.3.5Important safety instructions ... - Page 6 Ceramic glass surface as this can scratch the glass. Do not use scourers or any other harsh abrasive cleaning agents to clean your cooktop, as these can scratch the Ceramic glass. If the supply cord is damaged, it must be replaced by the manufacturer, its service agent or similarly qualified persons in order to avoid a hazard.
-
Page 7: Product Introduction
Congratulations on the purchase of your new Ceramic Hob. We recommend that you spend some time to read this Instruction / Installation Manual in order to fully understand how to install correctly and operate it. For installation, please read the installation section. Read all the safety instructions carefully before use and keep this Instruction / Installation Manual for future reference. -
Page 8: Working Principle
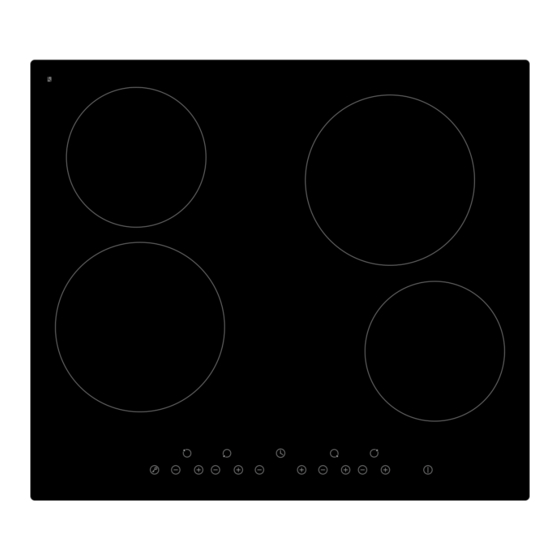
Read this guide, taking special note of the ‘Safety Warnings’ section. Remove any protective film that may still be on your ceramic hob. 2.6Technical Specification Cooking Hob A60-005 GL Cooking Zones 4 Zones Supply Voltage 220-240V~ 50/60Hz Installed Electric Power 5500-6600W Product Size D×W×H(mm) -
Page 9: Choosing The Right Cookware
3.2Choosing the right Cookware Do not use cookware with jagged edges or a curved base. Make sure that the base of your pan is smooth, sits flat against the glass, and is the same size as the cooking zone. Always centre your pan on the cooking zone. Always lift pans off the ceramic hob –... -
Page 10: Finish Cooking
3.3.2 Finish cooking Turn the cooking zone off by scrolling down to “ 0 ”or touching“-”and“+”control together Turn the whole cooktop off by touchingtheON/OFFcontrol. Beware of hot surfaces “H” will show which cooking zone is hot to touch. It will disappearwhen the surface has cooled down to a safe temperature. - Page 11 Timer overview Minute display shows the number Timer of minutes regulating control a) Using the Timer as a Minute Minder If you are notselecting any cooking zone Make sure the cooktop is turned on. Note: you can use the minute minder evenif you’re not selecting any cooking zone.
-
Page 12: Over-Temperature Protection
b) Setting the timer to turn one cooking zone off Set one zone Touch theorof the corresponding cooking zone you wantto set the timer for. Set the time by touching the or control of the timer Touching the“-”and“+” together, thetimer iscancelled, andthe“--”will show in the minute display. -
Page 13: Default Working Times
3.3.7Default working times Another safety feature of the hob is automatic shutdown.This occurs whenever you forget to switch offa cooking zone.The default shutdown times are shown in the table below: Power level Default working timer (hour) 4. Cooking Guidelines Take care when frying as the oil and fat heat up very quickly, particularly if you’re using PowerBoost.At extremely high temperatures oil and fat will ignite spontaneously and this presents a seriousfire risk. -
Page 14: Heat Settings
the meat to the pan and add your sauce. 6. Stir the ingredients gently to make sure they are heated through. 7. Serve immediately. 5. Heat Settings The settings below are guidelines only. The exact setting will depend on several factors, including yourcookware and the amount you are cooking. -
Page 15: Hints And Tips
Boilovers, melts, and Remove these immediately with • Remove stains left by melts and hot sugary spills on afish slice, palette knife or razor sugary food or spillovers as soon the glass bladescraper suitable for Ceramic as possible. If left to cool on the glasscooktops, but beware of hot glass, they may be difficult to cookingzone surfaces:... -
Page 16: Installation
The glass is being Rough-edged cookware. Use cookware with flat andsmooth scratched. bases. See ‘Choosingthe right cookware’. Unsuitable, abrasive scourer or See ‘Care and cleaning’. cleaning products being used. Some pans make This may be caused by the This is normal for cookware and crackling orclicking construction of your cookware does not indicate a fault. -
Page 17: Before Locating The Fixing Brackets
A(mm) B(mm) C(mm) 50 mini 20 mini Air intake Air exit 5mm 8.2 Before locating the fixing brackets The unit should be placed on a stable, smooth surface (use the packaging). Do not apply force onto thecontrols protruding from the hob. Fix the hob on the work surface by screw four brackets on the bottom of hob (see picture) after installation. -
Page 18: Cautions
8.3 Cautions 1. The ceramic cooker hob must be installed by qualified personnel or technicians. We have professionalsat your service. Please never conduct the operation by yourself. 2. The ceramic cooker hob shall not be mounted to cooling equipment, dishwashers and rotary dryers. 3. - Page 19 This appliance is labeled in compliance with Europeandirective 2012/19/EU for Waste Electrical and ElectronicEquipment (WEEE). By ensuring that this appliance isdisposed of correctly, you will help prevent any possibledamage to the environment and to human health, whichmight otherwise be caused if it were disposed of in the wrong way.