Table of Contents
Advertisement
Available languages
Available languages
Quick Links
RLV3150
ELECTRONIC THERMOSTAT
APPLICATION
This thermostat is designed to control
an electric heating system such as a
baseboard heater, a convector or a fan-
forced heater.
The thermostat cannot be used with the
following:
• a resistive load under 2 A
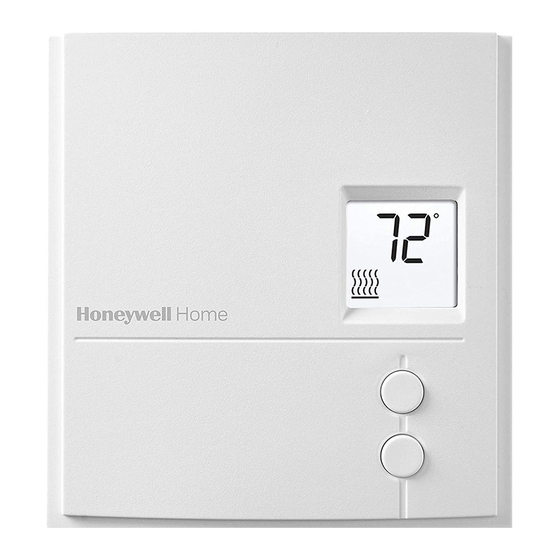
CONTROLS AND DISPLAY
Appears when the
setpoint is displayed
Heating intensity
indicator (the image
disappears when
heating is off)
• a resistive load over 12.5 A
• systems driven by a contactor or a
relay (inductive load)
• central heating systems
Supplied Parts
• One (1) thermostat
• Two (2) 6-32 mounting screws
• Two (2) solderless connectors
Backlit Screen
Up button
Down button
Temperature
Appears when the
thermostat is configured
for a fan-forced heater
(see page 3)
The settings are locked
Fig. 1.
USER GUIDE
33-00209EF-05
Advertisement
Table of Contents

Subscribe to Our Youtube Channel
Related Manuals for Honeywell Home RLV3150


Summary of Contents for Honeywell Home RLV3150
- Page 1 RLV3150 ELECTRONIC THERMOSTAT USER GUIDE APPLICATION • a resistive load over 12.5 A • systems driven by a contactor or a relay (inductive load) This thermostat is designed to control • central heating systems an electric heating system such as a...
- Page 2 RLV3150 INSTALLATION MOUNT THE GUIDELINES THERMOSTAT 1. Loosen the screw underneath the thermostat and separate the face- WARNING plate from the wallplate. TURN OFF POWER TO THE HEATING SYSTEM AT THE NOTE: The screw remains captive and MAIN POWER PANEL TO cannot be completely removed.
- Page 3 RLV3150 NOTE: If there is a protective film or can be turned On by raising the sticker on the thermostat’s setpoint using the Up button or screen, peel it off. turned Off by lowering the set- point using the Down button.
-
Page 4: Configuration Settings
RLV3150 CONFIGURATION SETTINGS Fig. 5. Configuration switches are on the back of the faceplate. Factory settings are inside gray cells. Parameter Down Lock Unlock Settings lock Fan Yes Fan-forced heater Unit °F °C 1. The thermostat buttons are dis- TEMPERATURE... -
Page 5: Setup Menu
RLV3150 SETUP MENU 4. When the last parameter is dis- played, press the Up and Down buttons for three seconds to save 1. Press the Up and Down buttons any changes and exit the menu. simultaneously for three seconds to enter the setup menu. -
Page 6: Specifications
RLV3150 SPECIFICATIONS Supply: 240 VAC, 60 Hz Minimum load: 2 A (resistive only) 500 W @ 240 VAC 273699 Maximum load: 12.5 A (resistive only) 3000 W @ 240 VAC Display range: 0°C to 50.0°C (32°F to 122°F) Setpoint range: 5.0°C to 30.0°C (41°F to 86°F) -
Page 7: Customer Assistance
RLV3150 CUSTOMER ASSISTANCE If you have any questions about the product installation or operation, or concerning the warranty, contact us at: Resideo 1985 Douglas Drive North Golden Valley, MN 55422 1-800-468-1502 For more information on our products, go to: honeywellhome.com CAUTION: ELECTRONIC WASTE NOTICE The product should not be disposed of with other household waste. - Page 8 © 2021 Resideo Technologies, Inc. All rights reserved. The Honeywell Home trademark is used under license from Honeywell International, Inc. This product is manufactured by Resideo Technologies, Inc. and its affiliates. Tous droits réservés. La marque de commerce Honeywell Home est utilisée avec l’autorisation d’Honeywell International, Inc.
-
Page 9: Commandes Et Affichage
RLV3150 THERMOSTAT ÉLECTRONIQUE GUIDE DE L’UTILISATEUR APPLICATION • charge résistive supérieure à 12,5 A • systèmes entraînés par un contacteur ou un relais (charge Ce thermostat est conçu pour réguler inductive) un système de chauffage électrique tel • systèmes de chauffage central qu'un chauffage de plinthe, un Pièces fournies... -
Page 10: Installation Directives
RLV3150 INSTALLATION MONTER LE DIRECTIVES THERMOSTAT 1. Desserrer la vis qui se trouve des- sous le thermostat et séparer la AVERTISSEMENT plaque frontale de la plaque COUPER L'ALIMENTATION murale. VERS LE SYSTÈME DE REMARQUE : La vis reste captive et ne... - Page 11 RLV3150 REMARQUE : Si l'écran du thermostat chauffage peut être mis en comporte un film protec- marche en augmentant le point de teur ou un autocollant, le consigne à l'aide du bouton Haut retirer. ou éteint en réduisant le point de consigne à...
-
Page 12: Affichage Et Réglage De La Température
RLV3150 RÉGLAGES DE CONFIGURATION Fig. 10. Les commutateurs de configuration sont à l'arrière de la plaque frontale. Les réglages d'usine sont à l'intérieur des cellules grises. N° Paramètre Haut Verrouillage Déverrouillage Verrouillage réglages Chauffage à ventilation Ventilateur Oui forcée Unité... -
Page 13: Menu De Configuration
RLV3150 • L'écran est rétroéclairé pendant 10 4. Lorsque le dernier paramètre est secondes lorsqu'un bouton affiché, appuyer simultanément quelconque est pressé. sur les boutons Haut et Bas pen- dant trois secondes pour enregis- trer toute modification et quitter le MENU DE menu. -
Page 14: Problèmes Et Solutions
RLV3150 PROBLÈMES ET SOLUTIONS Problèmes Solutions Le thermostat est chaud. Ceci est normal. En fonctionnement normal, le boîtier du thermostat peut atteindre une température entre 35 °C (95 °F) et 40 °C (104 °F). La température affichée Corriger si l’une des conditions suivantes existe : est erronée. -
Page 15: Garantie Limitée D'un An
RLV3150 GARANTIE LIMITÉE D'UN AN Resideo garantit ce produit, à l’exception des piles, contre tout défaut de pièce ou de main-d’oeuvre, durant une période pour un (1) an à partir de la date d’achat par le consommateur d’origine si le produit est utilisé et entretenu convenablement. En cas de défaillance ou de mauvais fonctionnement pendant la période de garantie,... -
Page 16: Service À La Clientèle
© 2021 Resideo Technologies, Inc. All rights reserved. The Honeywell Home trademark is used under license from Honeywell International, Inc. This product is manufactured by Resideo Technologies, Inc. and its affiliates. Tous droits réservés. La marque de commerce Honeywell Home est utilisée avec l’autorisation d’Honeywell International, Inc.
Need help?
Do you have a question about the RLV3150 and is the answer not in the manual?
Questions and answers
How do you turn the thermostat off for the summer
To turn off the Honeywell Home RLV3150 thermostat for the summer, switch off the power to the heating system at the main power panel. This prevents the thermostat from activating the heating system.
This answer is automatically generated