Advertisement
Quick Links
1
BEFORE INSTALLATION
Warning
Failure to follow the
instructions provided
and improper handling
may cause death or
serious injury.
Caution
Failure to follow the
instructions provided
and improper handling
may cause injury and/or
property damage.
This symbol indicates prohibition. The specific prohibited action is provided in and/or around the figure.
This symbol requires an action or gives an instruction.
GEN-IDCAM is a ZigBee passive infrared (PIR) motion sensor camera with pet-immune function. It is capable of sending wireless signals and captured
images (picture quality of up to 640 x 480 pixels) to the coordinator in the ZigBee network upon movement detection.
The PIR Camera is designed to give a typical detection range of 12 meters when mounted at 2 meters above ground. It has a pet-immune range of 7
meters and will not trigger false alarm from your household pets within this distance.
The PIR Camera utilizes ZigBee technology for wireless signal transmission. ZigBee is a wireless communication protocol that is reliable and has low
power consumption and high transmission efficiency. Based on the IEEE802.15.4 standard, ZigBee allows a large amount of devices to be included in a
network and coordinated for data exchange and signal transmission
The PIR Camera serves as an end device in the ZigBee network. It can be included in the ZigBee network to transmit signal upon activation, but cannot
permit any other ZigBee device to join the network through the PIR.
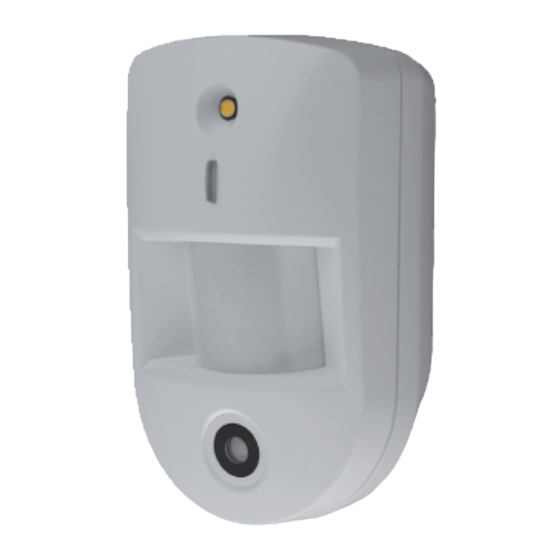
2
PARTS IDENTIFICATION
1.
Flash LED
The Flash LED delivers sufficient light for image capture under low lighting condition.
Both the Flash LED and the Blue LED will flash once when the Function Button is pressed for 10 seconds to indicate the PIR Camera has been reset.
2.
Blue LED/Function Button
LED Indication
The Blue LED lights up in the following conditions.
The Blue LED flash once every 20 minutes
The PIR Camera has lost connection to its current ZigBee network.
The Blue LED lights up for 30 seconds:
The PIR Camera is warming up when fault(s) exists in the PIR Camera.
The Blue LED flashes twice quickly:
The PIR Camera has successfully joined a ZigBee network after factory reset.
The Blue LED lights up for 2 seconds under normal operation:
The PIR Camera has detected a movement when fault(s) exists in the PIR Camera.
The Blue LED flashes rapidly
PIR Camera is transmitting pictures to the coordinator of the ZigBee network when fault(s) exists in the PIR
Camera.
The Blue LED and Flash LED flash once
PIR Camera has been reset.
Function Button Usage
To send a supervision signal, press the button once.
To reset the PIR Camera, press and hold the button for 10 seconds. Release the
button when both the Flash LED and the Blue LED flash once
3.
IR Sensor
The sensor is intended to detect moving objects.
4.
PIR Camera Lens
5.
Battery Compartment Cover
6.
Battery Compartment Screw
7.
Tamper Switch
When the PIR Camera is properly installed, the Tamper switch will be activated when the PIR
Camera is removed from mounting surface, or its cover opened. The Tamper switch is restored
when the PIR Camera is installed properly and its cover secured.
8.
Battery Compartment
9.
Jumper Switch (JP2)
Do not touch the unit base or power terminals of the product with a wet hand. (Also, if the product is wet
after rain, do not touch it.) It may cause electric shock.
Never attempt to disassemble or repair the product. It may cause fire or damage to the devices.
[Handling of Batteries]
Fire, explosion and severe burn hazard. Do not recharge, short circuit, crush, disassemble, heat above 100°C,
Incinerate, or expose contents to water. Do not solder directly to the cell.
Do not pour water over the product. The water may enter and may cause damage to the devices.
Clean and check the product periodically for safe use. If any problem is found, do not attempt to use the product
as it is and inform your installer.
If you do not use the product for a long period of time, remove the battery. Keep it in a cool, dark area.
Dispose batteries according to local regulations.
592540-0
INSTALLATION INSTRUCTIONS
Advertisement

Related Manuals for Optex Gen-IDCAM

Summary of Contents for Optex Gen-IDCAM
- Page 1 This symbol requires an action or gives an instruction. GEN-IDCAM is a ZigBee passive infrared (PIR) motion sensor camera with pet-immune function. It is capable of sending wireless signals and captured images (picture quality of up to 640 x 480 pixels) to the coordinator in the ZigBee network upon movement detection.
- Page 2 Jumper On Jumper Off The jumper link is inserted if the jumper link is removed connecting the two pins. or “parked” on one pin. Jumper On: After transmitting for a detected movement, any further movement detection will transmit the event code again (and the captured images) (default).
- Page 3 REMOVING DEVICE FROM ZigBee NETWORK (FACTORY RESET) To remove the PIR Camera from current ZigBee network, the PIR Camera must be put to Factory Reset to complete device removal. Factory Reset function will clear the PIR Camera of its stored setting and information and prompt the PIR Camera to search for new ZigBee network. Before removing device, make sure the PIR Camera is within current ZigBee network signal range Step1.
- Page 4 Write Unsigned 8-bit Read 0x0011 ZONE_ID 0xFF integer only SPECIFICATIONS Model GEN-IDCAM Detection method Passive infrared PIR Camera 7.0 m 90° wide Coverage Frequency 2.4 GHz Power source L91 Lithium battery: 2 units Battery life Approx. 2.5 years (1 activations per day, 25°C) Operating conditions -10°C to +50°C (up to 85% non-condensing)
Need help?
Do you have a question about the Gen-IDCAM and is the answer not in the manual?
Questions and answers