Briggs & Stratton Portable Generator Operator's Manual
Briggs & stratton portable generator user manual
Hide thumbs
Also See for Portable Generator:
- Operator's manual (76 pages) ,
- Owner's manual (52 pages) ,
- System manual (44 pages)
Table of Contents
Advertisement
Available languages
Available languages
Quick Links
Advertisement
Chapters
Table of Contents

Related Manuals for Briggs & Stratton Portable Generator


Summary of Contents for Briggs & Stratton Portable Generator
- Page 1 ® PortableGenerator Operator's Manual This generator is rated in accordance with CSA(Canadian Standards Association) standard 022.2 No. 100-04 (motors and generators). BRIGGS & STRATTON POWER PRODUCTS GROUP, LLC JEFFERSON, WISCONSIN, U.S.A. Printed in U.S.A. Manual No. 197523GS Revision H (03/12/2009)
-
Page 2: Where To Find Us
Thankyou for purchasing this quality-built Briggs & Stratton generator. We are pleasedthat you've placed your confidence in the Briggs & Stratton brand. When operated and maintained according to the instructions in this manual, your Briggs & Stratton generator will provide many years of dependable service. This manual containssafety information to make you aware of the hazards and risks associated with generator products and how to avoid them. -
Page 3: Table Of Contents
Tableof Contents Operator Safety ... Equipment Description... Safety Rules... Assembly ... Unpack Generator ... Install Wheel Kit... Add Engine Oil ... Add Fuel... Attach Negative Battery Cable ... System Ground ... Connecting to a Building's Electrical System... Generator Location ... Featuresand Controls... -
Page 4: Operator Safety
Operator Safety Equipment Description Read this manual carefully and becomefamiliar ... with your generator. Knowits applications, its limitations and any hazards involved. The generator is an engine-driven, revolving field, alternating current (AC) generator. It was designedto supply electrical power for operating compatible electrical lighting, appliances, tools and motor loads. - Page 5 Using a generator indoors CAN KILL YOU IN MINUTES. Generator exhaust contains carbon monoxide. This is a poison you cannot see or smell. NEVER use inside a home Only use OUTSIDE and or garage, EVEN IF doors far away from windows, and windows are open.
- Page 6 _i, WARNING Contact with muffler area can result in serious burns. Exhaust heat/gases can ignite combustibles, structures or damage fuel tank causing a fire. • DO NOTtouch hot parts and AVOID hot exhaust gases. • Allow equipment to cool before touching. •...
-
Page 7: Assembly
Assembly Your generator requires some assembly and is ready for use after it has been properly serviced with the recommended fuel and oil. If you haveany problems with the assembly of your generator, pleasecall the generator helpline at (800} 743-4115. If calling for assistance, pleasehavethe model, revision, and serial number from the identification label available.See Generator Controls and Featuresfor identification label location. -
Page 8: Add Engine Oil
Add Engine Oil 1. Place generator on a flat, level surface. 2. Cleanarea around oil fill and remove yellow oil fill cap. 3. Using oil funnel (optional), slowly pour contents of provided oil bottle into oil fill opening. NOTICE Improper treatment of generator can damage it and shorten its life. -
Page 9: Systemground
3. Slide lock washer, flat washer and negative battery cable (G) over screw. 4. Reattach screw to negative battery terminal and tighten. 5. Verify that connections to battery and generator are tight and secure. NOTE:Charge prior to use following the instructions in the section Battery Float Charger. -
Page 10: Safety Rules
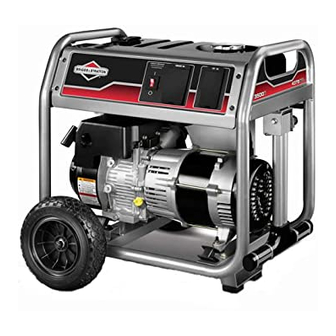
Featuresand Controls Read this Operator'sManual and safety rules beforeoperating yourgenerator. Compare the illustrations with your generator, to familiarize yourself with the locations of various controls and adjustments. Save this manual for future reference. A- FuelTank -- Capacity of seven (7) U.S. gallons (26.5 L). B - 120 Volt AC, 20 Amp, Duplex Receptacles -- May be used to supply electrical power for the operation of 120 Volt AC, 20 Amp, single phase, 60 Hz electrical,... -
Page 11: Cordsets And Receptacles
CordSets and Receptacles Use only high quality, well-insulated, grounded extension cords with the generator's 120 Volt duplex receptacle. Inspect extension cords before each use. Checkthe ratings of all extension cords before you use them. Extension cord sets used should be rated for 125 Volt AC loads at 20 Amps or greater for most electrical devices. -
Page 12: Battery Floatcharger
Battery FloatCharger Use battery float charger jack to keep the starting battery charged and ready for use. Battery charging should be done in a dry location, such as inside a garage. 1. Plug charger into unit's "Battery Float Charger" jack, which is located next to the start switch. -
Page 13: Operation
Operation Starting the Engine IMPORTANT:Always unplug the battery float charger before starting the generator. Disconnect all electrical loads from the generator. Use the following start instructions: 1. Make sure unit is on a level surface. IMPORTANT:Failureto start and operate the unit on a level surface will cause the unit not to start or shut down during operation. -
Page 14: Connecting Electrical Loads
Connecting Electrical Loads 1. Let engine stabilize and warm up for a few minutes after starting. 2. Plug in and turn on the desired 120 and/or 240 Volt AC, single phase, 60 Hz electrical loads. NOTE: • DONOT connect 240 Volt loads to the 120 Volt duplex receptacles. -
Page 15: Don't Overload Generator
Don't Overload Generator Capacity You must make sure your generator can supply enough rated (running) and surge (starting) watts for the items you will power at the same time. Follow these simple steps: 1. Select the items you will power at the same time. 2. -
Page 16: Maintenance
Maintenance MaintenanceSchedule Follow the hourly or calendar intervals, whichever occurs first. More frequent service is required when operating in adverse conditions noted below. • Changeengine oil • Cleandebris • Check engine oil level • Service engine air cleaner' • Change engine oiP •... -
Page 17: Enginemaintenance
EngineMaintenance A. WARNING Unintentional sparking can result in fire or electric shock. WHEN ADJUSTING ORMAKING REPAIRS TOYOUR GENERATOR • Disconnect the sparkplugwirefrom the sparkplugand place the wirewhereit cannotcontactsparkplug. WHEN TESTING FORENGINE SPARK • Useapproved sparkplugtester. • DONOTcheckfor sparkwith sparkplugremoved. Oil Recommendations We recommend the use of Briggs &... - Page 18 Service A ir Cleaner Your engine will not run properly and may be damaged if you run it with a dirty air cleaner. Replacemore often if operating under dirty or dusty conditions. To service the air cleaner, follow these steps: 1.
- Page 19 To remove muffler heat shield (A) from muffler (B), remove four screws that connect guard to muffler bracket. 2. Remove four screws that attach spark arrester screen (c). 3. Inspect screen and obtain a replacement if torn, perforated or otherwise damaged. DO NOT use a defective screen.
-
Page 20: Storage
Storage The generator should be started at least once every seven days and allowed to run at least 30 minutes. If this cannot be done and you must store the unit for more than 30 days, use the following guidelines to prepare it for storage. GeneratorStorage •... -
Page 21: Troubleshooting
Troubleshooting Problem Cause 1. One of the circuit breakers is open. 2. Fault in generator. Engine is running, but no AC 3. Poor connection or defective cord set. outputis available. 4. Connected device is bad. 1. Short circuit in a connected load. 2. -
Page 22: Emissions Control System Warranty
Warranties California, U.S. EPA,and Briggs& Stratton CorporationEmissionsControlWarranty Statement YourWarranty RightsAnd Obligations The California Air Resources Board, U.S. EPA,and Briggs & Stratton (B&S) are pleasedto explain the emissions control system warranty on your Model Year 2008 and later engine/equipment. In California, new small off-road engines must be designed, built, and equipped to meet the State's stringent anti-smog standards. - Page 23 The warranty on emissions-related parts is as follows: • Any warranted part that is not scheduled for replacement as required maintenancein the owner's manual supplied, is warranted for the warranty period stated above. If any such part fails during the period of warranty coverage, the part will be repaired or replaced by B&S at no charge to the owner.
- Page 24 Similarly, the warranty is void if the manufacturing date or the serial number on the portable generator has been removed or the equipment has been altered or modified.
- Page 25 Reserved...
-
Page 26: Product Specifications
Product S pecifications Starting Wattage ... Wattage* ..AC Load Current: at 120 Volts ... at 240 Volts ... Phase ... Rated Frequency ... Displacement ... Spark Plug Gap ... Fuel Capacity ... Oil Capacity ... CommonServiceParts Air Cleaner ... Resistor Spark Plug ... - Page 27 ® GeneradorPortdtil Manualdel Operario Este generador est_ clasificado conforme a la norma C22.2 No. 100-04 (motores y generadores) de la CSA (Canadian Standards Association [Asociaci6n canadiense de normalizaci6n]). BRIGGS & STRATTON POWER PRODUCTS GROUP, LLC JEFFERSON, WISCONSIN, U.S.A.
- Page 28 IVluchas gracias por comprar este generador Briggs & Stratton de gran calidad. Nos alegra que haya depositado su confianza en la marca Briggs & Stratton. Siempre que sea utilizado de acuerdo con las instrucciones de este manual, su generador Briggs & Stratton le proporcionar_,muchos aSos de buen funcionamiento. Este manual contiene informaciOn sobre seguridad para hacerleconsciente de los riesgos asociados a los generadores y mostrarle cOmoevitarlos.
- Page 29 Tablade Contenido Seguridad de operario ... Descripci6n del equipo ... Reglas de seguridad ... IVlontaje ... Desembalajedel generador ... Instale el juego de ruedas ... Agregar aceite al motor ... Agregue combustible ... Conecteel cable negativo de la baterfa ... Tierra del sistema ...
-
Page 30: Seguridadde Operario
Seguridadde operario Descripci6ndel equipo Lea atentamente este manual y familiaricese con el generador. Conozcasus aplicaciones, limitacionesy riesgos. Este generador funciona en base a un motor de campo el6ctrico giratorio y de corriente alterna (CA). Fuedise_ado con la finalidad de proveer energia el6ctrica para lamparas el6ctricas, aparatos, herramientasy cargas de motor compatibles. - Page 31 El uso de un generador en un espacio interior PUEDE PROVOCAR LA MUERTE EN POCOS MINUTOS. Los gases de escape del generador contienen monbxido de carbono, un veneno invisible e inodoro. Utilicelo NUNCA utilice un generador en el interior de una casa o EXTERIOR, un garaje, AUNQUE haya ventanas,...
- Page 32 ADVERTENCIA El contacto con la zona del silenciador puede producir quemaduras graves. Los gases y el calor de escape pueden inflamar los materiales combustibles y las estructuras 0 da_ar el dep6sito de combustible y provocar un incendio. • NO toque las superficies calientes y EVITElos gasesdel escape a alta temperatura.
-
Page 33: Montaje
Montaje Su generador requiere de ciertos procedimientos de montaje y solo estar_,listo para ser utilizado despu6s de haberle suministrado servicio con el combustible y aceite recomendados. Si usted tiene problemas con el montaje de su generador, por favor Ilame a la Ifnea de ayuda para generadoresal (800) 743-4115. -
Page 34: Agregaraceite Al Motor
Agregaraceite al motor 1. Coloque la generador en una superficie plana y nivelada. 2. Limpie la zona de alrededor del orificio de Ilenado de aceite y quite el tap6n amarillo. 3. Con la ayuda de un embudo (opcional), vierta lentamente todo el contenido de la botella de aceite por el orificio de Ilenado de aceite. -
Page 35: Tierra Del Sistema
4. Reconectela tornillo en el terminal negativo y apri6tela. 5. Aseg0rese que las conexiones a la bateria y al generador est_.napretadasy aseguradas. NOTA:C_.rguelaantes del uso conforme alas instrucciones de la secci6n Cargador de flotaci6n de la baterfa. Tierra del sistema El generador dispone de una conexi6n a tierra del sistema que conecta los componentes del bastidor a los terminales de tierra de los enchufes hembra de salida de CA. -
Page 36: Controles Y Caracteristicas
Controles y caracteristicas Lea este Mlanual del Operarioy reglas de seguridadantes de poner en marcha su generador. Compare las ilustraciones con su generador, para familiarizarse con la ubicaci6n de los diversos controles y ajustes. Guarde este manual para futuras consultas. A - Tanquedel Combustible-- El tanque tiene una capacidad de 26,5 L (7 oalones americanos) de oasolina sin contenido de plomo. -
Page 37: Juegosde Cordones Y Enchufesconectores
Juegosde cordones y enchufesconectores Utilice exclusivamente cables prolongadores de alta calidad, bien aislados y con conexiOna tierra para la toma doble de 120 V del generador. Examine los cables prolongadores antes de cada uso. Revise las capacidadesde todos las cordones de extension antes de usarlos. -
Page 38: Cargador De Flotaci6N De La Baterfa
Cargadorde flotaci6nde la bateria Utilice el conector del cargador de flotaci6n de la baterfa para mantener la baterfa de arranque cargaday preparada para el uso. La carga de la baterfa se debe realizar en un lugar seco, como el interior de un garaje. 1. -
Page 39: Operando
Operando Enciendael motor IIVIPORTANTE: Desenchufesiempre el cargador de flotaci6n de la bateria antes de arrancar el generador. Desconectetodas las cargas el6ctricas del generador. Use las siguientes instrucciones para encender: 1. Asegt_resede que la unidad est,. en una superficie plana. IMPORTANTE:Si la unidad no se arranca y utiliza en una superficie plana, se pueden producir problemas de arranque y de parada durante el funcionamiento. -
Page 40: Conexi6N De Cargasel6Ctricas
NOTA:Si el motor arranca despuCsde tirar tres veces del arrancador pero no sigue funcionando, o si la unidad se para en funcionamiento, asegt_resede que la unidad est,. en una superficie plana y compruebe que el nivel de aceite del cig0eSal es correcto. La unidad puede equiparse con un dispositivo de protecciCn de bajo nivel de aceite. -
Page 41: No Sobrecargarel Generador
No sobrecargarel generador Capacidad Debe asegurarse de que su generador puede proveer los suficientes vatios de potencia continua (vatiaje nominal) y vatios de salida para los elementos que deseealimentar al mismo tiempo. Siga estos sencillos pasos: 1. Seleccione los elementos que quiere alimentar al mismo tiempo. -
Page 42: Plan De Mantenimiento
IVlantenimiento Plan de mantenimiento Siga los intervalos de horas o de calendario, los que sucedan antes. Si opera en condiciones adversas (se_aladas m_.s abajo) es necesario un mantenimiento m_.sfrecuente. • Cambie el aceite del motor • Limpie los residuos • Compruebe el nivel de aceite •... -
Page 43: Mantenimientodel Motor
Mantenimientodel motor _i, ADVERTENClA Chispear involuntario puede tener _1__ como resultado el fuego o el golpe el6ctrico. CUANDOAJUSTE0 HAGAREPARACIONES A SU IVI._,QUINA GENERADOR • Siempre desconecte el alambre de la bujia y col6quelo donde no pueda entrar en contacto con la bujia. CUANDOPRUEBELA BUJIA DELMOTOR •... - Page 44 Limpie la zona de alrededor del tap6n de vaciado de aceite (A), situado en la base del motor, al otro lado del carburador. 4. Quite el tap6n de Ilenado de aceite y vacfetodo el aceite en un recipiente adecuado. 5. Vuelva a colocar el tap6n de vaciado y apri6telo bien. Quite el tap6n de Ilenado de aceite.
- Page 45 IL ADVERTENCIA El contacto con la zona del silenciador puede producir quemaduras graves. Los gases y el calor de escape pueden inflamar los materiales combustibles y las estructuras 0 da_ar el dep6sito de combustible y provocar un incendio. • NO toque las superficies calientes y EVITElos gasesdel escape a alta temperatura.
-
Page 46: Almacenamiento
Almacenamiento El generador deberAser encendido al menos una vez cada siete dias y deberA dejarlo funcionar al menos durante 30 minutos. Si no puede hacer esto y debe almacenar la unidad por mAs de 30 dias, siga las siguientes instrucciones para preparar su unidad para almacenamiento. -
Page 47: Resoluci6N De Problemas
Resoluci6n de problemas Causa Problemo 1. El interruptor autom_.ticode circuito est,. abierto. 2. Conexi6n mal o defectuosa del juego El motor est_ funcionando de cables. pero no existe salida de AC 3. El dispositivo conectado est,. da_ado. disponsible. 4. Averfa en el generador. 1. -
Page 48: Garantias
Garantias Garantia de controlde emisionesde California, U.S. EPAy Briggs& StrattonCorporation Derechosy obligacionesde la garantfa California Air Resources Board, U.S. EPA y Briggs & Stratton (B&S) le explican a continuaci6n la garantfa del sistema de control de emisiones de su motor/equipo modelo 2008 y posteriores. - Page 49 La garantfa de los componentes relacionados con las emisiones es la siguiente: • Los fallos de todo componente cubierto por la garanfia que no se deba sustituir como parte del plan de mantenimiento obligatorio detallado en el manual del propietario entregado quedar_.ncubiertos por la garantfa durante el perfodo de la garantfa especificado anteriormente.
- Page 50 Fecha de entrada en vigor:l de Febrero de 2006. Sustituye a todas las garantias sin fecha y alas de fecha anterior al 1 Febrero de 2006 Briggs & Stratton Power Products Group, LLC reparar_ o sustituir_ sin cargo alguno cualquier componente del generador port_til que presente defectos de materiales y/o mano de obra.
- Page 51 Reservado...
-
Page 52: Especificaciones Del Producto
Especificaciones d el producto Vataje que Empieza ... Vataje*. Corriente a 120 Voltios a 240 Voltios Frecuencia Nominal ... Fase Capacidad de Gasolina ... Desplazamiento Bujia Separaci6n Capacidad de Aceite ... Serviciocomiindespide Depurador de aire ... Bujia de re6stato ... Bujia larga de vida de platino Botella de aceite de motor Estabilizador de combustible...
Need help?
Do you have a question about the Portable Generator and is the answer not in the manual?
Questions and answers