Table of Contents
Advertisement
Quick Links
Advertisement
Table of Contents

Related Manuals for Martindale Electric LM195


Summary of Contents for Martindale Electric LM195
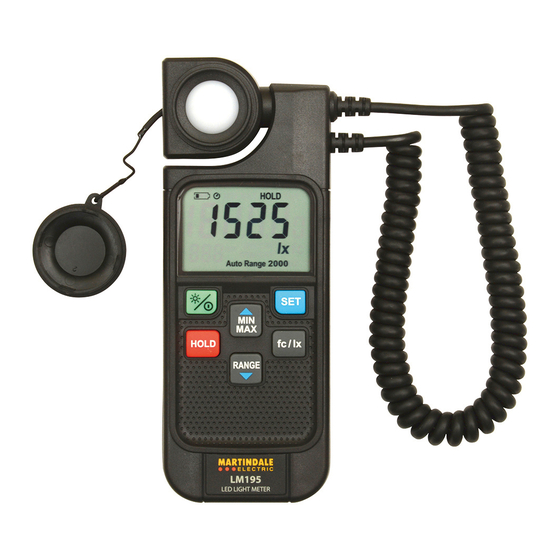
- Page 1 LM195 LED LIGHT METER nstructIon anual...
-
Page 2: Table Of Contents
Meaning of Symbols and Markings Precautions Introduction Inspection Description Accessories Battery Installation Operation Description of Press Buttons and LM195 Elements Description of LCD Symbols Low Battery Indication Power On/Off Auto Power Off Backlight Min Max Hold Mode Unit of Measurement 3.10... -
Page 3: Safety Information
1. SAFETY INFORMATION REMEMBER: SAFETY IS NO ACCIDENT These instructions contain both information and cautions that are necessary for the correct operation and maintenance of this product. It is recommended that you read the instructions carefully and ensure that the contents are fully understood. Particular attention should be paid to the Precautions and Technical Specifications. -
Page 4: Precautions
Please pay attention to the following cautions before use. Cautions The LM195 must only be used under the conditions and for the purposes for which it has been constructed and specified. Before use, check the unit for cracks or any other damage. Make sure the unit is free from dust, grease and moisture. -
Page 5: Introduction
If there is any damage then consult your distributor immediately. 2.2 Description The LM195 has the following functions and features: Light intensity measurement to 199900 lux, 19990 fc Spectral response: CIE photopic Hold, Max and Min functions... -
Page 6: Operation
3. OPERATION 3.1 Description of Press Buttons and LM195 Elements Sensor cap location Sensor cap LCD display Turns the LM195 on/off Turns the backlight on/off The user can hold the measured value displayed on the screen HOLD The user can change between, max, min and current readings... -
Page 7: Description Of Lcd Symbols
3.2 Description of LCD symbols Battery capacity indicator Auto power off is active Minimum recorded reading is displayed Maximum recorded reading is displayed HOLD Hold mode is active lx fc Units of measurement being displayed Range Range indicator Auto Range Auto range is active 3.3 Low Battery Indication If the... -
Page 8: Power On/Off
0.0 appears on the LCD, the calibration is complete. Remove the sensor cap and place it behind the sensor head on the fixing mount. The LM195 is now ready for use. To switch off the LM195, press the button and hold for 3 seconds until the unit has powered off. -
Page 9: Backlight
Press the button, the user can select between the minimum, maximum and current readings. If the LM195 is to be left monitoring lux levels over a period of time greater than 30 minutes, please note that Auto power off function will need to be disabled first (see section 3.5). -
Page 10: Auto/Manual Reading
Once selected, press button to save the setting. Hold the LM195 so the light sensor is directed toward the light source (see note 3.12). Read the measured light intensity from the display. - Page 11 It is important that the light source completely fills the sensor with minimal movement of the meter during measurement. It is also advisable where possible to hold the LM195 away from your body when taking measurements to avoid reflections or creating a shadow on the sensor.
-
Page 12: Cie Photopic Curve
The LM195 has been calibrated against a standard tungsten light source at a correlated colour temperature of 2856K. 3.13 CIE Photopic Curve... - Page 13 Wavelengh CIE photopic Photopic (nm) luminous effi- lumen/watt ciency conversion coefficient factor λ 0.00004 0.027 0.00012 0.082 0.00040 0.270 0.00121 0.826 0.00400 2.73 0.01160 7.92 0.02300 15.71 0.03800 25.95 0.06000 40.98 0.09098 62.14 0.13902 94.95 0.20802 142.1 0.32300 220.6 0.50300 343.5 0.71000 484.9...
-
Page 14: Maintenance
Martindale Electric recommends that it is returned at least once a year to an approved Calibration Laboratory for recalibration and certification. Martindale Electric is pleased to offer you this service. Please contact our Service Department for details. Email: service@martindale-electric.co.uk... -
Page 15: Cleaning
4.4 Repair & Service There are no user serviceable parts in this unit other than those that may be described in section 4. Return to Martindale Electric if faulty. Our service department will quote promptly to repair any fault that occurs outside the guarantee period. -
Page 16: Warranty
5. WARRANTY AND LIMITATION OF LIABILITY This Martindale product is warranted to be free from defects in material and workmanship under normal use and service. The warranty period is 2 years and begins on the date of receipt by the end user. -
Page 17: Specifications
Specification LM195 LED Light Meter All specified accuracies are at 25°C ±1°C, <80% R.H. for 1 year Temperature coefficient: 0.1 x (specified accuracy) per °C (0-24°C, 26-40°C) Note 1 Accuracy: ±3% rdg ±5 dgts (Standard A light source) ±8% (other visable light sources) - Page 18 Specification LM195 LED Light Meter PRESET LIGHT SOURCE WEIGHTING Preset Light Source Weighting: L0 – Standard incandescent light source and white only LED L1 – Not applicable L2 – LED AMBER (yellow) light (3000K) L3 – LED GREEN light L4 – LED RED light L5 –...
- Page 20 Specialist Metrohm Testers (4 & 5kV) Microwave Leakage Detectors Specialist Drummond Testers Martindale Electric Company Limited Tel: +44(0)1923 441717 Fax: +44 (0)1923 446900 E-mail: sales@martindale-electric.co.uk Website: www.martindale-electric.co.uk © Martindale Electric Company Ltd. 2019 Registered in England No. 3387451. V3 LIT195...
Need help?
Do you have a question about the LM195 and is the answer not in the manual?
Questions and answers