Skandia Elevator I Series Assembly Instructions Manual
Hide thumbs
Also See for I Series:
- Maintenance instructions manual (28 pages) ,
- Assembly instructions manual (24 pages) ,
- Assembly instructions manual (28 pages)
Table of Contents
Advertisement
Quick Links
Advertisement
Table of Contents

Subscribe to Our Youtube Channel
Related Manuals for Skandia Elevator I Series


Summary of Contents for Skandia Elevator I Series
- Page 1 ASSEMBLY INSTRUCTIONS I-LINE...
- Page 3 Warranty A 2-year factory warranty from the day of delivery applies to all models of Skandia Elevator AB machinery. A condition of the warranty and any subsequent compensation is that Skandia Elevator AB is contacted and an agreement reached between the customer and Skandia Elevator AB on how any faults should be rectified.
-
Page 5: Table Of Contents
Contents Thank you for choosing Skandia Elevator! Your conveyor system must be assembled correctly and maintained thoroughly if it is to operate satisfactorily. These assembly instructions and the separate maintenance instructions must be followed for the warranty to apply. We hope you will be pleased with your Skandia conveyor equipment for a long time. -
Page 6: Machine Overview
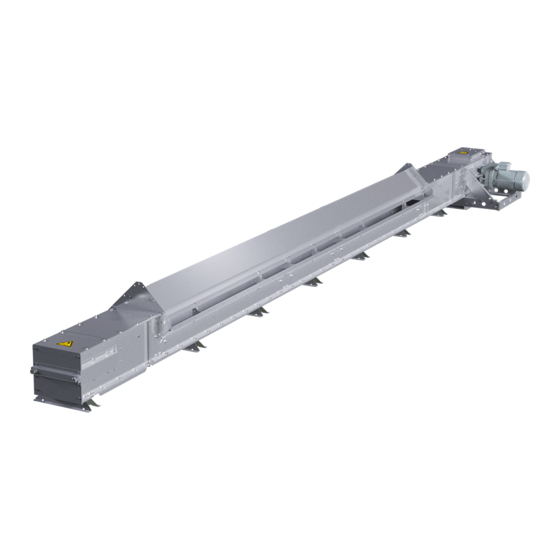
Machine overview DEK3070 DEK3150 DEK3150 Parts Pos. Tail end Intermediate section Drive Loading Unit Conveyor belt Angle gear motor Safety decals X X X X SKANDIA ELEVATOR – BTI... -
Page 7: Safety Information
• Use protective gloves, helmet, steel-toed boots, ear defenders, protective goggles and high-vis vest when carrying out assembly, electrical connection, maintenance and operation of conveyor equipment. SKANDIA ELEVATOR – BTI... -
Page 8: Electrical Safety
WARNING! Connections to, from, and between machinery must be permanently mounted and fully enclosed. If the installation design does not allow this at an outlet, finish off with a 1 m (3.3 ft) pipe. SKANDIA ELEVATOR – BTI... -
Page 9: Safety Decals
The machine is supplied with safety decals on delivery. They must not be removed or defaced. If a safety decal becomes damaged, you can order a new one free of charge from Skandia Elevator AB. Specify the part number of the decal. See the section below and the previous chapter Machine Overview. - Page 10 DEK3030 Warning for conveyor chain! SKANDIA ELEVATOR - DEK3030 Warning for chain drive! DEK3040 SKANDIA ELEVATOR – DEK3040 DEK3070 Warning for rotating conveyor drive shaft! SKANDIA ELEVATOR – DEK3070 DEK3080 Warning for rotating elevator drive shaft! SKANDIA ELEVATOR – DEK3080...
-
Page 11: Before Assembly
Assemble return idlers and carrying idlers in the intermediate sections. Insert return idlers (A). Fold out the holders (B) and insert carrying idlers (C). Push back the holders so that they do not fit loosely. Tighten the bolts (D). SKANDIA ELEVATOR – BTI... -
Page 12: Transport In Both Directions
• When conveying in both directions, the carrying idlers must be repositioned before the conveyor belt is installed. See "Belt steering" chapter at the back of the assembly instructions. • When conveying in both directions, more frequent checks of the belt steering are required. SKANDIA ELEVATOR – BTI... -
Page 13: Connection Of The Machine
A loading unit in tail end is positioned according to illustration. For several loading units (accessory), position the units according to the separate assembly instructions. 500 mm Connection to following machine Connect the conveyor to the following machine according to its assembly instructions. SKANDIA ELEVATOR – BTI... -
Page 14: Assembling The Machine
Push the machine parts together. Assemble the joints. IMPORTANT! For outdoor installation, extra diagonal bracing must be mounted over the joints so that the diagonal bracing continues alongside the entire machine. M8x20 M8x16 M8x16 SKANDIA ELEVATOR – BTI... - Page 15 Remove brace (F). Put slider bed into place (G). Note! Assemble any intermediate loading units (fixings) in accordance with the separate assembly instructions. Then return to these assembly instructions for the remaining instructions. M8x16 M8x20 SKANDIA ELEVATOR – BTI...
- Page 16 • Make sure that the tail pulley shaft is perpendicular to the conveyor belt. • Vulcanization of conveyor belts should be done by a professional vulcanizer. Pull the conveyor belt into the machine, vulcanize the ends together and tighten correctly. SKANDIA ELEVATOR – BTI...
- Page 17 Install the speed monitor (S) in the holder (T) in the drive end. WARNING! • Make sure the speed monitor is engaged during operation. • All electrical equipment must be connected by a qualified electrician. See separate connecting directions for electronics. 4-6 mm SKANDIA ELEVATOR – BTI...
- Page 18 Install the cover rails of the loading unit one at a M8x16 time and insert the last brackets (I) in between them. Attach the skirt strips (J) to the brackets (I) with the clamping strips (K). M8x20 SKANDIA ELEVATOR – BTI...
- Page 19 WARNING! Fit inlet cable-operated emergency stop according to the manufacturer's instructions. Cable-operated emergency stop is a requirement for CE certification of the machine if it is accessible during operation. SKANDIA ELEVATOR – BTI...
-
Page 20: Belt Steering
The pair closest to the tail end should be angled -1.5 degrees and the pairs between those closest to the tail end and drive end should be neutral without angle. – 1,5° 0° + 1,5° 0° 0° SKANDIA ELEVATOR – BTI... -
Page 21: Belt Steering Adjustments
See information about basic settings for carrying idlers on the previous page. Adjust the position of the tail pulley (Q) by tensioning on one side. Adjust the position of the drive pulley (R) by tensioning on one side. SKANDIA ELEVATOR – BTI... - Page 24 SKANDIA ELEVATOR AB KEDUMSVÄGEN 14, ARENTORP PHONE +46 (0)512 79 70 00 INFO@SKANDIAELEVATOR.COM S-534 94 VARA, SWEDEN FAX +46 (0)512 134 00 WWW.SKANDIAELEVATOR.COM...
Need help?
Do you have a question about the I Series and is the answer not in the manual?
Questions and answers