
Related Manuals for Amulet Hotkey DXR-H4


Summary of Contents for Amulet Hotkey DXR-H4
- Page 1 ® KVM E isplay xtEndEr ser manUal DXR-H4 and DXR-H4 SFP variant HB-RHA4-1110 Revision 2.1 November 2020...
- Page 2 Product Information Page 2...
- Page 3 The information contained in this document represents the current view of Amulet Hotkey® as of the date of publication. Because Amulet Hotkey must respond to changing market conditions, it should not be interpreted to be a commitment on the part of Amulet Hotkey, and Amulet Hotkey cannot guarantee the accuracy of any information presented after the date of publication.
-
Page 4: Table Of Contents
STEP 6: Connect a zero client to the DXR-H4 ........... 20 Other models ......... 10 3.7.1 Connect to a DXR-H4 using SLP Discovery ..1.10 Terminology ........... 10 STEP 7: Change the default password ..20 2. Your DXR-H4 host card at a glance .. - Page 5 Quad Display KVM Extender Host Card 4. Introduction to PCoIP ......21 5. Set up a PCoIP session ......25 What is PCoIP? ........21 Power up the zero client ......25 Types of PCoIP session ......25 4.1.1 Host rendering ..........4.1.2 Multi-codec display processing ......
- Page 6 8.4.2 Display log files with a macOS terminal window Choose a connection broker if required 31 ................ How to reset the DXR-H4 at the DXiP rack 6.6.1 Role of the connection broker ..................38 6.6.2 Specify the connection broker ......
- Page 7 Status LEDs on the rear panel (SFP model shown) �����������������������������������������������������������������������������13 Figure 5: Install the personality module ����������������������������������������������������������������������������������������������������������� �17 Figure 6: Cabling for the DXR-H4 (RJ45 variant shown) ������������������������������������������������������������������������������������18 Figure 7: Example SFP modules ������������������������������������������������������������������������������������������������������������������������ �18 Figure 8: Install the DXR-H4 host card ������������������������������������������������������������������������������������������������������������� �19 Figure 9:.
- Page 8 Contents Figure 25: SSH client ���������������������������������������������������������������������������������������������������������������������������������������� �34 Figure 26: Management interface login �����������������������������������������������������������������������������������������������������������34 Figure 27: Management Interface screen ���������������������������������������������������������������������������������������������������������34 Figure 28:. . AWI.hardware.and.firmware.version.information ��������������������������������������������������������������������������35 Figure 29: Firmware Upload window ����������������������������������������������������������������������������������������������������������������35 Figure 30: Successful upload window ���������������������������������������������������������������������������������������������������������������35 Figure 31: Insert jumper into the reset port ������������������������������������������������������������������������������������������������������38 Figure 32:.
-
Page 9: Before You Start
(1 m) and long (2.8 m to 3 m) sets: 1.2) in the rear of the chassis. • video cable (for example Mini DisplayPort to DisplayPort); The chassis can hold a maximum of 12 DXR-H4 host cards and 12 personality modules. • two stereo audio cables;... -
Page 10: Audio
1.6.1 Front and rear audio • MAC and IP address of the PCoIP host; On the DXR-H4, only the front or rear audio connections can be active at one time. The rear connections take precedence (if • MAC and IP address of the zero client. -
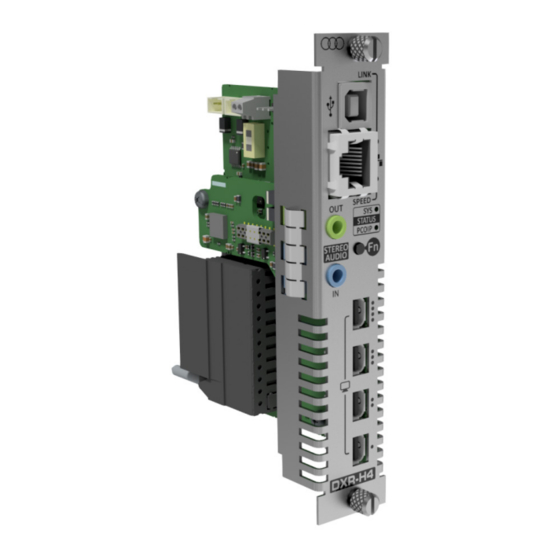
Page 11: Your Dxr-H4 Host Card At A Glance
ID LEDs simultaneously. This is useful when connecting cables to the cards. Front panel features The front panel on the DXR-H4 has three LEDs and two buttons. Figure 1 for the following description: 1. -
Page 12: Personality Module Features
Your DXR-H4 Personality module features The panel on the DXR-H4 personality module has sockets, status LEDs and a function button. Figure 2 for the following description: 1. Retaining screw: Two screws, one at the top and one at the bottom hold the card in place. -
Page 13: Status Led Descriptions
• Wink - LED is off more than on. • fault indications, power and standby status. 2.3.4 Power LED 2.3.1 Front panel status LEDs Tells you the power status of the DXR-H4. There are three LEDs on the front panel (see Figure 1. Standard DXiP rack (see 1.1 on page... -
Page 14: Sys Status Led
Your DXR-H4 2.3.5 SYS status LED 2.3.6 PCoIP status LED Tells you the state of the system and the network link. Displays the status of the PCoIP session. 1. When the unit is in STANDBY: 1. When the card is in STANDBY:... -
Page 15: Button Operation
Fn button. The Fn button is also repeated on the personality module at the rear of the chassis. 2.4.1 Power a). Press the button to put the DXR-H4 in or out of standby. b). A long press (more than four seconds) at any time will reset the DXR-H4. - Page 16 Your DXR-H4 Page 16...
-
Page 17: Set Up The Dxr-H4
Note: This procedure outlines the install process for a single host PC and DXR-H4 card and personality module. You can 2. With the Amulet Hotkey logo at the top, align the module repeat this process to install additional cards. with the slot guides in the chosen slot at the rear of the DXiP chassis. -
Page 18: Step 3: Connect The Personality Module To The Host Computer
Caution: CE/EMC compliance is tested with video, USB and audio cables with a maximum length of 3m. 1. For the DXR-H4 SFP variant only, push the SFP module (see Figure 7) into the network port on the personality module (see... -
Page 19: Step 4: Install The Dxr-H4 Card Into The Rack
If your network uses DHCP, the DXR-H4 obtains its IP address personality module card at the rear. from the DHCP server. If no DHCP server is available, the DXR-H4 times out after three minutes and adopts its default IP address 1. -
Page 20: Step 6: Connect A Zero Client To The Dxr-H4
3.10 How to power down the DXR-H4 2. Select the host you want and click OK. To correctly shut down the unit, you must put the DXR-H4 into If the zero client successfully connects to the host, the front standby: panel PCoIP status LED illuminates green to indicate an active session. -
Page 21: Introduction To Pcoip
Figure 10: Typical PCoIP set up A closed host system (1) connected to a DXR-H4 (2) connects over a LAN/WAN (3) to a zero client (4) to facilitate a remote desktop connection with quad video heads (5) www.amulethotkey.com | Page 21... -
Page 22: Multi-Codec Display Processing
• Cost savings. 4.2.2 Host types The DXR-H4 is a PCoIP host that is external to the host PC or 4.4.1 Increased security workstation. Other Amulet Hotkey PCoIP hosts are available in As PCoIP zero clients have a stateless architecture and no local various form factors. -
Page 23: Cost Savings
For more Console define configuration profiles, and apply information on the PCoIP Management Console, contact configuration profiles to groups. Amulet Hotkey Technical Support. A web application that you can use Administrative Web to remotely configure individual zero Interface (AWI) clients and PCoIP hosts. -
Page 24: Administrative Web Interface (Awi)
Introduction to PCoIP 4.5.2 Administrative Web Interface (AWI) 4.5.3 On Screen Display (OSD) The AWI is an embedded HTTPS web interface for PCoIP devices. The OSD appears when the zero client is powered on and It enables you to remotely configure individual PCoIP hosts and a PCoIP session is not in progress. -
Page 25: Set Up A Pcoip Session
Et ConnECtEd 5. Set up a PCoIP session The following connection methods are available: • Auto Detect This section describes how to connect your KVM Extender Host with a remote zero client or virtual desktop. • Connect directly to a specified host Power up the zero client •... -
Page 26: Pcoip Connection Manager
Get connected 3. (Optional) You can also set the Enable Auto-Reconnect in the 5.2.6 Connect using VMware View advanced settings to remember the last connected PCoIP host. You can configure zero clients to use PCoIP to connect to a virtual desktop in a VMware View environment. See also 7.2.3. 5.2.3 Connect to a choice of hosts using SLP Discovery If you want users to log on manually: If the zero clients and PCoIP hosts reside on the same subnet,... -
Page 27: Connect Using A Connection Broker
Quad Display KVM Extender Host Card Set an automatic connection 5.2.8 Connect using a connection broker You can set up zero clients to automatically connect to a remote Caution: It is a requirement for the VMware broker to work PCoIP host or virtual desktop when the end-user logs on. With that the Management Interface remains enabled. -
Page 28: Connect To A Soft Client
Get connected Connect to a soft client You can also connect to the DXR-H4 using a soft client (for example VMWare Horizon or Teradici PCoIP soft client). Caution: Configuration of the DXR-H4 is dependent on the Technical specific host and client operating systems. Contact support for further information. -
Page 29: Manage The Network
EtworK ManaGEMEnt 6. Manage the network Discover the IP addresses It may be necessary to know the IP addresses of the DXR-H4, for Dual IP configuration example to update the Teradici or Amulet Hotkey firmware. The DXR-H4 utilises two IP addresses. One is the address of the Note: The default IP address of the DXR-H4 is 192.168.1.100. -
Page 30: How To Change The Ip Address
• settings made by the user. 5. Select OK. Exact bandwidth requirements for PCoIP are difficult to predict, 6. Connect a network cable from the host PC to the DXR-H4. use the values in Table 11 as a guide only: 7. -
Page 31: Choose A Connection Broker If Required
It is a requirement for the VMware broker to work that the Management Interface remains enabled. See 7.2.3. All Amulet Hotkey zero clients can be configured to use a third party connection broker (also known as a connection management server). For example, the following connection broker products include PCoIP support: •... - Page 32 Network management Page 32...
-
Page 33: Firmware Updates
Connect to the correct IP address to do this using the buttons on the unit. The DXR-H4 utilises two IP addresses. One is the address of the Note: This enables the MI for this power cycle only. To Teradici PCoIP host. The second IP address is for the Amulet make the MI available at every power up, use the command Hotkey Management Interface (MI). -
Page 34: Interface
7.3.2 To login with the Amulet Hotkey Management Interface KBA.137.-.Management. All commands are documented in commands.for.Quad.Display.KVM.Extender.Hosts.KB-A000- To connect to the DXR-H4 with the Management Interface: 0137. 1. Make sure that the network connection to the Management Note: The interface and commands are intended for advanced Interface is enabled. -
Page 35: Check The Dxr-H4 Firmware
7.4.1 Keep firmware up to date 2. Select Firmware from the Upload menu. After you install the DXR-H4, check our website or with Technical The Firmware Upload window appears. Support for firmware updates and make sure you have the latest versions for each. - Page 36 Firmware Updates Page 36...
-
Page 37: Additional Information
To enable the function: localcursor dithering on the local graphics card by changing internal driver 1. Log into the DXR-H4 with the MI (see 7.3.2). settings. 2. Enter the command localcursor -e (or localcursor -x to AN.-.057.Disable.Temporal.Dithering.on.macOS.and.OS.X enable, but hide the localcursor). -
Page 38: Use The Hotkey Disconnect Function
1. Make sure the function localcursor is enabled. To check this: 3. Type ls to display the list of log files. a). Log into the DXR-H4 with the MI (see 7.3.2); 4. To view the contents of a log file, use any macOS b). -
Page 39: Re-Enable Host Driver Function After A Factory Reset
3. Enter ‘y’ or ‘n’ at the [y/n] prompt to reset the unit. 3. Check the box Enable Host Driver Function (see Figure To force a restart of the DXR-H4 remotely regardless of PCoIP and click Apply. sessions: 4. Reset the card by holding the power button in for more than 1. -
Page 40: Factory Reset The Dxr-H4 Remotely
5. Click Reset and then Continue. Caution: The unit will be shut down regardless of whether a 6. Restart the DXR-H4 to complete the changes. See 8.6.1. PCoIP session is active or not. 8.6.3 Factory reset the DXR-H4 remotely To put the unit into standby at the DXiP rack:... -
Page 41: How To Remove The Dxr-H4 From The Dxip Rack
4. Disconnect the cabling from the personality card. 5. Disconnect any cabling from the DXR-H4 host card. 6. Press the Power button once on the DXR-H4 host card to put the unit in standby. 7. Pull down the lever on the DXR-H4, remove the card from the chassis and put the card in an anti-static bag. - Page 42 Additional Information Page 42...
-
Page 43: Technical Specifications
9. Technical specifications 9.10.1 Warranty Your DXR-H4 Quad Display KVM Extender Host Card and personality module come with a 3 year warranty. 9.10.2 Technology Description Specification Form factor Rack mounted DXR-H4 host card and personality card PCoIP processor Teradici TERA2240 PCoIP Processor... -
Page 44: Environment
2x 22V 350W fully-redundant and hot-swappable rack-mounted Power Supply Units supply power to the DXiP Power backplane Cooling Active DXR-H4 : 705 g Unit weight Personality module: 120 g Excludes packaging and other kit parts Regulatory All cards conform to relevant parts of EN55024, EN55032 and FCC part 15 Class A. TAA compliant Maximum recommended ambient temperature: +15°...
Need help?
Do you have a question about the DXR-H4 and is the answer not in the manual?
Questions and answers