Table of Contents
Advertisement
Advertisement
Table of Contents
Troubleshooting

Subscribe to Our Youtube Channel
Related Manuals for Streck ESR-Auto Plus 506


Summary of Contents for Streck ESR-Auto Plus 506
- Page 1 ESR-Auto Plus Operator’s Manual ® Model 506, v 1.0-2.0...
- Page 3 Returns executed within 30 days of instrument functions. receipt will result in an automatic reassignment of the instrument title back to Streck. The customer will be TECHNICAL SERVICE DEPARTMENT responsible for return freight charges on all customer- 800.843.0912 (ext. 7510) initiated instrument returns.
-
Page 4: Table Of Contents
Table of Contents Introduction Keypad & Menu Overview 1.1 ESR Components 3.1 Keypad Overview 1.2 Unpacking Instructions 3.2 Menu Diagram 1.3 Barcode Scanner Installation 1.4 Cable Connections Menu Functions 1-5 1.5 Barcode Scanner Calibration 1.6 Installing Printer Paper 4.1 Standby Menu 1.7 Removing Paper 4.2 Menu 1: Search Sample 1.8 Instrument Set-up... - Page 5 Menu Function 6 - Service Menu Safety Precautions 6.1 Accessing Menu 9.1 User Precautions 6.2 Set Language 9.2 Electrical Equipment 6.3 Set Date and Time Style Formats 9.3 Disconnect Device 6.4 Registering Test Rack 9.4 Sample Analysis 6.5 Set Tube Type 9.5 Application of Secondary Labels 6.6 Set Calibration 9.6 Removal of ESR-Vacuum Tubes...
-
Page 7: Introduction
Introduction... -
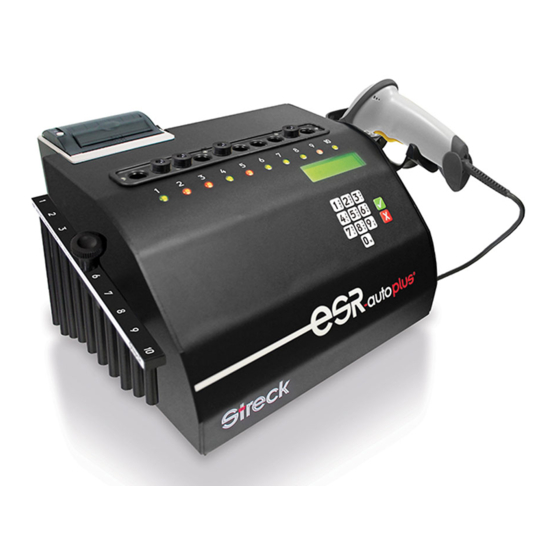
Page 9: Esr Components
® measure the sedimentation rate of erythrocytes (red blood cells) in Streck ESR-Vacuum Tubes. The results are recorded as millimeters (mm) per hour (Westergren Method) by converting to the QuickMode method, a scientifically developed method for measuring ESR in only 30 minutes. -
Page 10: Unpacking Instructions
1.2 Unpacking Instructions Retain all packaging materials for shipping, moving or storing the instrument. 1. Open the box and remove the top foam piece, which contains accessories such as the ESR-657 Mixer, barcode scanner, power cords and paper. 2. Carefully lift the instrument out of the bottom foam piece and remove the anti-static shipping bag. -
Page 11: Installing Printer Paper
Important! Streck thermal paper is specifically approved for use with the ESR-Auto Plus printer and should be used to prevent damage to the print head. Alternate paper may have different technical specifications that cause premature wear and tear. -
Page 13: Sample Preparation & Analysis
Sample Preparation & Analysis... -
Page 15: Esr-Vacuum Tubes
Chapter 2 Sample Preparation & Analysis 2.1 ESR-Vacuum Tubes The ESR-Auto Plus is intended for use with Streck 1.2ml ESR-Vacuum Tubes. ESR-Vacuum Tubes are also available in High Altitude and Safety Coated 1.2ml configurations. 2.0ml ESR-Vacuum Tubes may be used by selecting the alternate tube size in the User Configuration Menu. -
Page 16: Phlebotomy Guideline
• 1.2ml ESR-Vacuum Tubes: 60mm ± 5mm • 2.0ml ESR-Vacuum Tubes: 100mm ± 8mm 5. It is especially important to mix Streck ESR-Vacuum Tubes thoroughly by inverting a minimum of 8 times due to their smaller tube diameter and draw volumes (1.2ml and 2.0ml) compared to an EDTA tube (Figure 5b). -
Page 17: Secondary Patient Labels
2.5 Secondary Patient Labels The ESR-Auto Plus reads the sample using infrared light. This light is very strong and can typically read through one layer of most commonly used labels. Caution must be taken when applying additional patient labels to ESR-Vacuum Tubes. Excessive label thickness, wrinkling or flagging may increase the outer diameter of the tube enough to wedge it in the instrument. -
Page 18: Esr Tube Labeling Sleeves
Bend at scored lines 2.6 ESR Tube Labeling Sleeves ESR tube labeling sleeves (Streck catalog # 240363) are available to accommodate very long barcode labels. Such labels may obstruct the blood column during analysis, leading to inaccurate results. The labeling sleeves help reduce any errors and facilitate proper patient identification. -
Page 19: Starting A Sample
2.7 Starting a Sample The ESR-Auto Plus is ready to accept a sample when the “Next Sample” standby mode appears in the display 12:00 window. Scan the patient barcode with the barcode next sample... scanner, or enter the sample ID code manually on the keypad. -
Page 21: Keypad & Menu Overview
Keypad & Menu Overview... -
Page 23: Keypad Overview
Chapter 3 Keypad & Menu Overview 3.1 Keypad Overview (Figure 10) The keypad consists of alphanumeric characters A-Z and 0-9 which are used to manually input a specimen ID, and also to select various prompts as indicated in this manual. is used to accept entries or view additional menu settings. -
Page 25: Menu Functions
MAIN MENU DIAGRAM 1.SEARCH SAMPLE 2.CHECK POSITION 3.PRINT LOG FILE 4.CONTROL SAMPLES 5.RUN TEST RACK Menu Functions 1 - 5... -
Page 27: Standby Menu
Chapter 4 Menu Functions 1 - 5 4.1 Standby Menu The instrument is ready to accept a new sample in standby 12:00 mode. If the instrument is in a menu selection or in a next sample... different sequence of the program, press to advance to the standby display. -
Page 28: Menu 2: Check Position
4.3 Menu 2: Check Position Sample results may also be retrieved using the position where the sample was run. The results may be reprinted on the internal printer and/or DATA OUTPUT port. menu Press to search for a sample result by lane position. 2.check pos 1—10 check pos Enter the position 1-10 as listed on the ESR-Auto Plus and... -
Page 29: Menu 3: Print Log File
Completed Sample If the sample is complete and results are available, the 1) 12345 (1/5) display will show position, sample ID, number of samples 030101 09:00 ok? that fit the search criteria and the date/time for the most recently analyzed sample that fits the search criteria. 1) 12345 Press to view the next matching sample or... -
Page 30: Menu 4: Control Samples
Control Sample Menu Function accepts two levels of control, compares results to the registered assay ranges and stores data in a control file. Important! Streck recommends running 2 levels of ESR-Chex control each day that patient testing is performed to ensure the accuracy of the instrument. - Page 31 **** CONTROL SAMPLE RESULT LEVEL 2 **** MM-DD-YYYY HH:MM SERIAL NO: 506-0000 Error is the error code and Status is the status code reported SOFTWARE VERSION: v00.0 (YYYY-MM-DD) on a control samples. Refer to Section 10, Troubleshooting, POS: 6 ERROR: 0006 STATUS: 0002 for complete list of error and status codes.
- Page 32 ******** ESR CONTROL REPORT ******* ******** ESR CONTROL REPORT ******** MM-DD-YYYY HH:MM SERIAL NO: 506-0000 MM-DD-YYYY HH:MM SERIAL NO: 506-0000 SOFTWARE VERSION: V00.0 (YYYY-MM-DD) SOFTWARE VERSION: V00.0 (YYYY-MM-DD) 12345A 12345A LEVEL LEVEL EXPIRY DATE MM-DD-YY EXPIRY DATE MM-DD-YY EXP. RANGE 74-110 EXP.
- Page 33 4. Clear QC Log File All daily QC data contained in the QC log file may be deleted using the Clear QC Log function in the Show Controls Menu. Control lot information, such as lot number, expiration date, and min/max ranges, will not be affected by clearing the QC log file.
- Page 34 Enter the minimum assay value as stated on the control assay insert and press (Figure 14). –new control(1)– Enter the maximum assay value in a similar manner. range(min): 30 Press to return to the previous control registration menu. A report of the assay values will then be printed. Press accept the data.
-
Page 35: Menu 5: Run Test Rack
ESR results. This system check ensures the accuracy of all reported ESR results throughout the reportable range. Important! Streck recommends running the test Figure 15: ESR-Auto rack at the beginning of each day that the ESR- Plus Test Rack Auto Plus is in use. -
Page 37: Menu Function 6 - User Config. Menu
USER CONFIG MENU DIAGRAM PRINT THE SETUP SET DATE & TIME SET AUDIBLE ALARM SET PRINTER SET PRINT STYLE SET ACCESS CODE Menu Function 6 Options - User Configuration Menu... -
Page 39: Accessing Menu
User Configuration Menu. user config? 5.2 Print Set Up The system settings can be printed. Once your system is configured as desired, Streck recommends keeping a printout of the settings for reference (Figure 17). –user config– Press to print the instrument settings. -
Page 40: Set Date And Time
5.3 Set Date and Time The instrument has an internal real-time clock with battery backup. Date and time will be maintained when the instrument power is turned off. Date and time format can be changed to display different international standards. Refer to Section 6.3. -
Page 41: Set Printer Function
5.5 Set Printer Function Results will print automatically when auto print is enabled. If auto print is turned off, each printout must be selected manually using the reprint function. –user config– Press to access the Set Printer Menu. set printer? Press to advance to the next menu selection. -
Page 42: Set Access Code
Log File printout is generally used when results are sent to a computer using the DATA OUTPUT port. The Log File status and error messages are binary coded. Refer to Section 10 to decode binary error messages. 5.7 Set Access Code An access code can be assigned to control access to the User Configuration Menu. -
Page 43: Menu Function 6 - Service Menu
SERVICE MENU DIAGRAM RESTRICTED ENTRY GIVE CODE: 48 SET LANGUAGE SET DATE STYLE REGISTER TEST RACK SET TUBE TYPE SET CALIBRATION SET TEST MODE SET ACCESS CODE SEE TEMPERATURE Menu Function 6 Options - Service Menu... -
Page 45: Accessing Menu
Service Menu. These operations should be used with great caution as the accuracy of results may be affected. Important! Contact Streck Technical Service before making changes to the Service Menu. –menu– From standby, press and hold to access the user menus. -
Page 46: Set Date And Time Style Formats
6.3 Set Date and Time Style Formats There are a number of display formats available. –service menu– Press to adjust the date and time formats. set date style? Press to advance to the next menu selection. Press to select the displayed date format. –date format–... -
Page 47: Registering Test Rack
6.4 Registering Test Rack The ESR-Auto Plus test rack is designed to simulate ESR levels. Each test rack is unique and its reference values must be registered in the ESR-Auto Plus where the test rack will be used. –service menu– Press to register the test rack. -
Page 48: Set Tube Type
200mm pipettes that produce slightly different results, QuickMode results can be calibrated. At the time of delivery, the calibration factor will be set to +0%. Please contact Streck Technical Service before adjusting the calibration factor. Important! The 2.0ml calibration menu option will only be available if 2.0ml tubes are enabled in Set... -
Page 49: Set Test Mode
Press to accept the 1.2ml calibration values and | calibr.: proceed to the next menu selection. Enter the desired calibration factor on the numeric keypad, -99 to 99. +0_% (0—99) Press to switch between positive calibrations and negative calibrations. 6.7 Set Test Mode The ESR-Auto Plus can be set to Test Mode for servicing and testing various instrument functions. -
Page 50: Ram Reset 42
6.10 RAM Reset Operators can perform a RAM Reset to reset the instrument to its default factory settings. Remove any USB firmware upgrade drives before performing a RAM RESET. Important! RAM Reset will erase all customized settings, QC and patient data. If possible, print the instrument setup, patient log file, and QC data before performing a RAM Reset. -
Page 51: Background Of The Esr Test
Background of the ESR Test... -
Page 53: The History
Chapter 7 Background of the ESR Test 7.1 The History Clinicians have long observed that the settling rate of erythrocytes in anticoagulated blood is affected by disease. Initially, the sed-rate test was used as a pregnancy test, but was later found to be unsatisfactory for that purpose. Instead, ESR gained its reputation in the battle against infections, particularly tuberculosis. -
Page 54: The Esr-Vacuum Tube
It also helped reduce the formation of blood foam, which is a common occurrence when drawing ESR samples. This tube became the Streck ESR-Vacuum Tube in 1996. ESR-Auto Plus Operator’s Manual... -
Page 55: A Typical Esr Reaction
THE SEDIMENTATION REACTION 7.6 A Typical ESR Reaction In order to understand the advantages of the ESR-Auto Plus and the 30-minute method, it is important to understand the course of development of ESR. A number of factors affect the sample during its reaction, which can make ESR quite unspecific;... -
Page 57: Performance & Technical Specifications
Performance & Technical Specifications... -
Page 59: Overview
Chapter 8 Performance & Technical Specifications 8.1 Overview Many automated ESR instruments analyze samples using similar methodology as manual ESR testing. The instruments collect readings at two different timepoints; the first is an initial timepoint to register the initial fill level in the tube, the second after a specified period of time to register the level of RBC sedimentation. -
Page 60: Temperature Compensation
8.4 Temperature Compensation Ambient temperature affects the ESR result. In warmer conditions, the ESR reaction increases considerably. The ESR test should be performed at 20° C. Since this is impossible in some laboratories, a conversion scale was developed with the 100mm system. Both scales are programmed in the ESR-Auto Plus and a temperature sensor mounted internally decides which scale to use. -
Page 61: Barcode Scanner
Technical Service before making changes to the barcode scanner. The barcode reader is a scanning model and is available from your Streck representative. The barcode scanners are considered to be Class 2 lasers that emit Class 2 laser light. The barcode reader has Figure 23 several adjustable parameters. -
Page 62: Technical Specifications, Esr-Auto Plus
8.10 Technical Specifications, ESR-Auto Plus Electrical specifications The ESR-Auto Plus is provided in an auto-switching electrical configuration as noted below. The correct electrical configuration will be programmed at Streck prior to shipment. Input 110 VAC 60 Hz 24 VA US / 110V input Fuse Littelfuse part #: 576-0312.500HXP 500mA, fast-acting... -
Page 63: Environmental Conditions
Sound pressure level Less than 55 dB at the highest sound pressure level. Working environment Temperature range 5° C to 40° C Relative humidity Max. 80% for temperatures up to 31° C, decreasing linearly to 50% relative humidity at 40° C. Storing environment Temperature range 0°... -
Page 64: Technical Specifications, Esr-657 Mixer
The ESR-Auto Plus, ESR-657 Mixer and ESR Barcode Scanner are intended for use as specified in this manual. If used in ways other than specified in this manual, the protection provided by the equipment may be impaired. Streck cannot take any responsibility for injuries or accidents that might occur as a consequence of this action. -
Page 65: Safety Precautions
Safety Precautions... -
Page 67: User Precautions
Only authorized Streck service personnel may open the instrument to perform maintenance or repair. In addition, Streck recommends plugging the ESR-Auto Plus and mixer into a power surge protector for additional protection from power surges and fluctuations. -
Page 68: Removal Of Esr-Vacuum Tubes
The operator should seal the affected tube channel with tape, place the instrument in a biohazard bag and contact Streck Technical Service at 800-843-0912 for instructions on how to return the instrument to Streck for repair and decontamination. 9.7 Repackaging Instructions... -
Page 69: Troubleshooting
Troubleshooting... -
Page 71: Error Codes
Chapter 10 Troubleshooting Important! Contact Streck Technical Services at 800.843.0912 (ext. 7510) or technicalservices@streck.com for assistance with any of the items listed in this Troubleshooting section, or if any other system malfunctions are observed. 10.1 Error Codes Error codes are printed in text and numeric code on the ticket style printout and in numeric code only on the log style printout and LCD display. -
Page 72: Status Codes
10.2 Status Codes Status codes are printed in text and numeric code on the ticket style printout and in numeric code only on log style printout and LCD display. The status codes and explanations are listed below. Status Code Status Description Cause 1.2ml Tube Appears when a 1.2ml tube is detected. -
Page 73: Troubleshooting Guide
2. Power unit OFF for a few minutes and then power ON. Run test rack. 3. If problems persist, perform RAM Reset (see Section 6.10). 4. If problems continue, contact Streck Technical Services. Barcode scanner 1. Scanner not properly 1. Verify that barcode scanner is inserted securely does not read the connected to unit. - Page 74 Log File at Limit 1. Log file is full. No corrective action needed. Old results are being purged on a first in, first out basis. Print log file to retain a copy of all results.
-
Page 75: Quick Reference Guide
Quick Reference Guide... -
Page 77: Standby Screen
Main Menu. 11.2 Sample Mixing Important! Do not remove anticoagulant from Streck ESR-Vacuum Tube before transfer. Allow all refrigerated samples to come to room temperature before mixing and analyzing. 1. Transfer patient sample from an EDTA tube or collect sample directly into an ESR-Vacuum Tube. -
Page 78: Run Qc Sample
11.5 Run QC Sample Important! Register controls before running a QC sample. 1. From standby, press and hold 2. Select number 4.CONTR. SAMPLES. 3. Select number 1.Run Control. 4. Select either Level 1 or 2 and press 5. Instrument reads: “Insert in Free Position.” 6. -
Page 79: Re-Register Test Rack
11.9 Re-Register Test Rack 1. From standby, press . Enter “6.” 2. Instrument reads: “User Config.” Press 3. Instrument reads: “Service Menu.” Press 4. Instrument reads: “Give Code.” Enter “48.” Press . Press until the instrument reads “Reg Test Rack?” 5. - Page 83 Internet IFU Directions Instructions for use can be obtained via the Internet at www.streck.com using the specific IFU section, or by calling the Naudojimo instrukcijas galima gauti apsilankius internetinėje svetainėje adresu: www.streck.com, ir susiradus atitinkamos following phone number, 1-800-843-0912, or by calling your local supplier.
Need help?
Do you have a question about the ESR-Auto Plus 506 and is the answer not in the manual?
Questions and answers