Table of Contents
Advertisement
Advertisement
Table of Contents

Related Manuals for Wellion CALLA Light


Summary of Contents for Wellion CALLA Light
- Page 1 OWNERS GUIDE...
- Page 2 If you have questions or simply need more information, please call our authorized represent- ative. Thank you again for choosing the Wellion CALLA Light Blood Glucose Moni- toring System.
-
Page 3: Table Of Contents
TABLE OF CONTENTS Understanding Your New Blood Glucose Kit The Wellion CALLA Light Meter The Wellion CALLA Blood Glucose Test Strip Meter Display Screen Setting Up Your New System Inserting (or Changing) Batteries Setting Time and Date Turning ON/OFF Tone Sound... - Page 4 Understanding Your Blood Glucose Test Result Viewing Stored Readings and 1, 7, 14, 30, 60 and 90 Days Average from Memory Caring for the Meter Cleaning the Meter Storage and Precautions Solving Problems Manufacturer´s Warranty Specifications Symbols...
-
Page 5: Understanding Your New Blood Glucose Kit
UNDERSTANDING YOUR NEW BLOOD GLUCOSE KIT The Wellion CALLA Light Blood Glucose Monitoring System kit includes the fol- lowing items: Wellion CALLA Light blood glucose meter 10 Wellion Lancets Compact Pouch Easy Start Guide User Guide Reference Guide... -
Page 6: The Wellion Calla Light Meter
(see turn off the meter. page 40) or numbers when set- ting up the meter (see page 11). The correct reading of your data can be ensured only with the original Wellion CALLA USB cable with Micro-USB connector. - Page 7 The Wellion CALLA Light Meter Battery Compartment Holds two AAA batteries.
-
Page 8: The Wellion Calla Blood Glucose Test Strip
IMPORTANT: • Be sure to use only the Wellion CALLA Blood Glucose Test Strips with the Wellion CALLA Light Blood Glucose Meter. Other brands of test strips will not work with the Meter. - Page 9 • The Wellion CALLA Blood Glucose Test Strips are sensitive to moisture and light, it is important to close the vial cap of the test strip bottle tightly after each use. DO NOT leave any test strips outside the bottle while not in use.
-
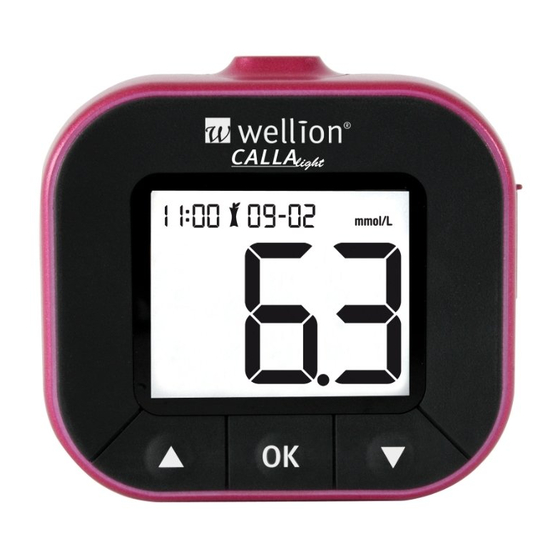
Page 10: Meter Display Screen
Meter Display Screen Year/Month/Date, Hypo/Hyper warning setting message Tone setting message AC/PC marker Memory recall icon setting icon Day average icon Low battery icon Hour/Minute Reading unit icon Meter failure icon Invalid temperature icon Control solution Alarm clock setting icon mode icon Test strip Reading,... -
Page 11: Setting Up Your New System
SETTING UP YOUR NEW SYSTEM Inserting (or Changing) Batteries Batteries need to be inserted before using your Wellion CALLA Light Meter for the first time or when the battery icon appears on the meter display. Materials you will need: Your Wellion CALLA Light Meter... - Page 12 NOTE: • Current date and time information will be memorized by the meter for appro- ximately 5 minutes. If the batteries are inserted after 5 minutes, meter may prompt to verify the current date and time (see page 13, Setting Time and Date).
-
Page 13: Setting Time And Date
Material you will need: Your Wellion CALLA Light Meter NOTE: • If date and time on the Wellion CALLA Light Meter has not been set, test or control results will not be stored in the meter memory. Step 1: Press and hold the OK button until the display screen displays “FunC“. - Page 14 Step 3 - Set Month: Press the OK button to enter date and time set up. The current month will flash. Use buttons to select the correct month. Press the OK button to confirm your choice and advance to set the day. Step 4 - Set Day: The current day will flash.
- Page 15 Step 6 - Set Hour: The current hour will flash. Use buttons to select the correct hour. Press the OK button to confirm your choice and to advance to set the minutes. Step 7 - Set Minute: The current minute will flash. Use buttons to select the correct minutes.
-
Page 16: Turning On/Off Tone Sound
Turning ON/OFF Tone Sound The Wellion CALLA Light Meter comes with tone ON as preset. Turning off the tone will cause you to miss many important cues from your meter - such as confirmation or error messages. Material you will need:... - Page 17 Step 3: Press button to select the next function to setup or insert a test strip and begin testing. You can also turn off the meter by press and hold the OK button until the display screens shows OFF. NOTE: •...
- Page 18 Step 3: Press button, go to tone set up and press the OK button to enter tone setup. Use buttons to turn the tone on or off. Step 4: Press button to select the next function to setup or insert a test strip and begin testing.
-
Page 19: Hypo (Hypoglycemia) And Hyper (Hyperglycemia) Warning Setting
Hypo (Hypoglycemia) and Hyper (Hyperglycemia) Warning Setting The Wellion CALLA Light meter contains a user definable hypoglycemia and hyper- glycemia alarm to better assist you in understanding your blood sugar levels and glycemic state. IMPORTANT: • For your convenience, the factory preset Hypo alarm (Hypoglycemia) is 70 mg/dl (3,9 mmol/l) and the factory preset Hyper alarm (Hyperglycemia) is 250 mg/dl (13,9 mmol/l). - Page 20 The Wellion CALLA Light Meter has a settable Hypo range from 0 to 127 mg/dl (0 to 7 mmol/l) Step 3:...
- Page 21 Press the OK button to enter hyper setup. Press buttons to once adjust the values one by one or press and hold buttons to advance through the numbers very quickly. The Wellion CALLA Light settable Hyper range from 0 to 511mg/dl (0 to 28,4 mmol/l).
- Page 22 Step 4: Press button to select the next function to setup or insert a test strip and begin testing. You can also turn off the meter by press and hold the OK button until the display screens shows OFF. To set up Hypo/Hyper warning when the meter is off, turn on the meter and enter setup mode by pressing and holding the OK button until the meter display screen shows “FunC”.
-
Page 23: Setting Alarms
Setting Alarms Your Wellion CALLA Light Meter has 3 alarms that can be setup. The factory preset is off for all alarms. Follow the steps below to setup up your alarms. Material you will need: Your Wellion CALLA Light Meter... - Page 24 Step 4: After pressing the the OK button, the alarm status will flash. Press buttons to turn the alarm ON or OFF. Press the OK button to confirm your selection. NOTE: • If OFF is selected and the OK button is pressed, the screen will show Step 5: With ON selected, begin setting alarm by first setting the hour by pressing...
- Page 25 NOTE: • Hold down the buttons during hour or minute selection to scroll through the numbers quickly. Step 6: Press buttons to set up the next alarm(s). There are three alarms which can be set. Follow steps 3 through 5 to set the additional alarms. After finishing setting up the alarms, press buttons to “End”...
-
Page 26: Control Solution Testing
CONTROL SOLUTION TESTING The purpose of the control solution testing is to make sure the Wellion CALLA Light Blood Glucose Monitoring System is working properly. You should perform control solution testing when: • Using the meter for the first time •... - Page 27 A new Wellion CALLA Blood Glucose Test Strip Step 1: Insert a Wellion CALLA Blood Glucose Test Strip into the meter with the arrow mark facing up. Make sure the test strip contact points are inserted all the way into the meter. Close the test strip bottle immediately after taking out a strip.
- Page 28 30. Step 3: Squeeze a drop of Wellion CALLA Control Solution onto a clean, dry, nonabsorbent surface. Do not apply control solution to the test strip directly from the bottle. Replace the bottle cap on the control solution bottle immediately after use.
- Page 29 Step 5: The screen will count down. After 6 seconds, the control solution testing result will appear on the meter display screen. Step 6: Compare the reading on the screen to the corresponding con- trol range printed on the test strip bottle. If the reading does not fall within the ranges printed on the test strip bottle, see Control Solution Solving Problems on page 45.
-
Page 30: Control Solution Trouble Shooting
• Wrong brand of Control Solution • Make sure using being used Wellion CALLA Control Solution. • Control solution not at room tempe- • Make sure the testing environment rature is between 10°C to 40°C. • Expired or contaminated control •... -
Page 31: Testing Your Blood Glucose
After every turning on of the meter it will perform a system check automatically. Materials you will need: Your Wellion CALLA Light Meter A new Wellion CALLA Blood Glucose Test Strip Lancing device with a clean, unused lancet Before you begin, make sure: •... -
Page 32: Preparing Your Lancing Device
Preparing your Lancing device Ejection System Sliding Barrel Penetration Depth Release Button Shallow Deep Adjustable Lancet Holder 2 3 4 5 6 7 8 9 10 Lancet Step 1: Unscrew the adjustable cap of the lancing device and in- sert the lancet by push down firmly until it is fully seated. Step 2: Twist the protective cover off from the lancet. - Page 33 Step 3: Adjust the puncture setting on the adjustable cap for the puncture depth level (1 is the lightest and 10 is the deepest). Step 4: With one hand holding the lancing device, pull back the cocking handle with your other hand until you hear a click sound and the lancing device is ready.
-
Page 34: Performing A Blood Glucose Test
Performing a Blood Glucose Test Step 1: Take out a Wellion CALLA Test Strip from the test strip bottle and close the bottle immediately. Insert the test strip to turn on the meter. IMPORTANT: • Check the expiration date printed on the test strip bottle and its package. Do not use expired test strips. - Page 35 Step 2- For Fingertip Testing: Hold the lancing device against the side of your fingertip and press the release button to create a puncture. TIP: • Gently message your hand and finger toward the puncture site to form a drop of blood. Do not “milk, ” or squeeze around the puncture site. •...
- Page 36 Step 4: The screen count down and after 6 seconds, your glucose testing result will appear on the meter display screen. CAUTION: If you see “HI” or “LO” displayed, your blood glucose level may be above 600 mg/dl (33,3 mmol/l) or below 20 mg/dl (1,1 mmol/l). Test again using finger- tip testing, DO NOT test on forearm.
- Page 37 Wählen Sie einen Marker Nach dem Essen-Marker Kein Marker Vor dem Essen-Marker Step 6: Remove and discard the used test strip into proper wastebasket. The meter will automatically shut off. Step 7: Remove the used lancet from your lancing device. You can use the lancet ejector to prevent needlestick injuries.
-
Page 38: Understanding Your Blood Glucose Test Result
IMPORTANT: Discard used test strips and lancets according to your local disposal regulations where applicable. UNDERSTANDING YOUR BLOOD GLUCOSE TEST RESULT Blood glucose value will vary depending on food intake, medication, health, stress and exercise. The ideal range for adults without diabetes should be: •... - Page 39 • Treat your diabetes according to the instruction from your doctor and/or consult your healthcare provider. If the Meter displays results that are marked with „hypo“ or „hyper“ this means that your results are below or above your chosen hypo or hyper limit AND you DO NOT feel ill: •...
-
Page 40: Viewing Stored Readings And 1, 7, 14, 30, 60 And 90 Days Average From Memory
VIEWING STORED READINGS AND 1, 7, 14, 30, 60 AND 90 DAYS AVERAGE FROM MEMORY The CALLA Light Meter automatically stores up to 500 test and control results with date and time. In addition, the meter also provides 1, 7, 14, 30, 60 and 90 days averaging to help you better track your effort in controlling your blood glucose level. - Page 41 If other error messages (E 1, E 2, etc) appear, see Solving Problems on page 45. buttons to view older stored results. End will appear if there are no recorded test results in the me- mory. Step 3: Press the OK button to enter viewing daily averages. The first average will be the 1 day average.
- Page 42 NOTE: • Control testing results are flagged by ctl on the bottom left corner of the dis- play screen in addition to mem. • Control testing results will not be included in the day averages. • When there are no daily average data available, the display screen will show 3 dashes.
-
Page 43: Caring For The Meter
• If the meter gets dirty, use a moist (NOT WET) lint-free cloth dampened with a mild detergent. • Do not get water inside the CALLA Light Meter. Never immerse the meter or hold it under running water. • Do not use glass or household cleaners on the meter. - Page 44 • Avoid leaving the meter in extremely hot or cold places, such as near a heat source or in an extremely hot or cold car. • Do not store or use the meter or test strips in high humidity levels, such as ba- throom or kitchen.
-
Page 45: Solving Problems
SOLVING PROBLEMS This section details the significant display screen messages and error codes you will encounter when using your Wellion CALLA Light meter and test strips. What you see What it means What should you do “Test strip failure: • Insert a new test strip into the meter. - Page 46 “Test strip was remo- • Repeat the test with a new test strip. ved too early during • If problem persists, contact your testing” authorized distributor. “Extreme conditions: • Move the meter into an area that Big temperature dif- is between 10°C to 40°C, and allow ference”...
- Page 47 “Battery is low” • Change the batteries according to page 11, Inserting (or changing) the batteries. “Testing has been • Move the meter into an area that performed outside is between 10°C to 40°C, and allow of operating tempe- 10 to 15 minutes for it to reach the rature.
- Page 48 „Test result is low- • Treat low blood sugar immediately. er than 20 mg/dl Wash and dry your hands and repeat (1,1 mmol/l)“ the test using a new test strip. If the result is still LO, contact your physi- cian or healthcare professional imme- diately.
-
Page 49: Manufacturer´s Warranty
MANUFACTURER´S WARRANTY The producer warrants Wellion CALLA Light blood glucose meter against defects in materials and workmanship for a period of two years from the date of purchase. The warranty is lost if the instrument is misused, poorly maintained or is tampered with. -
Page 50: Specifications
SPECIFICATIONS Test Strips: Wellion CALLA Blood Glucose Test Strips Test Range: 20-600 mg/dl (1,1-33,3 mmol/l) Calibration: Plasma Test Time: 6 Seconds Sample Size: 0,65 μl Hematocrit Range: 35 – 50 % Display Type: Large LCD screen Memory: 500 blood test results with date and time... -
Page 51: Symbols
For additional information, refer to the Wellion CALLA Test Strip insert. Alternate Site Testing (AST) on palm or forearm possible. SYMBOLE Do not reuse (EXP) Expiration date (use by last day of month) Do not use if package is damaged... - Page 52 MED TRUST Handelsges.m.b.H. Gewerbepark 10 7221 Marz In Vitro Diagnostic AUSTRIA Medical Device www.medtrust.at...
Need help?
Do you have a question about the CALLA Light and is the answer not in the manual?
Questions and answers
I'm English, live in Portugal and been diagnosed with diabetes. I have been provided with a Wellion Calla light monitor but need an instruction manual in English.
An English instruction manual for the Wellion CALLA Light Blood Glucose Monitoring System is included in the kit. It contains a User Guide and a Reference Guide.
This answer is automatically generated