
Related Manuals for Equalizer Systems El Pac 1

Summary of Contents for Equalizer Systems El Pac 1
- Page 1 (800) 846-9659 www.equalizersystems.com Operation, Troubleshooting & Warranty Manual Effective-2011 Revision- February 2021 EQ008R3 EL-PAC 1 & 2...
- Page 2 General Notes for El Pac 1 & 2…………………………………...1 Installation of El Pac 1 on Single Speed Bulldog, Fulton, and Ram Jacks…………………………………….2 Installation of El Pac 1 on Single Speed Fulton Jacks…………….3 Installation of El Pac1 on Two Speed Bulldog Jacks with 4” x 4” Gear Reduction Box…………………………4 Installation of El Pac 2 on Binkley Two Speed Jacks Driver’s Side………………………………………………6...
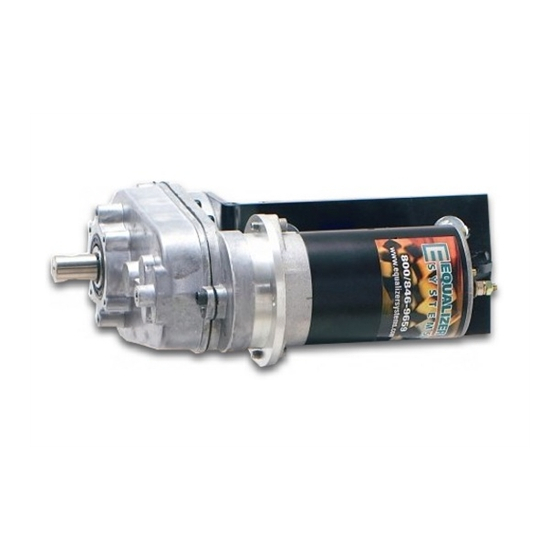
- Page 3 Questions? Call Equalizer Systems at (800) 846 9659 for technical assistance. The El Pac 1 gearbox has a specific gear ratio and a maximum lifting capacity of 5,000 lbs. It is recommended that the length of the trailer should be not greater than 28 feet of floor length.
- Page 4 Any other single speed jackleg is NOT compatible with the El Pac 1. Once again, the El Pac 1 is designed to mount on either side of the jack leg; however, the preferred mounting would be on the passenger side of the jack leg if space permits.
- Page 5 Installation of El Pac 1 on Fulton Installation of the El Pac 1 on a Fulton jack is done the same way as the Bulldog and Ram jacks with one exception. The Fulton jack has a smaller shaft than the Bulldog and Ram jacks. To take care of this, you use the supplied nylon bushing (part # 1961E) around the shaft prior to sliding the El Pac 1 in place.
- Page 6 Failure to have the jack leg in the high gear will void warranty. 1. The El Pac 1 must be installed on the passenger side of the Bulldog two-speed jack with the 4” x 4” gear reduction box. See the drawings on page 5.
- Page 7 3. Attach the El Pac 1 to the bracket using the (4) supplied ¼” x ¾” bolts and lock washers. 4. Slide the El Pac 1 gearbox over the shaft. Align the bracket correctly (square to the jackleg and centered on the shaft).
- Page 8 INSTALLATION of EL PAC 2 (Binkley Two-Speed Jacks) The El Pac 2 is designed to mount on either side of the Binkley 2-speed jack leg. The suggested mounting style is on the driver’s side of the existing jack leg. This will allow the factory crank and handle to attach to the El Pac 2 override output shaft.
- Page 9 6. Drill a hole through the jack shaft using the output shaft of the El Pac 2 as a guide. Use the supplied 5/16” x 2” bolt and nylock nut to secure the output shaft to the jack shaft. 7. Mount Switchgear in desired location. 8.
- Page 10 Installation on Driver’s Side of Jack Leg (newer style Binkley) For the most part installation of the El Pac 2 on the newer style Binkley jack is the same with the following exceptions. 1. Since there is no collar around the input shaft of the newer Binkley 2-speed jack, after you pull the input shaft out into low gear, you must measure 2”...
- Page 11 Installation on Passenger’s Side of Jack Leg 1. Again, the suggested (and preferred) mounting style is on the driver’s side of the existing jack leg. However, it may be necessary to mount your El Pac 2 on the passenger side of your jack leg due to the space limitations.
- Page 12 POWER SUPPLY AND SWITCHGEAR CONNECTIONS FOR EL PAC 1 & 2 Make the connection of the 12V negative cable to the battery the very last connection. Check all other connections and have the switchgear mounted and connected to the El Pac prior to applying power.
- Page 13 5. Attach the Red #6 AWG wire from the switchgear to the ‘AUX’ post on the breaker assembly using the supplied crimp ring terminal. This ‘AUX’ post will have two nuts present and is diagonal from the +12 volt battery pigtail. Install the crimp ring and use first nut as a jamb nut to hold the wire securely to the assembly.
- Page 14 Check the weight of the trailer on the jack(s). Two speed jack in improper gear. • The clutch in the El Pac 1 may be set too low. Call Equalizer at • (800) 846-9659 for assistance. PARTS LIST...
- Page 15 1. Only warranty claims with prior written or verbal authorization from Equalizer Systems will be recognized, all other claims will be denied. 2. Equalizer Systems warrants single and dual jack system components for a period of two years from the date of original sale of the vehicle. This warranty covers defects in material and workmanship only.
- Page 16 11. Excessive warranty labor resulting from inadequate access to the Equalizer Systems product will not be reimbursed. 12. Equalizer Systems will not pay a markup on warranty parts unless required by law. 13. Travel expenses, hotel, telephone, fuel or any other expenses of the like are not covered under warranty.
Need help?
Do you have a question about the El Pac 1 and is the answer not in the manual?
Questions and answers