Table of Contents
Advertisement
Quick Links
User manual
Dealer stamp
e-bility GmbH
Dieselstraße 28, 53424 Remagen
Germany
Hotline: 0 800 - 1954 533
Phone: +49 2642 - 999 800
„
Fax:
+49 2642 - 999 802 9
„like us on
like us on facebook
E-Mail: info@electronic-mobility.com
facebook
ENG
facebook.com/Elektroroller.Kumpan
www.kumpan-electric.com
facebook.com/Elektroroller.Kumpan
Advertisement
Table of Contents

Related Manuals for Kumpan electric 1950 Pure


Summary of Contents for Kumpan electric 1950 Pure
- Page 1 User manual Dealer stamp e-bility GmbH Dieselstraße 28, 53424 Remagen Germany Hotline: 0 800 - 1954 533 Phone: +49 2642 - 999 800 „ Fax: +49 2642 - 999 802 9 „like us on like us on facebook E-Mail: info@electronic-mobility.com facebook facebook.com/Elektroroller.Kumpan www.kumpan-electric.com...
- Page 3 Dieselstraße 28 53424 Remagen www.kumpan-electric.com 1. Auflage, Remagen, 04-2016...
-
Page 4: Table Of Contents
Content Safety Instructions Important information Basic safety rules Check before your first ride •First steps First step before putting in usage Scope of supply Handlebar assembly Front wheel assembly Rearview mirror assembly and adjustment Headlight assembly Assembly of the rear fender rubber pad Affixing of the frame rubber pads Kumpan 1950 Total view - left side... - Page 5 Throttle driving mode Supporting driving mode Safe driving and stopping Stopping/ parking Set the vehicle on the main stand Wartung Lighting Brakes Tires Battery Others Cleaning and care Troubleshooting Technical data...
- Page 6 Please follow the instructions provided by the guideline, prior to the first ride with your new Kumpan Electric 1950. This will prevent the occurrence of complications due to improper usage.
-
Page 8: Important Information P
Security instructions Important information: Kumpan 1950 Urban. of increasing its power or performance is prohibited. Modifications of this type are illegal. There is also the risk of seri- When using the kickboard 1950 Urban, the following docu- ously damaging the scooter, and worse, such modifications can make ments and ID’s have to be carried along: it unsafe, leading to possible falls or accidents, with serious or even fatal injuries. - Page 9 No additional documents are required to be carried along, when using the kickboard 1950 Urban/Pure. The usage of this model is restricted by provincial or municipal law. Consult your state’s transportation authorities for the latest regulations before operating the scooter on Urbans.
-
Page 10: Basic Safety Rules
Safety instructions Basic safety rules: Most accidents are caused by the in- When consuming specific medicine, Always follow the national and local experience of the driver. Therefore, alcohol, or anesthetics, the risk of traffic regulations. Avoid sudden- NEVER lend your vehicle to a novice. accidents is increasingly higher. - Page 11 If any component was affected, bring the vehicle to a Kumpan electric ser- vice station for repair and check-up. Please inform the Kumpan electric service station about the circumstan- ces, which led to the damage to help identify any fault.
- Page 12 Safety instructions Basic safety rules: can help to make you more noticeable Please do not change the position, in traffic. Be sure to avoid loose clo- the angle/inclination or the color of thes that could get caught on any part the following parts, under any circum- of your kickboard.
- Page 13 The same rules apply for the stee- Kumpan electric recommends to use ring angle of the front wheel (this only original accessories. shouldn’t be restricted in any way), as...
- Page 14 Safety instructions Loading: Due to excessive package weight, the Never place bulky, heavy or dangerous Make sure to only transport packages, stability and maneuverability can be objects on the handlebars, the fenders which can be safely fixed onto the ve- impaired.
-
Page 15: Check Before Your First Ride P
Check bevor a journey: Please follow the function-and-safety Checkpoint: To check: checklist, as described below, before using the vehicle. Front disk brake: • the function (see p. 57 f.) • the idle stroke of the brake lever • the brake hose for possible damage Back disk brake: •... -
Page 16: First Steps
Safety instructions First step: Ensure that the vehicle batteries are fully charged. If this is not the case, charge the batteries up to the fullest capacity before using the vehicle. (see p. 36f and 41ff). Check the tire pressure: Front/Back 2, 1 bar Check the lighting on the vehicle prior to each journey. -
Page 18: Scope Of Supply
A rearview mirror, a bell, front and rear light (preassembled), frame extension with carrier and bench, two orange side reflectors, licen- se plate support (assembled) a throttle and a speedometer. The illustration shows the scope of supply from the model 1950 Pure... -
Page 19: Handlebar Assembly
Handlebar assembly (for 1950 Pure & 1950 Urban) Assemble the handlebar preferably Set the handlebar (see illustration) in Now, recline the previously removed with the kickboard in folded mode. the pan stem. Here, make sure that stem cover and screw it back in using... - Page 20 First step before putting in usage Handlebar assembly (for 1950 Pure & 1950 Urban) In order to adapt your handlebar to your er- If the handlebar should not be fixed Remove the rubber cover of the fixing gonomics, you should follow the additional correctly, as seen in the above illust- screw.
- Page 21 Release the 5mm Allen screw in a Position yourself in front of the kick- Now you can adjust the front wheel counter clockwise direction. board and fix the alignment of the to the handlebar. They have to form a frontal wheel with your legs, as illus- 90˚...
- Page 22 First step before putting in usage Handlebar assembly (for 1950 Pure & 1950 Urban) First fasten the 5mm Allen screw and then both Allen key screws of the stem. Insert the rubber cover on the headset fixing screw.
-
Page 23: Front Wheel Assembly
Front wheel assembly (bei 1950 Pure & 1950 Urban) Unfold the kickboard and fix it with Turn the lock nut of the quick release Insert the quick release skewer on the help of both quick release ske- skewer of the front wheel, as illustra-... - Page 24 First step before putting in usage Front wheel assembly ( 1950 Pure & 1950 Urban) Make sure that the brake disc fits Attach the spring on another side, as Slide the front wheel including the between both brake linings. illustrated above, and turn the coun- quick release from below into the fork.
- Page 25 When the wheel is horizontally To fasten in the wheel, press the quick leveled and centered, tighten the release lever into the direction of the fork quick release lever (rotate a few turns to finalize the fixation of the front wheel. in clockwise direction).
-
Page 26: Rearview Mirror Assembly And Adjustment
First step before putting in usage Rearview mirror assembly and adjustment (1950 Urban): Adjust jour rearview mirror prior to Fit the rearview mirror into the desi- Rotate the mirror clockwise appx. every journey. The rearview mirror gnated port. 8-9 times in the thread and arrange arm has to be adjusted in a straight it. - Page 27 Now, fasten the end nut with a 14 hex Place yourself in driving direction on driver (clockwise), in order to lock the the kickboard in order to adjust the mirror in position. Position yourself on mirror. Place the mirror according to the kickboard in the driving direction your best visibility of what is happe- in order to optimally adjust the mirror.
-
Page 28: Headlight Assembly
First step before putting in usage Headlight assembly (1950 Urban): Insert the headlight with the ground- Insert the provided Phillips screw in Plug both cable lugs into the contacts ing clip into the preassembled head- the lamp holder and screw in the M5 on the backside of the headlight so- light holder on the front bar of the nut tightly (not self-retaining). - Page 29 Fasten the M5 nut and counter it with We suggest to avoid the usage of the sufficiently illuminate the Urban in another M5 nut, as described in the 1950 Pure, when driving by night or front of the kickboard. illustration above. in darkness.
-
Page 30: Assembly Of The Rear Fender Rubber Pad
First step before putting in usage Assembly of the rear fender rubber pad (1950 Pure) The brown rubber emblem does not Before assembly, remove the protec- The “K” has to be oriented in the dri- only serve as an ornament, but also tion from the adhesive film on the ving direction as imaged above. -
Page 31: Affixing Of The Frame Rubber Pads
Affixing of the frame rubber pads (1950 Pure 6 1950 Urban) The scope of supply contains two Attach these rubber buffers on the transparent rubber buffers designa- left and right site of the rear frame ted for the protection of the frame... -
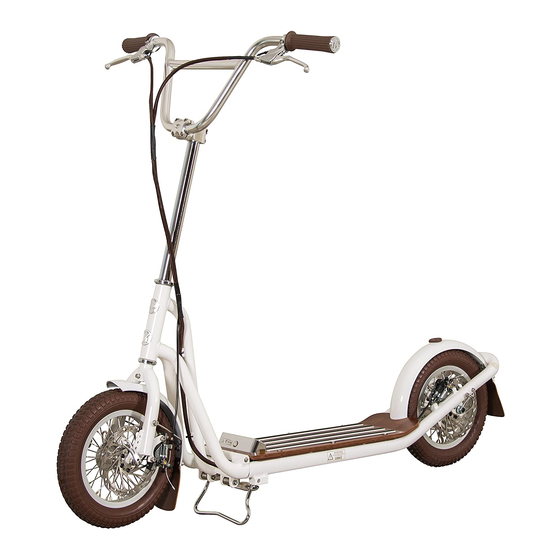
Page 32: Total View - Left Side
Kumpan 1950 Total view - left side (1950 Pure) Brake lever rear wheel Control panel Hydraulic disc brake, rear Main stand Mudguard flap Hydraulic disc brake, front... - Page 33 Total view – left side (1950 Urban) Headlight Brake lever, front wheel Bell Throttle Brake lever, rear wheel Control panel Bench / luggage carrier Rear light/brake light/license plate light Side reflectors License plate holder Mudguard flap Hydraulic disc brake, rear Main stand Hydraulic disc brake, front...
- Page 34 Der Kumpan 1950 Total view – front & back (1950 Pure) b025012/12345678 Engine number 1. Brake lever, rear wheel 2.Brake lever, front wheel 3.Rear frame extension...
- Page 35 Total view - front & back (1950 Urban,) b025012/12345678 Engine number 1.Rearview mirror 2.Brake lever, rear 3.Brake lever, front 4. Headlight incl. front reflector 5.Speedometer 6.Rear & brake lamp incl. license plate lamp 7.Rear reflector 8.Bench 9.Luggage carrier...
-
Page 36: Structure Of The Control Panel
Kumpan 1950 Structure of the control panel (1950 Pure and 1950 Urban) ON/OFF 1.Battery charge status and error code display 2.USB – Phone – charging socket (see p. 37) 3.Battery charging socket (see page 32) 4.ON/OFF button (see page 58 f.) -
Page 37: Throttle
Throttle (1950 Urban) 1.Throttle(see page S. 44 ff) 2. • a. Throttle “ON” • b. Throttle “OFF” 3. Bell... -
Page 38: Control-Panel
Operation/Driving Control Panel (1950 Pure & 1950 Urban): the lighting system, press and hold Plug the charging device’s power plug The control panel can be found in the the power button again for appx. 2 into the 110 V household outlet. - Page 39 for a longer period, since this can The Kumpan 1950 provides you cause a deep discharge. Note page with the possibility to recharge your 41 . Smartphone via USB. Firstly, plug in Every deep discharge can damage a mini-USB-adapter into your phone the battery irreparable.
-
Page 40: Unfolding The Kickboard
Operation/Driving Unfolding the kickboard (1950 Pure & 1950 Urban) Lift up the front part including the handlebar in the At the bottom of the kickboard, up Press the clips with your fingers over upright position. front, you can find both quick release... - Page 41 Assure yourself that the quick release Proceed with the second lever exactly On the outside of the clamp you can levers are fully tightened and pressed as described above. find a fine adjustment screw (3M Al- against the kickboard’s footboard. In len screw), which you can adjust when this position, they should not allow the pretension clamp, in tighten sta-...
-
Page 42: Vehicle Identification Number/ Serial Number
The vehicles identification number can be found underneath the kickboard’s footboard, just before the rear wheel. The kickboard model 1950 Pure (without Ur- ban approval) has a serial number and a chassis number. The kickboard model 1950 Urban (with Urban... -
Page 43: Charging The Battery
Charging the battery (1950 Pure & 1950 Urban) TIPPS ON HOW TO CHARGE THE BATTERY: WORKING PARAMETERS OF THE BATTERY: Recharge the battery after each lon- • Suggested operating temperature: ger journey (when driving more than Between 23°F and 104 °F 10 km). -
Page 44: Charge Status Indicator On The Charger
Operation/Driving Charge status indicator on the charger (1950 Pure & 1950 Urban) fully charged. Your kickboard is ready to start. Remove first the power plug from the 130 V house outlet, then the charging plug form the vehicle’s charging socket. -
Page 45: Safety Instructions
Safety instructions: Use only the supplied batteries. Char- Run periodical visual inspections of Plug out the power outlet: ge the batteries only with the original the connector plug and charger. If da- charger provided by the producer. maged, change them. Keep out of wa- •... -
Page 46: Start The Engine P
Operation/Driving Start the engine Run in Throttle driving mode: (1950 Pure & 1950 Urban) (1950 Pure & 1950 Urban) (1950 Urban) ON/OFF Press the power button facing the Avoid instantaneous and prolonged When starting to drive, the main frontal wheel once for ca. 2 seconds braking until your mileage reaches 10 stand has to be lifted up. -
Page 47: Safe Driving And Stopping
Supporting driving mode (1950 Pure & 1950 Urban) The scooter will be operated by a ma- The electrical support will from this Position yourself with a foot on the nual kick off the ground. point be slowly reduced, in order to footboard. - Page 48 Operation/Driving The harder the driver kicks off, the By pressing the brake lever, the vehicle longer the electrical support will be will slow down. maintained. Regardless of whether just one or both brakes are lightly touched or pulled through, the electrical support will be stopped immediately (electri- cal Cut –...
- Page 49 Safe driving and stopping (1950 Pure & 1950 Urban) In the following, you will be given You should gently press the brakes at The vehicle is with tube- type tires some advices which will enable you to regular intervals. equipped. In case of a flat tire you can have a safe and joyful day to day ride.
-
Page 50: Stopping/ Parking
Operation/Driving Stopping / parking ( Set the vehicle on the main stand (1950 Pure & 1950 Urban) (1950 Pure & 1950 Urban) Take the gas away and slowly decele- rate the vehicle. In the case of the kickboard version with Urban approval, switch off the... - Page 51 ADVICE: Always make sure that the kickboard stands stable.
-
Page 52: Lighting
Maintainance Front lamp: Brakes: Tires: Assure yourself, before you start dri- Allow only trained personnel of two Verify the tire pressure after a longer ving, that the beams angle is visible – wheel or bike specialist dealer to fix period of rest. (see also page 26 - front lamp assem- the brakes. -
Page 53: Battery
Battery / accumulator: Others: Verify periodically for visible damages Verify the rubber grip is eroded or if it the battery housing under the foot- still sits fixed. board. Verify the function and stability of Store the vehicle, when possible, dry the support stander (see page 48). - Page 54 Cleaning and care Instructions for cleaning and care: After washing, any cleaning residues should be removed with clear water: In order to prevent rust, after driving Dry your vehicle with a leather cloth. in the rain, we recommend you to clean and dry the vehicle thoroughly.
- Page 56 Troubleshooting ERROR POSSIBLE CAUSES TROUBLESHOOTING • The range of the scooter decreases • The tire pressure is too low. • Check the tire pressure and correct (siehe S. 57). • Outdoor temperatures around • Do not charge your kickboard at free freezing or below.
- Page 57 ERROR POSSIBLE CAUSES TROUBLESHOOTING • Urban lighting is not aligned correctly • Head light is adjusted too low or too • Adjust the headlight so that the high Urban in front of you is lighted • Vibrating brake lever • The brake disc is unbalance •...
- Page 58 Technical data MOTOR BATTERY Model brushless wheel hub motor Type lithium-Ion voltage 36 V maximum power 250 W capacity 8,8 Ah Efficiency ≥ 80% weight 1,6 kg Max. torque 11 Nm bei 322 U/min charging current/ charge time 1,5-3 A / 2,5 hours VOLTAGE CHARGER Board/driving mode...
- Page 59 DIMENSION Pure Urban FRAME handlebar height 114 cm 114 cm Aluminium dimensions 137/72/114 cm 137/72/114 cm dimensions folded 117/55/67 cm 117/55/77 cm BRAKES Front hydraulic disc brakes with pack size 104/19/40 cm 104/19/51 cm electric cut-off function Rear hydraulic disc brakes with electric cut-off function packaging size 105/26/60...
- Page 60 Technical data VEHICLE DIMENSIONS 1950 Pure (in mm) 1040 1370...
- Page 61 VEHICLE DIMENSIONS 1950 Pure, folded (in mm) 1040 1370...
Need help?
Do you have a question about the 1950 Pure and is the answer not in the manual?
Questions and answers