Table of Contents
Advertisement
Quick Links
Advertisement
Table of Contents

Related Manuals for Art Tube Channel


Summary of Contents for Art Tube Channel
-
Page 1: Tube Channel
TUBE CHANNEL USER’S MANUAL... -
Page 2: Table Of Contents
FEATURES ... 3 OVERVIEW... 3 ? ... 3 HY USE AN EXTERNAL PROCESSING CHANNEL ... 4 ESIGN OTES SETTING UP ... 5 ... 5 NPACKING AC P ... 5 OWER OOKUP ... 5 UDIO ONNECTIONS ... 6 NSTALLATION ... 6 AFETY RECAUTIONS ... - Page 3 EQ T ... 19 What is the best way to use EQ?... 19 TUBE REPLACEMENT... 20 BLOCK DIAGRAM... 21 A R T TUBE CHANNEL SPECIFICATIONS ... 22 WE’RE ON-LINE! ... 23 WARRANTY AND SERVICE INFORMATION... 23 ... 23 IMITED ARRANTY ...
-
Page 4: Features
However, they are not necessarily your best option for the actual recording of tracks. While their onboard circuitry is nearly always clean and quiet, the simple truth is that the Tube Channel has a better sounding and more... -
Page 5: Design Notes
“big” consoles use external EQs, compressors and preamps!The goal of any recording is to get the sounds right before you commit them to tape. The Tube Channel exists to help you get it right so you don’t have to “fix it in the mix”. -
Page 6: Setting Up
Your Tube Channel was packed with care at the factory. The shipping carton was designed to protect the unit during initial shipment. Please retain this carton for use in transporting the Tube Channel, or in the unlikely event that you need to return your Tube Channel for servicing. -
Page 7: Installation
We recommend using only high-quality cables equipped with the appropriate connectors. Installation The Tube Channel may be employed in a number of setups including:- Between a microphone and a mixer, digital multi-track recorder, DAT machine, hard disk recorder, or analog recorder.- In a mixer’s channel insert points.- Between a microphone and signal... -
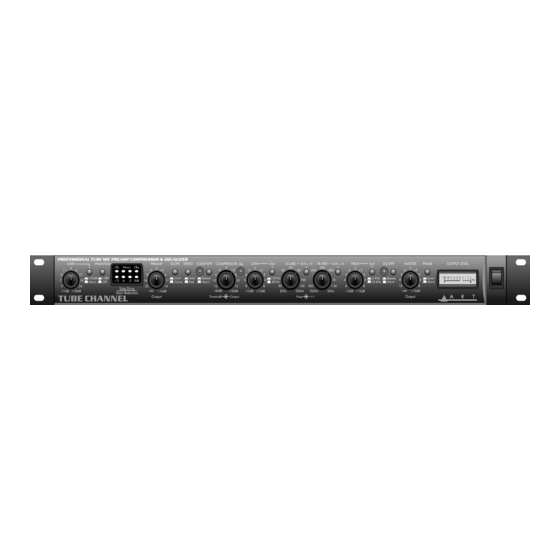
Page 8: Front Panel Controls & Indicators
Front Panel Controls & Indicators Preamp Circuit Gain Control The Gain control sets the amount of input gain of the Tube Channel. Turn the control clockwise to increase gain and counterclockwise to decrease gain. Selection of the gain range is made with the +20dB gain switch. -
Page 9: Tube Drive/Gain Reduction Display
Note: MOST dynamic microphones should not be affected or damaged if they are plugged into the Tube Channel when phantom power is turned on (we haven’t run across any). -
Page 10: Optical Compressor Circuit
When setting up the preamp circuit, start with the Preamp Output at its “0” level. Once you get the Gain control set the way you want it to sound, use the Preamp Output control to set the level out of the preamp circuit (much like using the master volume control on a guitar amplifier). -
Page 11: Compressor Threshold And Output Controls
(bypass) position, signal is allowed to pass from the preamp circuitry to the equalizer circuit with no compression. The LED will glow red when Bypass is engaged. This informs you that the compressor is bypassed. In its “out” (Norm) position, the compressor is active. Use the Bypass switch when setting the compressor’s output level to achieve unity (no boost or cut) gain. -
Page 12: Clip Indicator
Equalizer Circuit The equalizer circuit in the Tube Channel is a tube--based, semi- parametric, four-band equalizer. Each of the bands overlap, giving you the ultimate in flexibility. The “Q” (or bandwidth) of each of the filters is purposely wide to provide a very musical sound. -
Page 13: Lo-Mid Frequency Control
position the corner is 120Hz. Lo-Mid Frequency Control The Lo-Mid control is a dual concentric pot (there are two controls-- one outer and one inner). The outer control is used to select a frequency while the inner control is used to apply +/-12dB of gain. The Lo-Mid control can cover two frequency ranges depending on the position of the Shift x 10 switch. -
Page 14: High Shift Switch
This informs you that the equalizer is bypassed. In its “out” position, the equalizer is active. Use the EQ Bypass switch when setting the Tube Channel’s output level to achieve unity (no boost or cut) gain through the equalizer circuit. Unity gain is achieved when the active level is the same as the bypassed level. -
Page 15: Output Level Vu Meter
Output Level VU Meter A backlit, average reading, VU meter is provided to accurately monitor the output level of the Tube Channel. The “0” level is calibrated to +4dBm with a 600 ohm load on the output (using either the XLR or ¼” connector). -
Page 16: Rear Panel Connections
Input One input jack per channel should be used at a time. However, because of its design, the Tube Channel can be hard-wired without having to disconnect the XLR inputs when using the ¼” jacks. If no load is placed on the XLR input (no instrument or microphone connected) the ¼”... -
Page 17: Preamp - Compressor Loop
Control of the compressor circuit. This jack may be used to connect the output of a piece of equipment to the input of the compressor circuit in the Tube Channel. Since there is no input level control to the compressor in the Tube Channel, the piece of equipment in the insert loop should have level matching capabilities (i.e., an output level... -
Page 18: Applications
Connect the output from the Compressor Send jack into the input of the next piece of equipment (or the return of a mixer). To use only the equalizer circuit of the Tube Channel: Plug a line level signal (or a send from a mixer) into the EQ Return Jack. Connect either output from the Tube Channel into the input of the next piece of equipment (or the return of a mixer). -
Page 19: Special Effects
Note: Be certain that you do not connect the Tube Channel’s XLR Output to a mixer input that has Phantom Power applied. The Tube Channel has enough gain to be used in front of a power amplifier. To use the Tube Channel as a instrument preamp, simply plug the instrument into the Input jack and connect the Output jack to the input of the power amplifier.See Loop Connections for further... -
Page 20: Eq Tips
EQ Tips What is the best way to use EQ? There are two schools of thought on EQ: 1) Use as much as you need to make things sound good. 2) Don’t use any EQ. Most people follow the suggestion of “if it sounds good, it is good.” You need to use your ears and judge for yourself as their are no steadfast rules for EQing. -
Page 21: Tube Replacement
Tube Replacement The Tubes in your Tube Channel should last for many years. They are hand-sorted for performance. In the event that you need to replace them, A R T suggests that you do so with tubes available from A R T. -
Page 22: Block Diagram
6KLIW 6KLIW 6KLIW 6KLIW... -
Page 23: A R T Tube Channel Specifications
A R T Tube Channel Specifications Dimensions 5.25"D x 19"W x 1.65"H Weight 8.0 lb. Maximum Gain XLR to XLR 81dB ¼” to ¼” 63dB Phantom Power +48v DC (switchable) Compression Ratio 2.3:1 (comp)/ 6:1 (lim) Attack Time 6.5ms Release Time... -
Page 24: We're On-Line
215 Tremont Street (716) 436-3942 (FAX) Rochester, NY 14608 USA We’re on-line! For Product information, questions, applications, tips, answers and general discussion with A R T employees look for A R T on the Internet.. Email us at artroch@aol.comCheck out our Web Page at: http://www.artroch.com Warranty and Service Information Limited Warranty... - Page 25 States only. For service outside the United States, please contact your authorized A R T distributor.1) Be sure the unit is the cause of the problem. Check to make sure the unit has power supplied, all cables are connected correctly, and the cables themselves are in working condition.2) If you find the unit to be at fault, write down a description of the problem, including how and when the problem occurs.3) Call the factory for a Return Authorization (RA) number.4) Pack the unit...
Need help?
Do you have a question about the Tube Channel and is the answer not in the manual?
Questions and answers