Table of Contents
Advertisement
Quick Links
A6108 Blade PC Quick Start Guide
A6108
components
1.
ClearCube Technology, Inc.
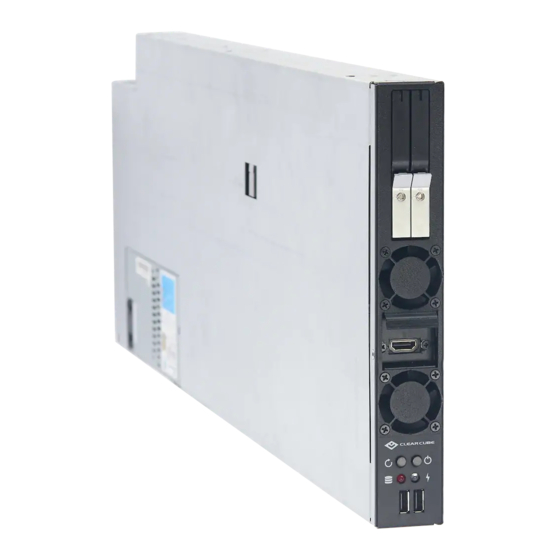
The table and picture below show each major A6108 Blade PC component.
1
Power button
and indicator
Button:
Press to power on and power off blade. Press and hold for 3 seconds to force power off.
Indicator:
Button is illuminated (solid) when power is on.
Button blinks slowly to indicate blade is in Sleep power state.
2
Reset button and HDD indicator
Press to reset blade power.
Indicator:
Button flashes to indicate hard drive activity.
3
USB
Dual USB 2.0 port
4
Video Access and Pull Tab Provides access to select video and pull tab for removal from
chassis
5
Storage drive carrier
connectors inside the blade. Does not support hot-swap operation.
3700 W Parmer Lane
Number Part
Function
Button:
Holds up to two storage drives, connecting directly to SATA
The A6108 Blade PC components
Page
1
of
15
Austin, TX 78727
P/N G0200185 Rev A, 1.0.12.19.2016
(512) 652-3500
www.clearcube.com
Advertisement
Table of Contents

Subscribe to Our Youtube Channel
Related Manuals for ClearCube A6108


Summary of Contents for ClearCube A6108
- Page 1 A6108 Blade PC Quick Start Guide A6108 The table and picture below show each major A6108 Blade PC component. components Number Part Function Power button and indicator Button: Press to power on and power off blade. Press and hold for 3 seconds to force power off.
- Page 2 Introduction About this guide This quick start guide shows the components and features of A6108 Blade PCs; how to install and remove blades from an A-series chassis; how to view pre-OS video; how to implement Intel AMT; and provides references to additional information about Aseries blades, A-series ®...
-
Page 3: Power Management
Result: The blade powers down, the power indicator (1) turns off, and the blade powers on again. Storage drives and carrier About blade A6108 blades use carrier free hot swappable bays for drives—such as hard disk drives (HDD), solid state drives (SSD), self-encrypting drives (SED), and hybrid drives (SSHD). storage drives NOTE: A6018 blades does support hot-swap replacement of drives. - Page 4 Continued on next page Page P/N <TBD> Rev A, 1.0.10.9.2020 ClearCube Technology, Inc. 1505 Volta Dr. Suite 100 Cedar Park , TX 78641 (512) 652-3500 www.clearcube.com...
- Page 5 The picture below shows how storage drives are ordered in the storage drive carrier. Drive order in the storage drive carrier Page P/N <TBD> Rev A, 1.0.10.9.2020 ClearCube Technology, Inc. 1505 Volta Dr. Suite 100 Cedar Park , TX 78641 (512) 652-3500...
-
Page 6: Inserting And Removing
2, above) provides redundant power, network ports (Ethernet and dedicated PCoIP), and a USB port for all blades in a chassis. removing The table below shows how to install and remove an A6108 blade from an A3100 chassis. Step Action Open the chassis front bezel by pressing in on the latch on the upper-right side of the chassis. -
Page 7: Additional Steps
USB-based mass storage devices (such as flash drives) on ClearCube blades. A3100 Chassis Ports and Protocol Support Expansion As noted above, the A3100 chassis provides power, network, and USB connections for A6108 blades. The picture below shows the network connections on A3100 Chassis Expansion Backplane. Backplane Network ports Network ports on the rear of the A3100 chassis support different features. - Page 8 Page P/N <TBD> Rev A, 1.0.10.9.2020 ClearCube Technology, Inc. 1505 Volta Dr. Suite 100 Cedar Park , TX 78641 (512) 652-3500 www.clearcube.com...
- Page 9 To access A6108 pre-OS video (such as BIOS setup utility screens), the easiest method is to attach a monitor directly to the front of the blade and use the two USB ports for keyboard and mouse. If additional ports are needed, a USB hub is supported.
- Page 10 Next steps: power on devices and view pre-OS video. Continued on next page Page P/N <TBD> Rev A, 1.0.10.9.2020 ClearCube Technology, Inc. 1505 Volta Dr. Suite 100 Cedar Park , TX 78641 (512) 652-3500 www.clearcube.com...
- Page 11 The monitor will display the ClearCube boot logo – select the choice needed. <DEL> or <F2> -- to enter BIOS Setup <F7> -- to enter boot menu Next steps: You can now deploy the A6108 blade. See the sections below for important details about A6108 configuration, operation, and maintenance. Flashing the The A6108 BIOS is available from the ClearCube Support site.
- Page 12 The A3100 chassis supports Intel AMT through the primary Ethernet port only. See Figure 5 and Figure 6 above for more information. Supported A6108 blades support all Intel AMT features except for KVM over IP. features Default login The list below shows default Intel AMT credentials: credentials •...
- Page 13 Continued on next page Page P/N <TBD> Rev A, 1.0.10.9.2020 ClearCube Technology, Inc. 1505 Volta Dr. Suite 100 Cedar Park , TX 78641 (512) 652-3500 www.clearcube.com...
- Page 14 AMT) Start Here Guide, available at ® ® www.intel.com. To find the document, search for the title shown above. information Page P/N <TBD> Rev A, 1.0.10.9.2020 ClearCube Technology, Inc. 1505 Volta Dr. Suite 100 Cedar Park , TX 78641 (512) 652-3500 www.clearcube.com...
-
Page 15: Related Information And Support
Related information and Support Related The table below shows documents about A6108 configuration, operation, and maintenance topics. information For information about … See … Creating custom operating system images Tech Bulletin TB00265, Operating System Image Requirements Blade and chassis setup, operation, upgrades, and maintenance A-Series Blade and Chassis User’s...
Need help?
Do you have a question about the A6108 and is the answer not in the manual?
Questions and answers